In the last part of this article we'll show you how to cust omize, using an example, the Joomla! forms created with RSForm!Pro,so you can build a small shopping cart.
To install the example, in the backend panel, head to Components -> RSForm!Pro ->Backup/Restore. After the form restore, you will find the Custom PayPal example in the Manage Forms tab. Note that you will need at least RSForm!Pro revision 28.
Download RSForm!Pro custom PayPal example
Custom script
You can use custom scripts with your RSForm!Pro forms to extend the component functionality: you can specify product quantity, automatically calculate the total amount, auto fill the form fields, add a shipping cost and handling fee, etc.
Specifying products quantity:
We will modify the custom script available on the forum to automatically calculate the total amount of the selected products and passe it further to the PayPal page.
The form includes 3 products with different prices. For each product, the customer can select the desired quantity from a drop-down box. The form can be easily extended to a higher number of products. (when you add more products don't forget to change the Form Layout).
e.g. Product 1 - Price $100.00: Quantity [0] [1] [2] [3] [. . . .] [10]
Product 2 - Price $200.00: Quantity [0] [1] [2] [3] [. . . .] [10]
Product 3 - Price $90.00: Quantity [0] [1] [2] [3] [. . . .] [10]
To further demonstrate the capabilities of RSForm!Pro, we have added a Javascript function that will enable the quantity field when a product is checked. All scripts and functions will be described in detail further below.
Frontend preview:
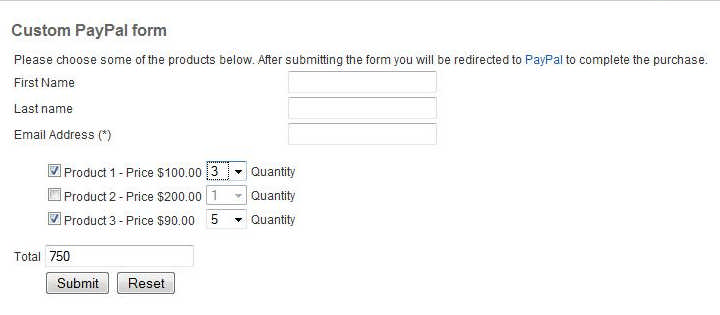
The Total field will automatically calculate the amount based on the user's selection:
($100 x 3)+($90 x 5)=$750
After submission, the customer will be redirected to the PayPal page.
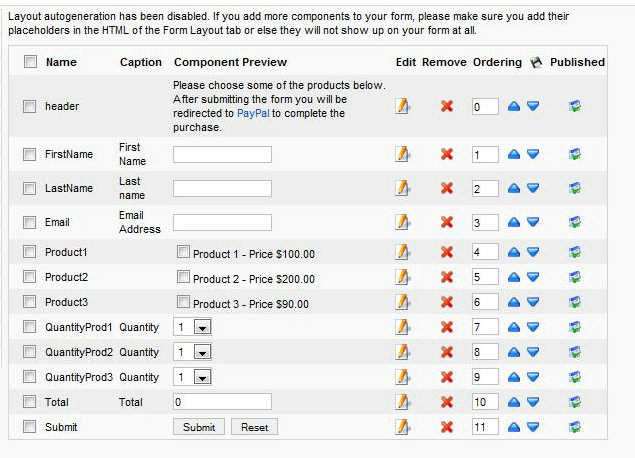
Backend preview:
Steps to create the above Paypal form:
1. Add products, prices and quantities.
We have created 3 Checkbox Groups to add the products along with their prices, and 3 Dropdown Components for specifying the quantity.
If you want to learn how to create Checkbox Groups and Drop-down components, read the following articles from documentation: Components - Checkbox group and Components - drop-down.
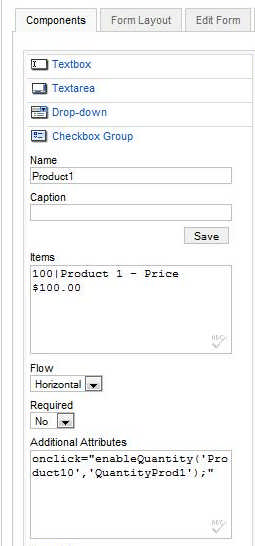
The Additional Attributes area incorporates the following code snippets: onclick="enableQuantity('Product10','QunatityProd1');" and onchange="calculateTotal();"
Explanations:
- The format of the Items area (100|Product 1 - Price $100) is designed to separate the value from the label, thus the Product 1 - Price $100 will be displayed in the front-end, but if selected, the price (100) will be stored.
- onclick="enableQuantity('Product10','QuantityProd1');" : onclick is the javascript trigger type. Basically this implies that every time you click on the checkbox the enableQuantity function will run. Product10 and QuantityProd1 are both parameter values. We used this method (of passing parameters to the function) so we do not have to add a Javascript function for each checkbox group or perform unnecessary calculations. Though the checkbox group is named Product, you can see that we actually use Product10 (notice the extra 0). This is because the first checkbox element has a 0 appended. If we would have used a second one, it would have been Product11 and so on. QuantityProd1 is the name of the quantity drop-down that will be associated with the product checkbox.
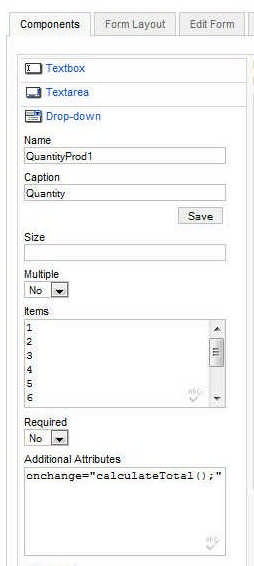
- onchange="calculateTotal();": as onclick, onchange is also a Javascript trigger. Whenever the selected value of the drop-down element changes, the function in question will be triggered (in this case calculateTotal()).
2. Modify form layout.
After all the fields have been added, you will have to go to the Form Layout tab, and uncheck the Auto-generate layout checkbox. This will allow you to edit the actual form layout. It is to be noted that if you add a field after this has been unchecked the layout code will not be automatically updated.
At the beginning of the already existing code you will have to add the following Javascripts (along with the Javascript tags):
function enableQuantity(prod,quantity)
{
    if(document.getElementById(prod).checked)
        document.getElementById(quantity).disabled = false;

    else
        document.getElementById(quantity).disabled = true;
calculateTotal();
}

function calculateTotal()
{
var products = new Array("Product10","Product20","Product30");
var i=0;
var total = 0;
for(i;i < products.length;i++)
if(document.getElementById(products[i]).checked)
total  = total + parseInt(document.getElementById(products[i]).value) * parseInt(document.getElementById('QuantityProd'+(i+1)).value);

document.getElementById('Total').value = total;
}
The enableQuantity function will enable the quantity drop-down if you have checked a product checkbox. This has been added so you can't select a quantity if you don't have selected a product first.
The calculateTotal function does what the name states - it calculates the total for the selected products and quantity. In terms of functionality, it verifies what products have been checked, gets the quantity and updates the value of the total field.
At the end of the code, add the following Javascript to trigger the enableQuantity function. This will ensure that although the form validation might provide an error, the quantity of the checked products will remain enabled:
enableQuantity('Product10','QuantityProd1');
enableQuantity('Product20','QuantityProd2');
enableQuantity('Product30','QuantityProd3');
3.Add additional attributes to checkbox and drop-downs
After modifying the form layout, go back to the Components tab and add the following Additional Attributes:
In the Checkbox Groups add :
onclick="enableQuantity('Product10','QuantityProd1');"
In the Drop-down components add:
onchange="calculateTotal();"
4. Add the custom script in the Scripts tab
Now, that all the calculation and aesthetics part is over it is time to move on to the actual PayPal part. In order to redirect to PayPal after the form is submitted you will have to place the following script in the Scripts called after form process area:
if($_POST['form']['Total'] != '0')
{
$business = 'me@mybusiness.com';
$item_name = 'Products';
$currency_code = 'USD';
$amount = $_POST['form']['Total'];
$return = 'http://your_site.com';
header('Location: https://www.paypal.com/cgi-bin/webscr?cmd=_xclick&business='.$business.'&item_name='.$item_name.'¤cy_code='.$currency_code.'&amount='.$amount.'&return='.$return); exit();
}

The custom script must be added in the "Script called after form has been processed ".
(Components -> RSForm!Pro -> Manage forms -> Select the PayPal form -> Scripts -> Script called after form has been processed ).
You will find a detailed explanation of the "Script called after form has been processed" section in the article Custom PHP code from documentation.
Explanations:
if($_POST['form']['Total'] != '0') : This basically verifies if the value of the total field is not "0". If it is 0 then there is no point to redirect to PayPal to complete the payment, and the form will carry out its normal routine. If it is different from "0" then set the PayPal parameters and redirect to PayPal.
$business='me@mybusiness.com' - replace me@mybusiness.com email with your PayPal seller account
$item_name='Products' - the product name that you intend to sell trough PayPal
$currency_code='USD' - you can change this value according to the PayPal currency codes
$amount=$_POST['form']['Total'] - grabs the calculated total value. This value will be passed to PayPal.
$return='http://your_site.com' - replace http://your_site.com with the website address where you want to redirect the customers after purchasing.
The parameters that we used are for demo purpose only. You should use the details from your PayPal account. Additional parameters can be used in the same manner. Further details on these can be seen on the PayPal documentation page.
If you want an alternative to custom scripting, you can use the RSForm!Pro PayPal plugin that we have discussed in the first 2 parts of this article: PayPal form with a Single Product field and PayPal form with Multiple Products fields, although it won't be as much as flexible as the custom script is.
If you have further questions about this script or about integrating RSForm!Pro with PayPal, you can ask our support department or simply, leave them in comments.
Related articles:
- 3 ways to create a small Joomla! shopping cart with RSForm!Pro and Paypal - Part 1
- 3 ways to create a small Joomla! shopping cart with RSForm!Pro and Paypal - Part 2
- 3 ways to create a small Joomla! shopping cart with RSForm!Pro and Paypal - Part 4: payment confirmation
I can't be more explicit on this other then to provide the actual script.
QuoteThis is hardly the place to ask for scripts. You can try using the forum for this.
Can you be more explicit? I am not a professional JavaScript ^^
QuoteThis is actually normal. Next and Previous buttons are designed to change form pages, not to reset totals. You would need a Javascript function that would reset your PayPal related product selections and set the total to 0.
QuoteReset button and prev bouton
Hello,
QuoteI have a form into multiple pages and my paypal block is the latest.
If I do "previous", my paypal total does not reset. I would like the "reset" button and "prev" button is the same.
Can you help me ?
Thx
Small Joomla shopping cart
Hi admin,
QuoteThanks for the great tutorial. A small question though: I am using a conditional where the final total amount, is posted to different fields with different costs. I thus need to assign 4 different conditional values to the PHP variable:
$amount = $_POST['form']['Total'];
How do I assign 4 different conditional values to the variable "$amount"?
Thanks
RSForm
Thanks for the great tutorial, and the useful Joomla extension. I'm interested in using the new Calculation plugin and have the totals coursed/redirected to PayPal. Any ideas with this custom script?
Quotesum and total
How can i make the sum of values that have decimals?
Quotei used the paypal example form...
I need to calculate: # of members*3.50+Founder`s day gift=total
Members @ $3.50 each:$
# of Members:___
Founder’s Day Gift: $___
Total Amount Enclosed:$____
Thank you
Same but no quantity
Hi, thx for this tutorial.
QuoteI need to have exactly the same form, with 3 products that ya can select or not but without quantity.
How can I delete the quantity from your form ?
Thx
@rahane
This is possible, but some Javascript knowledge. Basically instead of redirecting to PayPal directly within the Scripts called after form process area, you will need to create a small Javascript (that will be appended to the $thankYouMessag e variable) that will redirect to the created URL with some delay.
QuoteA non Javascript approach is also possible by using the built in redirect URL option (Properties > Form Info area). Basically you will have to simply assign the created PayPal URL to a hidden field, within the Scripts called on form process area. In the return URL area, simply add the usual field placeholder: {name of field:value}. The drawback to this solution is that the user will need to click on the "Continue" button that will reside on the Thank you message.
display of thank you message
I would like to see the thank you message before the connection to paypal starts. How can I do ?
Quote