Do you have a long form that you need users to fill out in order to provide them with outstanding service? Yes? Well, then you also know that such forms are often abandoned because of their length. So what is there to do?
Focus on User Experience!
This article has all the info you need to introduce a script into your RSForm!Pro that will save your user’s filled in data so they can come back to the page later, finish completing the form and submitting the info to you!
You can skip all the explanation and download the example form:
This script was created to store all values from the RSForm!Pro standard fields (Textboxes, Textareas, Checkboxes, Radio Groups, Dropdown / Multiple Select Dropdown, Calendar, Birthday Field and even the map)
With local storage, web applications can store data locally within the user's browser. Before HTML5, application data had to be stored in cookies, included in every server request. Local storage is more secure and large amounts of data can be stored locally, without affecting website performance.
The local storage stores named key/value pairs locally and unlike cookies this data has no expiration date, persists even if you close your browser or turn off your computer and will be available the next day, week, or year.
Let's get started!
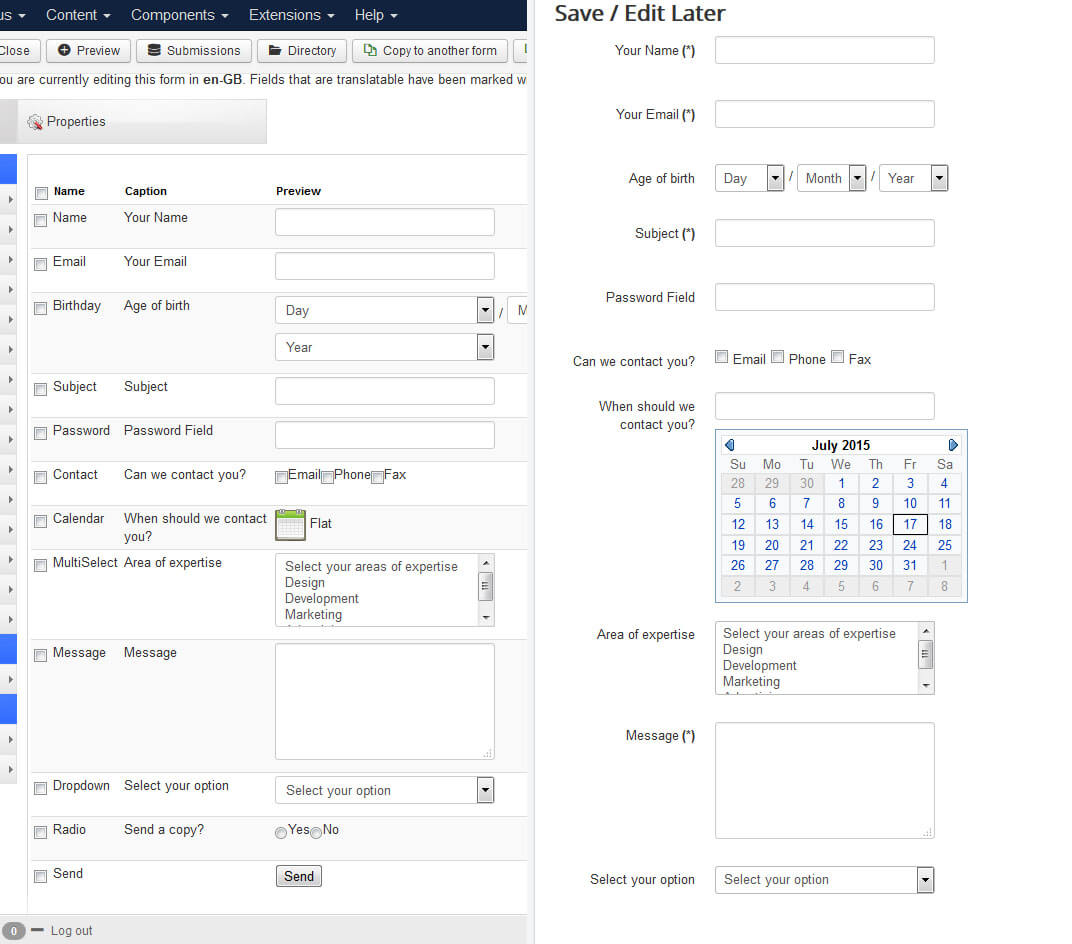
First step is to create a form - add all your fields. For this example I started with the basic contact form and added all the standard fields.
In order to access the local storage object, we will use Javascript (jQuery library to make it easier - you will need to make sure you have it loaded). I would recommend reading first this article: CSS and Javascript section as it provides basic information of this section of the RSForm!Pro component.
Don't forget to add the script tags and we can get started. We will wait for the document to be ready and create a new object (we call it rsfpsel) in which we will add our functions (I took this approach to explicitly define the scope of my functions instead of exposing them to the global scope).
  <script type = "text/javascript">

    jQuery(document).ready(function($) {
      'use strict';
      // We create our object
      var rsfpsel = {

      };
    });

  </script>
Now that we have the object created, we can start adding our functions (a function is a block of code designed to perform a particular task when it's called). For this tutorial I created 6 functions that will be explained in detail, the first being a function to grab all the form's fields.
<script type = "text/javascript">

    // We add the first function.
    var rsfpsel = {
      getFields:function(context){
        var fields = $(context).find('input, textarea, select, input:checkbox, input:radio').not(':input[type=password], :input[type=button], :input[type=submit], :input[type=reset], :input[type=hidden], .rsform-captcha-box');
        return fields;
      },
    };


</script>
The getFields function (basically a helper function) will find all inputs, textareas, selects, checkboxes and radios in the context (this is a parameter, which will be used later on), leaving out the password fields, hidden fields, captcha box and the buttons. This will return all fields as an object that we can use in our next steps.
Now that we selected the fields, we can create a function that will store the values from the form in the local storage (this is where things start being a little more hard to follow and I will provide information through comments):
<script type = "text/javascript">

    // We add the functions to store the values
    var rsfpsel = {
      storeValue:function(){
        // due to the fact that we are using multiple input types, we need to store the value properly in the storage
        var getType = $(this).attr('type');
        if(getType == 'radio'){
          // if the input is a radio group, we need to make sure that only the checked radio element is stored
          localStorage[$(this).attr('id')] = $(this).val();
          $(this).siblings("input:radio").each(function() {
            // so we remove everything else here
            localStorage.removeItem([$(this).attr('id')]);
          });
        } else if (getType == 'checkbox'){
          if ($(this).prop('checked')) {
          // checkboxes are .. checkable, this implies that you need to remove the value from the localstorage if it's no longer checked
          localStorage[$(this).attr('id')] = $(this).val();
          } else {
            // we do it here
            localStorage.removeItem([$(this).attr('id')]);
          }
        } else {
          // this case handles the basic input fields
          localStorage[$(this).attr('id')] = $(this).val();
        }
      },

      // special function for RSForm!Pro special fields - calendar and map (explanation later on)
      storeSpecialValue:function(){
        var registerThis = $(this).siblings("input").not(':input[type=button], :input[type=submit], :input[type=reset], :input[type=hidden]');
        localStorage[$(registerThis).attr('id')] = $(registerThis).val();
      },
    };

</script>
Ok, so we created 2 new functions that will handle the storing of the input value. In order to store the values we will call it outside the object, like this:
<script type = "text/javascript">

  jQuery(document).ready(function($) {
    'use strict';
    // We create our object
    var rsfpsel = {
      /*...
      * our functions should be here;
      */
    };

    // we grab all the fields from the form using the getFields function and listen to the change event handler to store the value.
    rsfpsel.getFields('#userForm').change(rsfpsel.storeValue);

    // this is used for the special fields, instead of change, we bind it to the on mouseleave handler.
    $('#userForm').find(".yui-calcontainer, .rsformMaps").mouseleave(rsfpsel.storeSpecialValue);
  });

</script>
Note that we need to use the rsfpsel prefix before the function name, this is because the function is actually a property of the object.
We stored the values in the Local Storage, now what?
Here comes the tricky part, we need to inform the user if there is any data stored and depending on his selection, we will populate the fields with it or not. So first, we need to create a function to check if in the local storage, there is any reference to the inputs from the form:
<script type = "text/javascript">

    // We add a function to check the local storage
    var rsfpsel = {
      checkStorage: function() {
        // we create an empty array that will hold all the id's of the fields
        var $ids = [];
        rsfpsel.getFields('#userForm').each(function(){
          // we push the id's to the array here
          $ids.push($(this).attr('id'));
        });
        for(var i=0, len=localStorage.length; i<len; i++) {
          // we iterate over the localStorage key
          var key = localStorage.key(i);
          if($.inArray(key, $ids)!== -1){
            // and if the key is found in the array that holds the id's we return true;
            return true;
          }
        }
      },
      // And another function to notify the user if he used or cleared the data
      notifyStorage:function(status){
        if (status == 'success'){
          var addThis      = 'alert-success';
          var showText    = 'Form Restored';
        } else {
          var addThis      = 'alert-error';
          var showText    = 'Form Cleared';
        }
        $('#userForm').prepend('<div class="alert '+addThis+'"><button type="button" class="close" data-dismiss="alert">×</button> '+ showText +' </div>');
      },
    };

</script>
Recap!
Until now, we created a script that stores the input values in the local storage and a function that notifies you of this. Now we need to use the local storage data to populate the fields.
<script type = "text/javascript">

    // We add another function to populate the form fields (last one, I promise)
    var rsfpsel = {
      populate: function(){
        // we grab all the fields, and for each of them
        rsfpsel.getFields('#userForm').each(function() {
          // we grab the id
          var $id = $(this).attr('id');
          if (localStorage[$id]) {
            // and depending on the id, we populate the value
            $('#' + $id).val(localStorage[$id]);
            $('#' + $id).prop('checked', true);
            if ($('#' + $id).attr('multiple') == 'multiple'){
              // if the input is a multiple dropdown list, we split the values and select all of them
              var lstorage  = localStorage[$id];
              var values    = lstorage.split(",");
              $(this).find('option').each(function(){
                if($.inArray($(this).val(), values) !== -1){
                  $(this).prop('selected', true);
                }
              });
            }
          }
        });
      },
    };

</script>
Now that we have everything we need, we need to initiate the script outside the rsfpsel object.
<script type = "text/javascript">

  jQuery(document).ready(function($) {
    'use strict';
    // We create our object
    var rsfpsel = {
      /*...
      * our functions should be here;
      */
    };

    // we grab all the fields from the form using the getFields function and listen to the change event handler to store the value.
    rsfpsel.getFields('#userForm').change(rsfpsel.storeValue);

    // this is used for the special fields, instead of change, we bind it to the on mouseleave handler.
    $('#userForm').find(".yui-calcontainer, .rsformMaps").mouseleave(rsfpsel.storeSpecialValue);

    // on form display, we check if the localstorage has data and if so, we let our user know and give him the option to use it
    if (rsfpsel.checkStorage()){
      // NOTE THAT THIS IS BOOTSTRAP 2.3.2 (Joomla! standard);

      // if the condition is met, we create a modal with 2 buttons to save or use
      $('#userForm').prepend('<div id="myModal" class="modal hide fade" tabindex="-1"><div class="modal-header"><button class="close" type="button" data-dismiss="modal">×</button><h3 id="myModalLabel">HEADS UP!</h3></div><div class="modal-body">Heads up! You have data stored in the Local Storage! You can use it or clear it and start from scratch! </div><div class="modal-footer"><button class="btn" data-dismiss="modal"  id="delete">Clear</button> <button class="btn btn-primary" id="populate">Use Data</button></div></div>');

      // we display the modal here (i used this option so you can close it with ESC key)
      $('#myModal').modal({keyboard:true});

      // we add functionality to the buttons
      $('#myModal .modal-footer button').click(function(item){
        // we prevent any other behavior for them
        item.preventDefault();
          // and depending on what button was pressed, we either clear the storage or populate the fields
        if ($(this).attr('id') == 'populate'){
          rsfpsel.populate();
          rsfpsel.notifyStorage('success');
        } else {
          var $reset = confirm("Are you sure you want to delete data?");
          if ($reset){
            localStorage.clear();
            rsfpsel.notifyStorage('error');
          }
        }

        // Hide the modal afterwards
        $('#myModal').modal('hide');
      });
    }

  });

</script>
TIP
If you want to trigger the saving manually, you can change the event that handles the saving in a matter of seconds.
For example, create a new Button Form Field and bind the saving on it:
  // Comment these lines out or delete them completely
  // rsfpsel.getFields('#userForm').change(rsfpsel.storeValue);
  // $('#userForm').find(".yui-calcontainer, .rsformMaps").mouseleave(rsfpsel.storeSpecialValue);

  // Bind the click on the button to save everything:
  $('#savebutton').click(function(){
    rsfpsel.getFields('#userForm').each(rsfpsel.storeValue);
    $('#userForm').find(".yui-calcontainer, .rsformMaps").mouseleave(rsfpsel.storeSpecialValue);
  });
Putting it all together
If you followed the instructions provided, your script would look like this:
<script type = "text/javascript">

jQuery(document).ready(function($) {
  'use strict';

  var rsfpsel = {

    getFields:function(context){
      var fields = $(context).find('input, textarea, select, input:checkbox, input:radio').not(':input[type=password], :input[type=button], :input[type=submit], :input[type=reset], :input[type=hidden], .rsform-captcha-box');
      return fields;
    },

    storeValue:function(){
      var getType = $(this).attr('type');
      if(getType == 'radio'){
        localStorage[$(this).attr('id')] = $(this).val();
        $(this).siblings("input:radio").each(function() {
          localStorage.removeItem([$(this).attr('id')]);
        });
      } else if (getType == 'checkbox'){
        if ($(this).prop('checked')) {
        localStorage[$(this).attr('id')] = $(this).val();
        } else {
          localStorage.removeItem([$(this).attr('id')]);
        }
      } else {
        localStorage[$(this).attr('id')] = $(this).val();
      }
    },

    storeSpecialValue:function(){
      var registerThis = $(this).siblings("input").not(':input[type=button], :input[type=submit], :input[type=reset], :input[type=hidden]');
      localStorage[$(registerThis).attr('id')] = $(registerThis).val();
    },

    checkStorage: function() {
      var $ids = [];
      rsfpsel.getFields('#userForm').each(function(){
        $ids.push($(this).attr('id'));
      });
      for(var i=0, len=localStorage.length; i<len; i++) {
        var key = localStorage.key(i);
        if($.inArray(key, $ids)!== -1){
          return true;
        }
      }
    },

    notifyStorage:function(status){
      if (status == 'success'){
        var addThis      = 'alert-success';
        var showText    = 'Form Restored';
      } else {
        var addThis      = 'alert-error';
        var showText    = 'Form Cleared';
      }
      $('#userForm').prepend('<div class="alert '+addThis+'"><button type="button" class="close" data-dismiss="alert">×</button> '+ showText +' </div>');
    },

    populate: function(){
      rsfpsel.getFields('#userForm').each(function() {
        var $id = $(this).attr('id');
        if (localStorage[$id]) {
          $('#' + $id).val(localStorage[$id]);
          $('#' + $id).prop('checked', true);
          if ($('#' + $id).attr('multiple') == 'multiple'){
            var lstorage  = localStorage[$id];
            var values    = lstorage.split(",");
            $(this).find('option').each(function(){
              if($.inArray($(this).val(), values) !== -1){
                $(this).prop('selected', true);
              }
            });
          }
        }
      });
    },
  };

  rsfpsel.getFields('#userForm').change(rsfpsel.storeValue);

  $('#userForm').find(".yui-calcontainer, .rsformMaps").mouseleave(rsfpsel.storeSpecialValue);

  if (rsfpsel.checkStorage()){
    $('#userForm').prepend('<div id="myModal" class="modal hide fade" tabindex="-1"><div class="modal-header"><button class="close" type="button" data-dismiss="modal">×</button><h3 id="myModalLabel">HEADS UP!</h3></div><div class="modal-body">Heads up! You have data stored in the Local Storage! You can use it or clear it and start from scratch! </div><div class="modal-footer"><button class="btn" data-dismiss="modal"  id="delete">Clear</button> <button class="btn btn-primary" id="populate">Use Data</button></div></div>');

    $('#myModal').modal({keyboard:true});

    $('#myModal .modal-footer button').click(function(item){
      item.preventDefault();
      if ($(this).attr('id') == 'populate'){
        rsfpsel.populate();
        rsfpsel.notifyStorage('success');
      } else {
        var $reset = confirm("Are you sure you want to delete data?");
        if ($reset){
          localStorage.clear();
          rsfpsel.notifyStorage('error');
        }
      }

      $('#myModal').modal('hide');
    });
  }
});

</script>
I even used some styles for the modal, I resized it and fixed z-index (for some issues with the calendar).
<style>
.modal-body{
  padding:30px;
}
div.modal{
  width:35%;
  margin:0 auto;
  transform: translateX(-50%);
  z-index:9999;
}
div.modal.fade.in{
  top: 35%;
}
.modal-backdrop{
  z-index:9995;
}
</style>
Save and Continue
Is This Working for anybody ?
QuoteNot working
I have added this code to my site but it is not working.
QuoteHello. Please open a support ticket here: https://www.rsjoomla.com/submit-a-ticket.htmlQuote
script not working
Hit there, I just imported this script in RSForm! Pro 2.3.17. The script is not working. There is no SAVE button ...
Quotewith conditional fields
I find this script quite interesting and possibility useful. I'm wondering if anyone has pointers to make it work with conditional fields. As it is now, any fields which are conditionally displayed based values of other fields..... are not saved, or are erased, or something. Data is restored to a given field which is used to conditionally display another input... however that conditionally displayed field is NOT displayed and there appears to be no data restored the field.
QuoteSecurity
Doesn't sound like this option is all that secure. If the data is stored within the browser, the next time that browser goes to that form it automatically fills everything in, correct? Is the data password protected somehow, what if the individual doesn't use the same machine to access the form the second time? Anyway for the data to be saved within the mysql database?
Quote@Franka
The implementation itself is not depended on the formid. Simply apply the scripts for your second form. If you get stuck, please submit a support ticket.
Quoteseveral forms to save
What to do if you have 3 forms you want to save?
QuoteI understand different id's but where?
The sample is the demo. Unzip the file and you will get all the additional materials to implement this. The sample includes a form backup, a CSS file and a JS one.
QuoteImplementation sample and use
I have downloaded the form and tried it out but I can't seem to see how it is implemented.
QuoteDo you have a demo for us to try?