Build your first form with RSForm!Pro
RSForm!Pro is a powerful and versatile form builder for Joomla!, offering a wide variety of configuration and customization options.
Step 1: Create new form
Let's start by creating a simple contact form. Head over to Components >> RSForm!Pro >> Manage Forms and click "New".
This will launch the form creation wizard, which we will skip this time around and create our form from scratch.All available fields are listed in the "Form Fields" tab to the left side of the screen.
We will start adding a "Textbox" by filling in the "Name" and "Caption" of the field. Note that the "Name" is only used for internal reference - it will not be displayed in the front-end area, whereas the caption is the text that will be displayed in the actual form.
We'll add the rest of our fields in the same manner. However, for fields such as "Checkbox Group", we will have to specify the items of the checkbox, one per line.
Selectable items are composed out of two parts: value and label, separated by the pipeline character (|). In this example we will use the checkbox for sending a copy to the submitting user.
Since we've added all desired fields to our form let's go ahead and add the "Submit button".
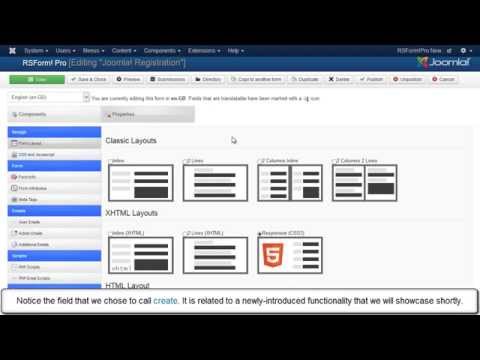
Step 2: Adjust the form
Now that the form is complete, we can easily manipulate its layout structure through the "Grid Layout" feature.
Fields can be re-arranged into rows that can have a configurable number of columns. We will add a row with three columns that we'll drag and drop at the top of our form. The number of columns can be later changed by clicking the 'Options' button of the row and selecting the number of contained columns. The lenght of the columns can also be modified, simply click and hold above the "3 vertical dots" icon, move left or right and release to set. In our example, we've set up the new row with two equal columns, where we'll re-arrange our "First Name" and "Last Name" fields by simply dragging and dropping them in the desired position.
Now let's name our form! To do so, we'll access the 'Form Properties' tab, head over to "Form Info" and fill in the "Form Title" and "Form Name" fields. The "Form Name" will only be used for internal reference, it will not be displayed when viewing the form in the front-end. Let's view our form in the front-end!
The "Last Name" field is not entirely visible in the front-end, the label is displayed next to the fields thus pushing the field's edge into the "Main Menu". We'll adjust this by displaying the label on top of the fields. In order to do so, we'll head over to Form Properties and access "Form Layout" tab. Here we'll change the "Layout Flow" from Horizontal (label is displayed next to the field) into Vertical (label on top of field).
Our form already looks better, however we'll also make further style adjustments to our E-mail, Subject and Massage fields so that they align with the "Last Name" field.
The "CSS and Javascript" tab allows for any styles to be added or any scripts can be set to be triggered when the form loads. We have added a custom width for the Email and Subject fields and for the Message field we've also set a bigger height so that the submitting user can have a clear overview of their message.
We have added a custom width for the Email and Subject fields and for the Message field we've also set a bigger height so that the submitting user can have a clear overview of their message.
Our "Contact Form" now looks just the way we wanted!
Video Tutorials Categories
- All Videos 104
- RSBlog! 4
- RSBooking! 0
- RSComments! 2
- RSContact! 1
- RSDirectory! 4
- RSEvents!Pro 5
- RSFeedback! 2
- RSFiles! 6
- RSFinder! 1
- RSFirewall! 8
- RSFirewall! for WordPress 0
- RSForm! 1
- RSForm!Pro 26
- RSMail! 5
- RSMediaGallery! 1
- RSMembership! 14
- RSPageBuilder! 0
- RSSearch! 2
- RSSeo! 7
- RSShowcase! 0
- RSSocial! 0
- RSTickets!Pro 4
- Templates 11
Comments
Related Videos