RSTickets!Pro Menu Items
The access to the front-end functionality of RSTickets!Pro is done via the following menu items:
Knowledgebase Article
Creating a Knowledgebase Article menu item will allow you to display a certain article from your knowledgebase. Besides the usual, standard, Joomla! menu items parameters a simple select box has been added to easily point out the article to be displayed.
Knowledgebase - Create Article
Using this menu item, users from groups having the Knowledgebase Article - Create permission enabled (found under Global Configuration > RSTickets!Pro > Permissions tab) can post Knowledgebase Articles from the frontend area.
The following configuration options are available:
- Article Title: the article title.
- Alias: the Alias will be used as part of the URL.
- Category: the category that the article will belong to.
- Text: WYSIWYG editor area for easy text writing.
- Draft: This is a draft of the article. Article drafts can only be seen by staff members.
- Thumb: This is the thumb image displayed next to the category name.
- Remove Icon: Yes / No - Set this to yes if you would like to remove the current icon.
- Tags: Insert the tags you wish the article to be found by (type new ones or select existing tags).
- Meta Description
- Meta Keywords
- Private: Yes / No - if set to yes, the article will only be visible to staff members
- Published: Yes / No

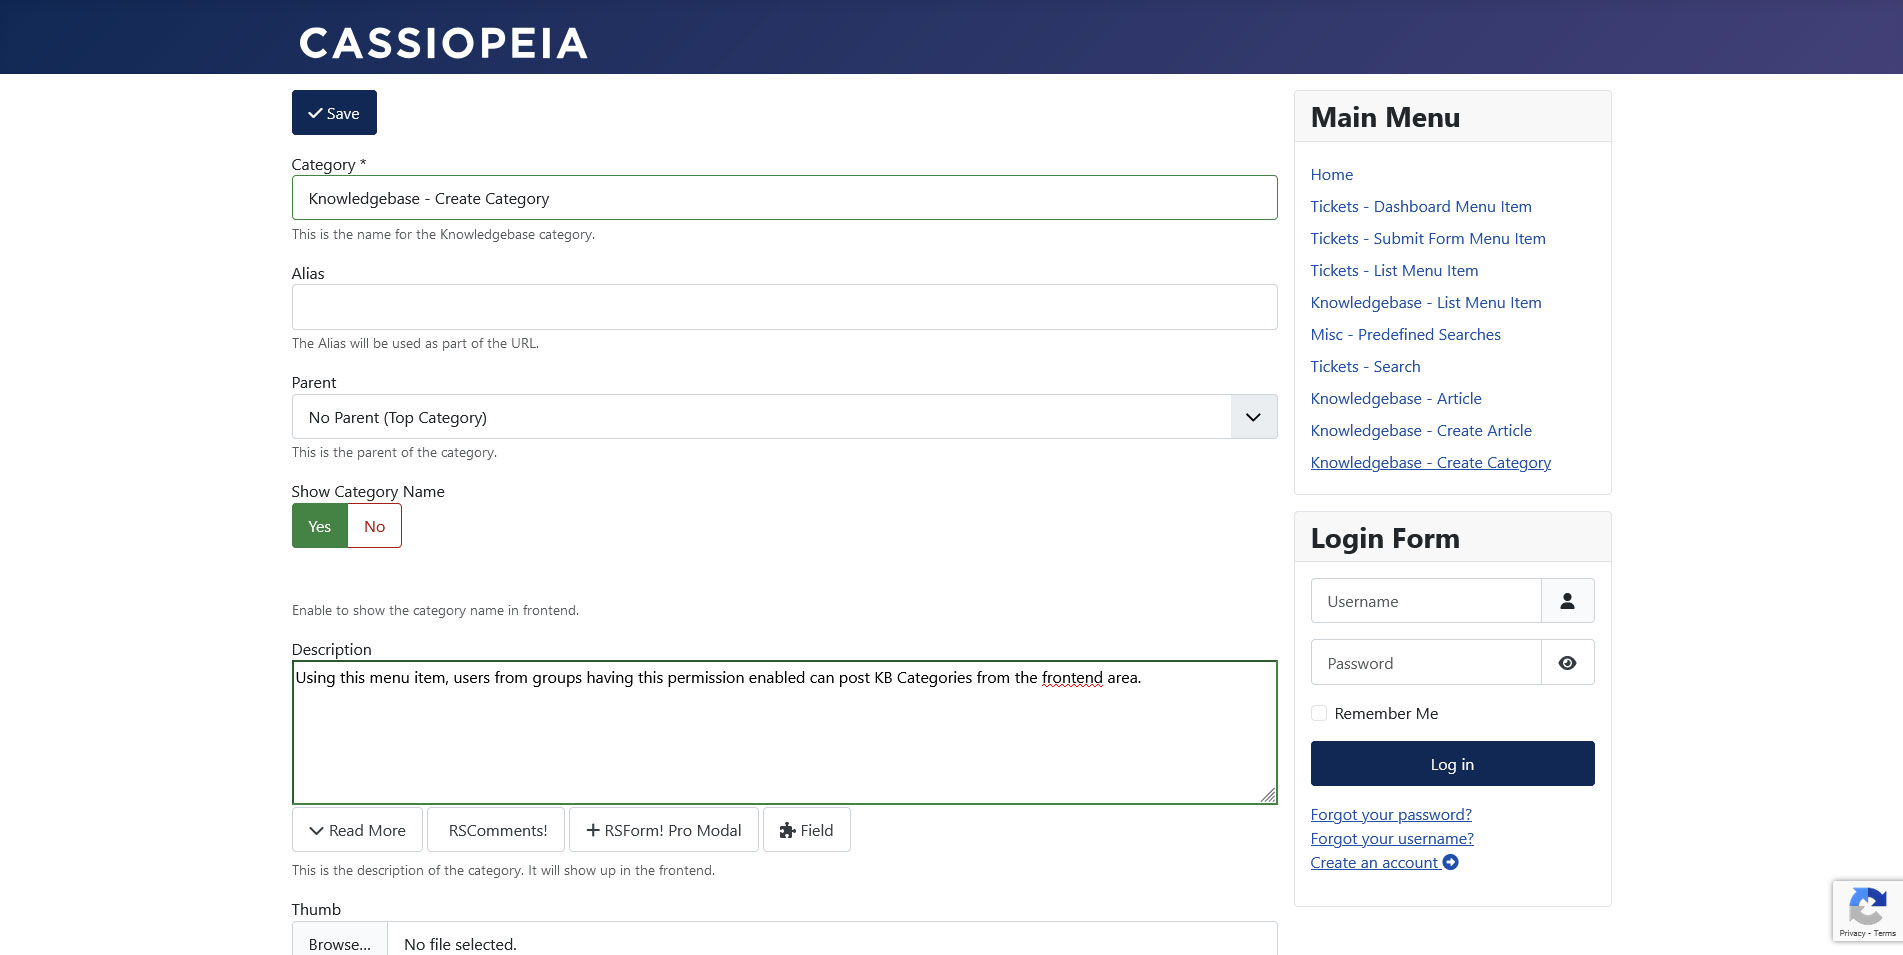
Knowledgebase - Create Category
Using this menu item, users from groups having the Knowledgebase Category - Create permission enabled (found under Global Configuration > RSTickets!Pro > Permissions tab) can post Knowledgebase Articles from the frontend area.
The following configuration options are available:
- Category: the actual name of the category that is to be added.
- Alias: the Alias will be used as part of the URL.
- Parent: this can be a no-parent category or a sub-category.
- Show Category Name: Yes / No - Enable to show the category name in frontend.
- Description: a WYSIWYG area that can be used for adding a description.
- Thumb: This is the thumb image displayed next to the category name.
- Remove Icon: Yes / No - Set this to yes if you would like to remove the current icon.
- Results Layout: Select the way you would like the articles to be displayed. Available options:
- List Layout
- Column Layout. If this is selected, a new field will be revealed:
- Columns Number: Select how many columns should the layout have.
- Results Tag Sorting: Yes / No - Enable to display a list of tags corresponding to the articles of this category.
- Meta description
- Meta keywords
- Private: Yes / No - enabling a category to be private will make it available only for staff members
- Published: Yes / No
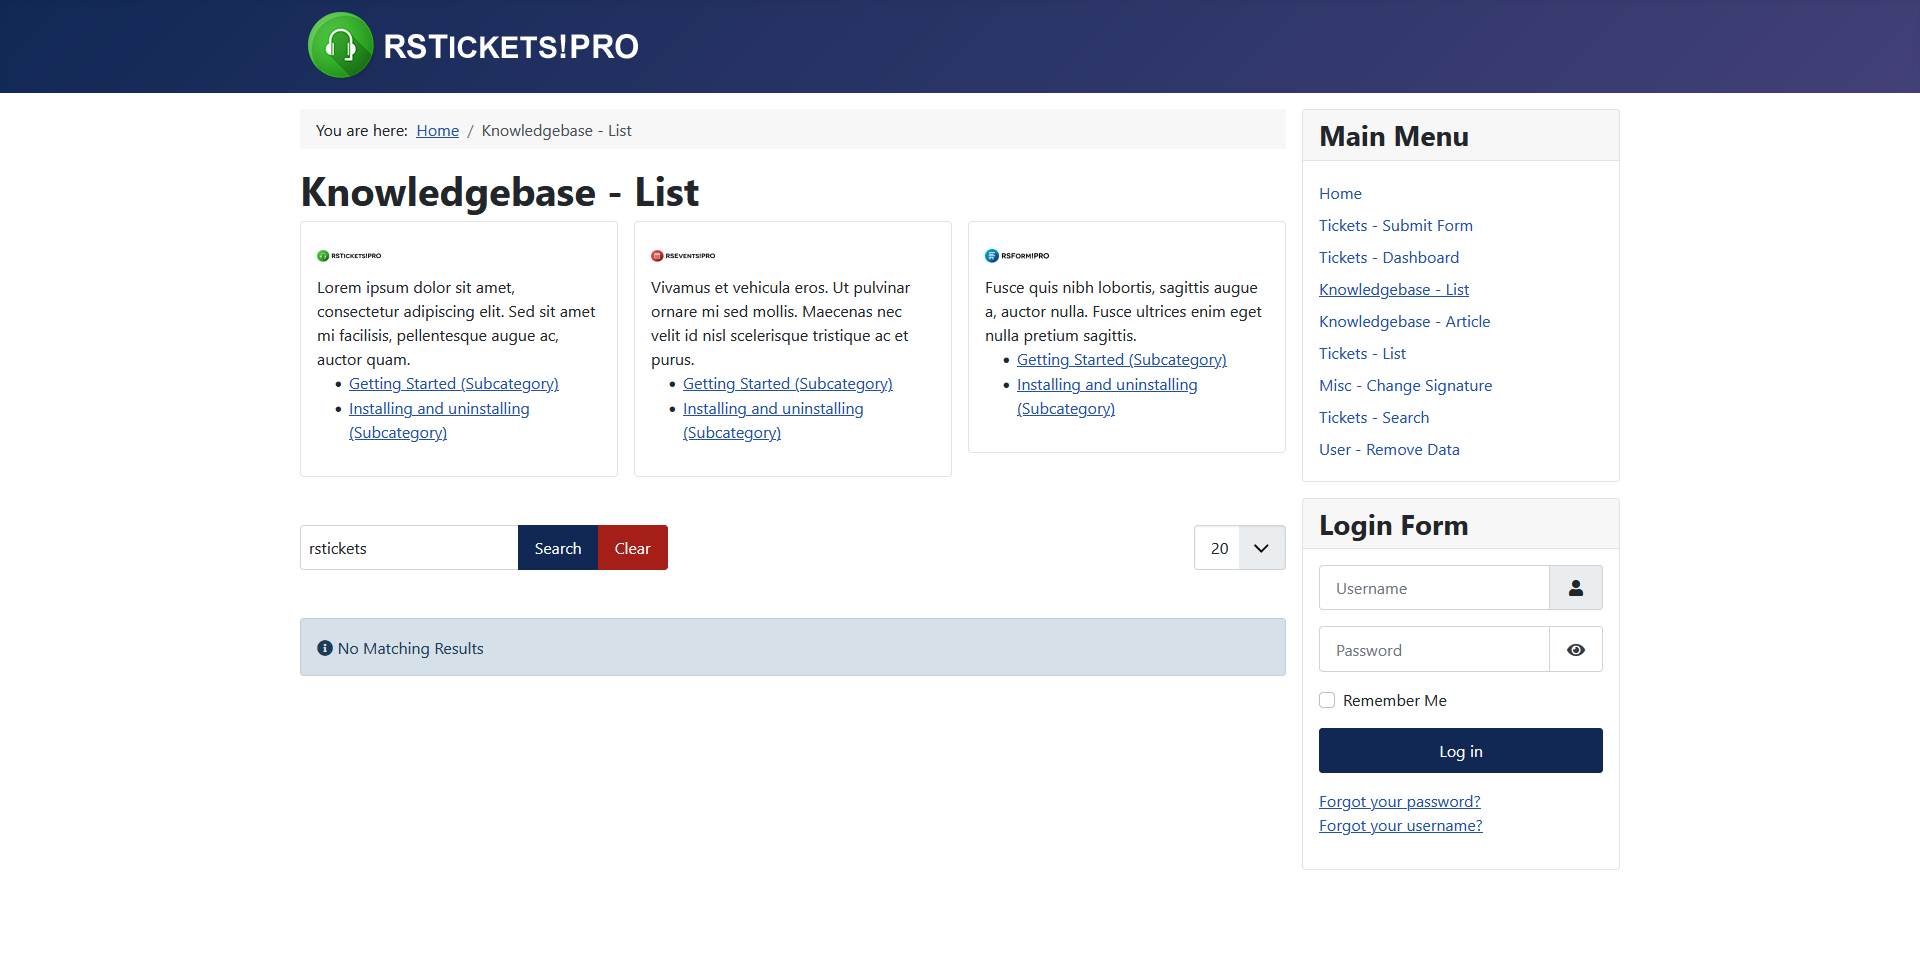
Knowledgebase List
This menu item type will create a listing of all your configured RSTickets!Pro knowledgebase categories and articles. The following parameters are available:
- Order Articles By: order articles Default / Hits / Creation Date / Modified Date / Article Title
- Order Direction: Ascending / Descending
- Show Description: Yes/No - Enable to show the description of each category in frontend.
- Show Subcategories: Choose the maximum number of subcategories to display for each category.
- Split Categories To Tabs: Yes/No - Enable this option if you want the Knowledgebase Categories to be split into tabs.
- Show Filter: Yes/No - if enabled, it shows a textbox that will allow users to search through the articles of the current category.
- Show Tag Sorting: Yes/No - Enable to display a list of tags corresponding to the articles of the current category. This option will be applied to all categories of the Knowledgebase.
- Show Table Headings: Yes/No - Set whether you want to display the table headings or not.
- Show Table Numbering: Yes/No - Enable to show table numbering.
- Show Article Hits: Yes/No - Set whether you want to display the article hits or not
- Show Pagination: Yes/No - will display pagination
- Show Pagination Limit: Yes/No - will display how many items you wish to display per page
Change Signature Layout
This menu item also addresses only RSTickets!Pro staff members. Here, one can add/edit his signature. The signature can be automatically added (using a checkbox) at the end of ticket reply.

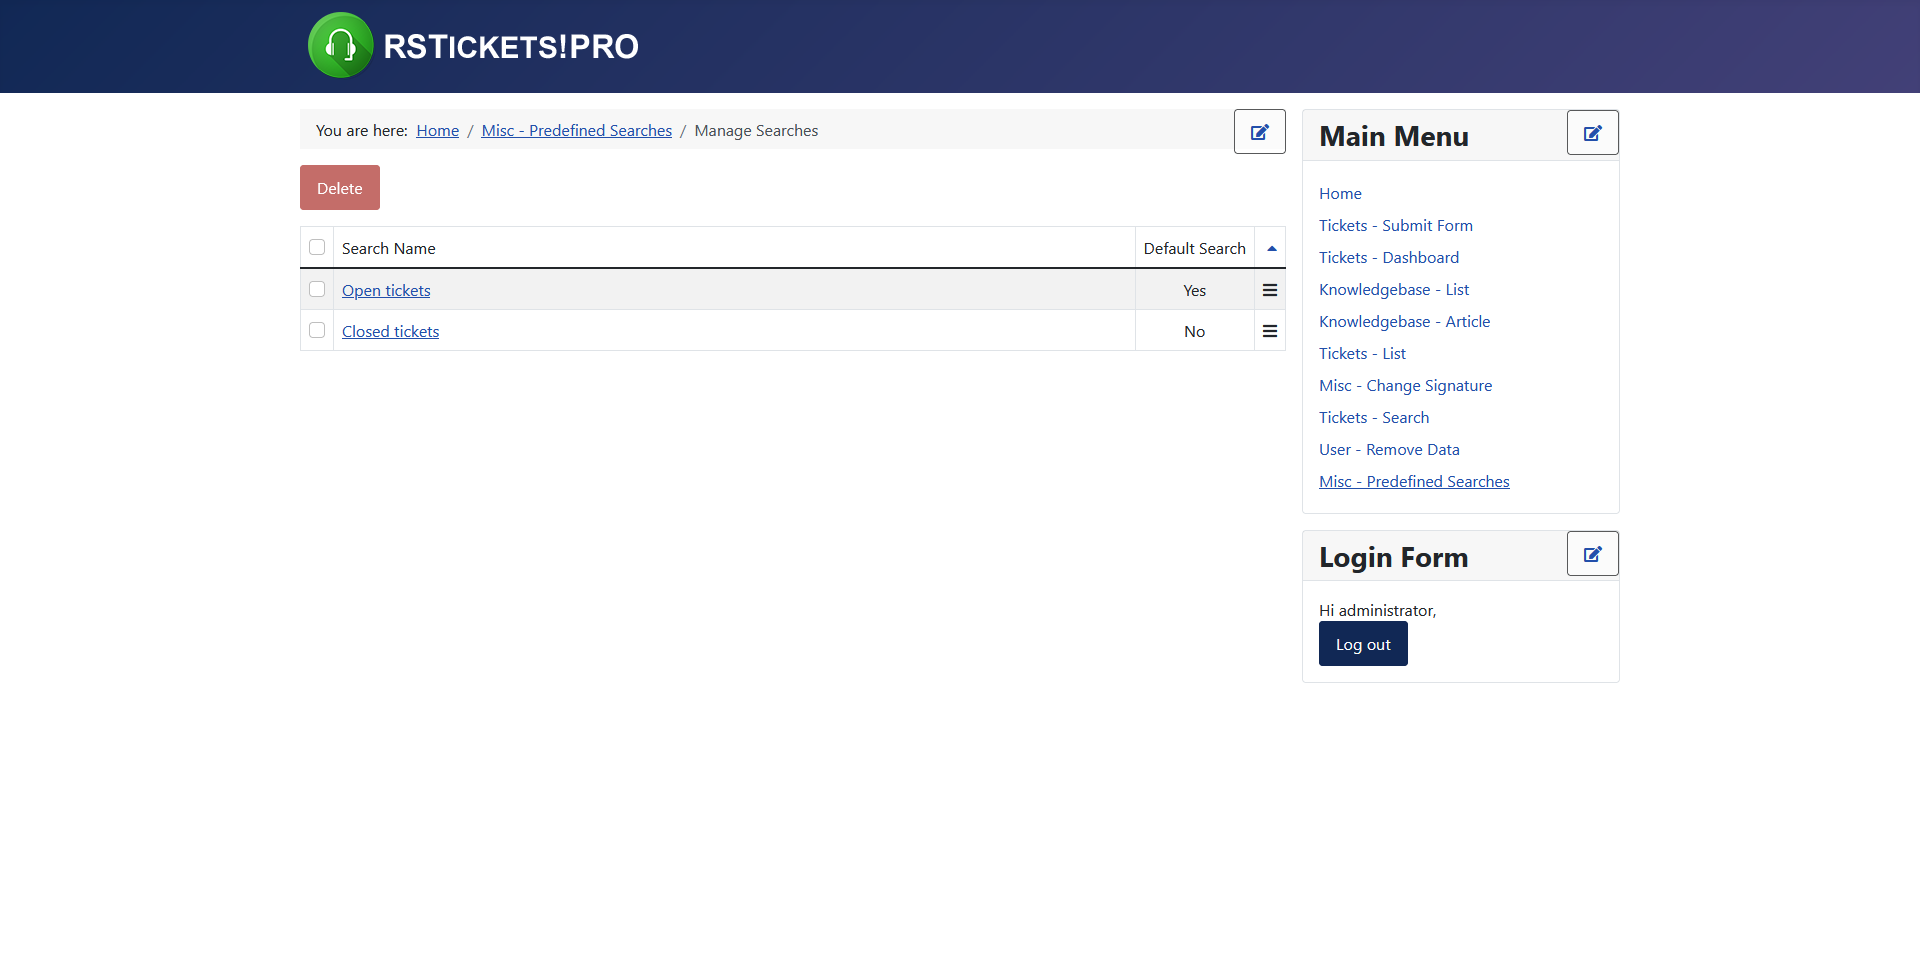
Predefined Searches Layout
As the name implies, one can define and save a custom search that he uses more often - like open tickets for example. Using this menu item will allow you to manage these searches: edit/delete and set a search item as default. It is to be noted that the predefined search layout only addresses the needs of staff members.
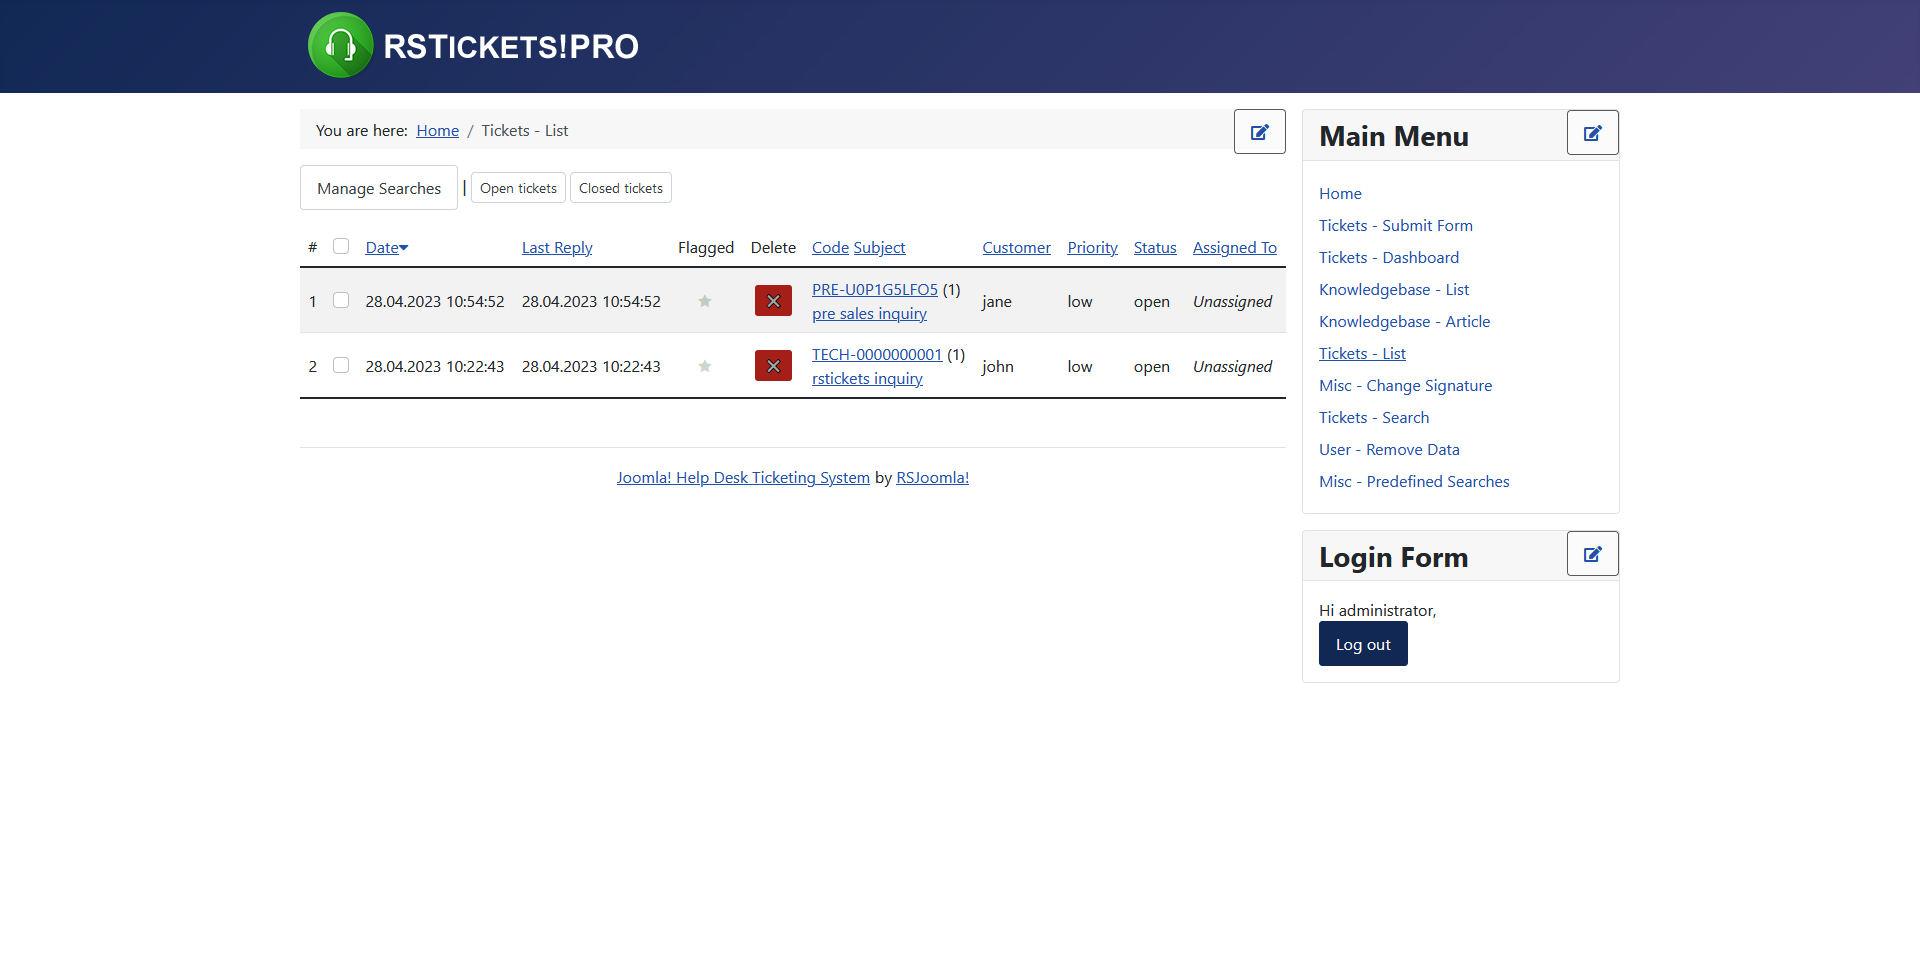
Tickets List
Adding a Tickets List menu item will display a list of tickets:
Options:
- Show Filter: Show all tickets available to the user / Show only unassigned tickets / Show tickets submitted by the logged in user / Show tickets assigned to current logged in user / Show both (assigned and submitted).
- Priority: filter tickets based on the selected priorities.
- Status: filter tickets based on the selected statuses.
- Table Headings: show/hide.
- Order: default / last reply / subject / status / priority / replies.
- Direction: ascending / descending.
Advanced:
- Offset: show/hide
- Date: show/hide
- Last Reply: show/hide
- Code: show/hide
- Replies: show/hide
- Customer: show/hide
- Priority: show/hide
- Status: show/hide
- Assigned To: show/hide
- Time Spent: show/hide
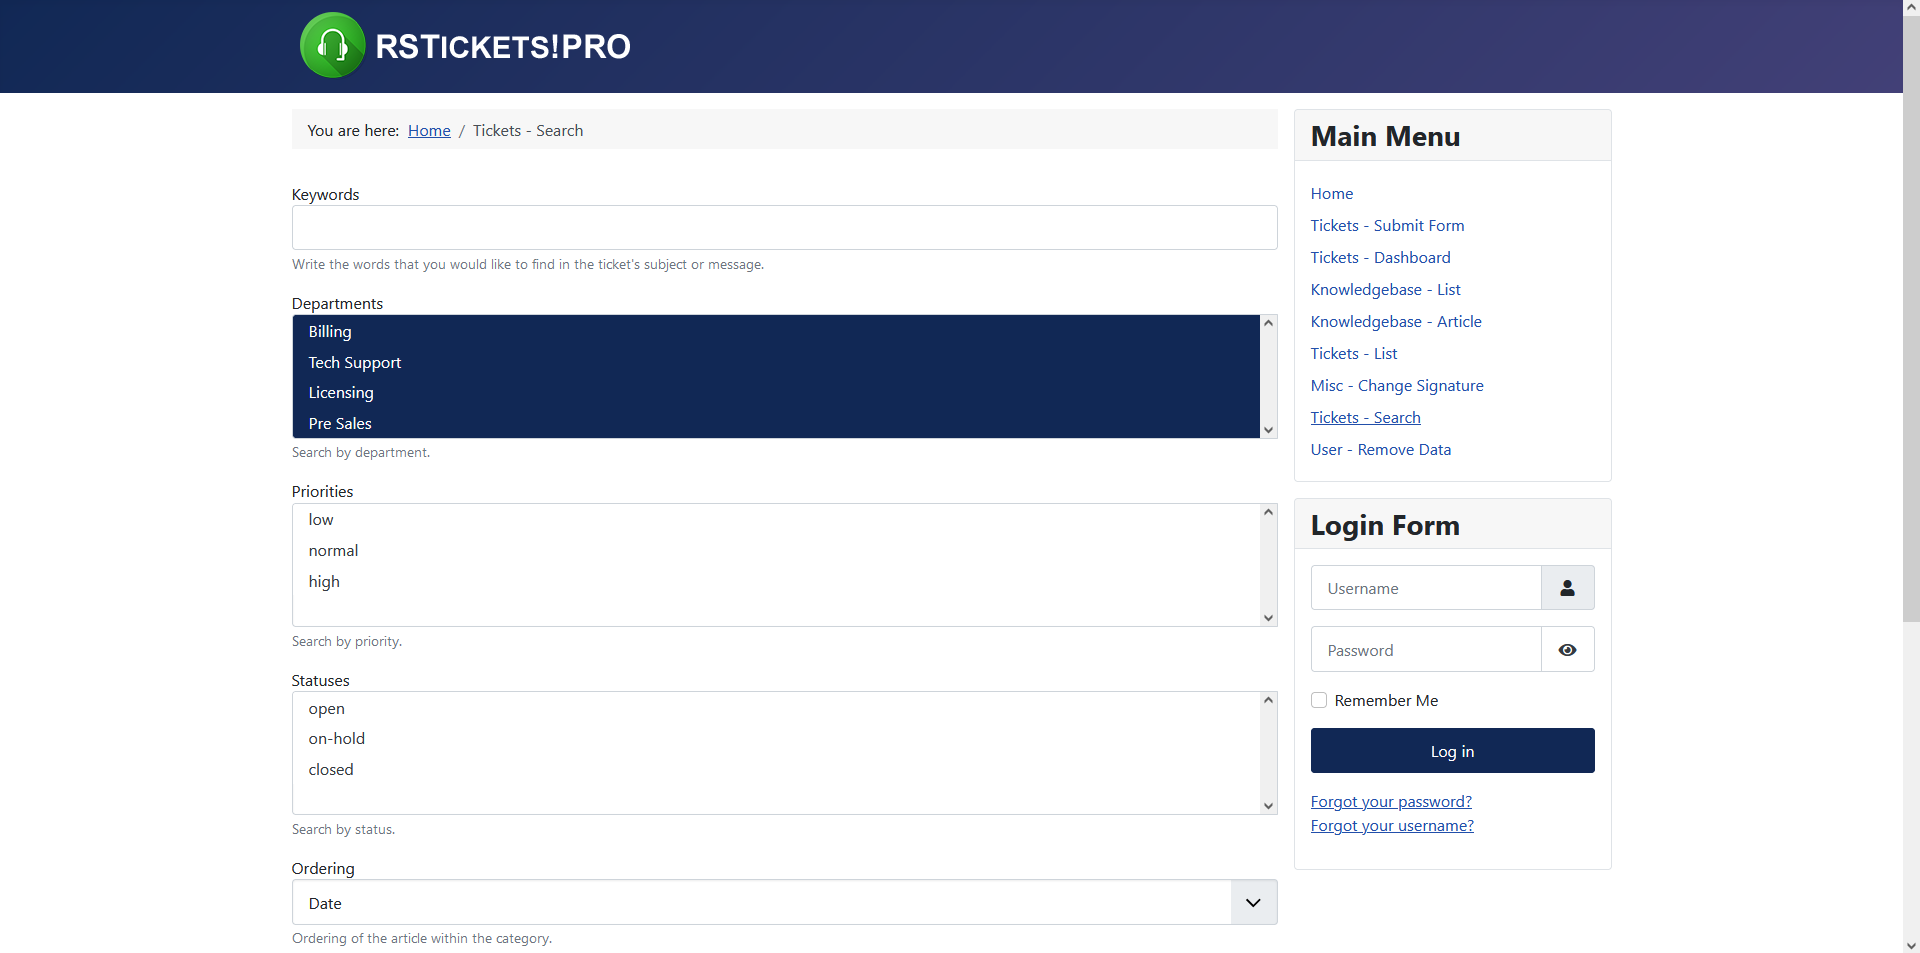
Search Layout
The Search Layout will allow you to search through already submitted tickets. It is to be noted that if you are logged in as a customer it will search on tickets that belong to the logged in user. If the user is a staff member it will search through tickets that are accessible (is assigned as staff for a department). In both instances, the search will be performed on the ticket subject and message fields. Furthermore, you can perform the search only on flagged tickets.
RSTickets!Pro offers a advance search option. Here you can filter out the result based on the following criteria: customer (username or email address), staff member (username or email address), department, priority and status. The search results can be filtered by: last reply, subject, status, priority and replies, ascending or descending.
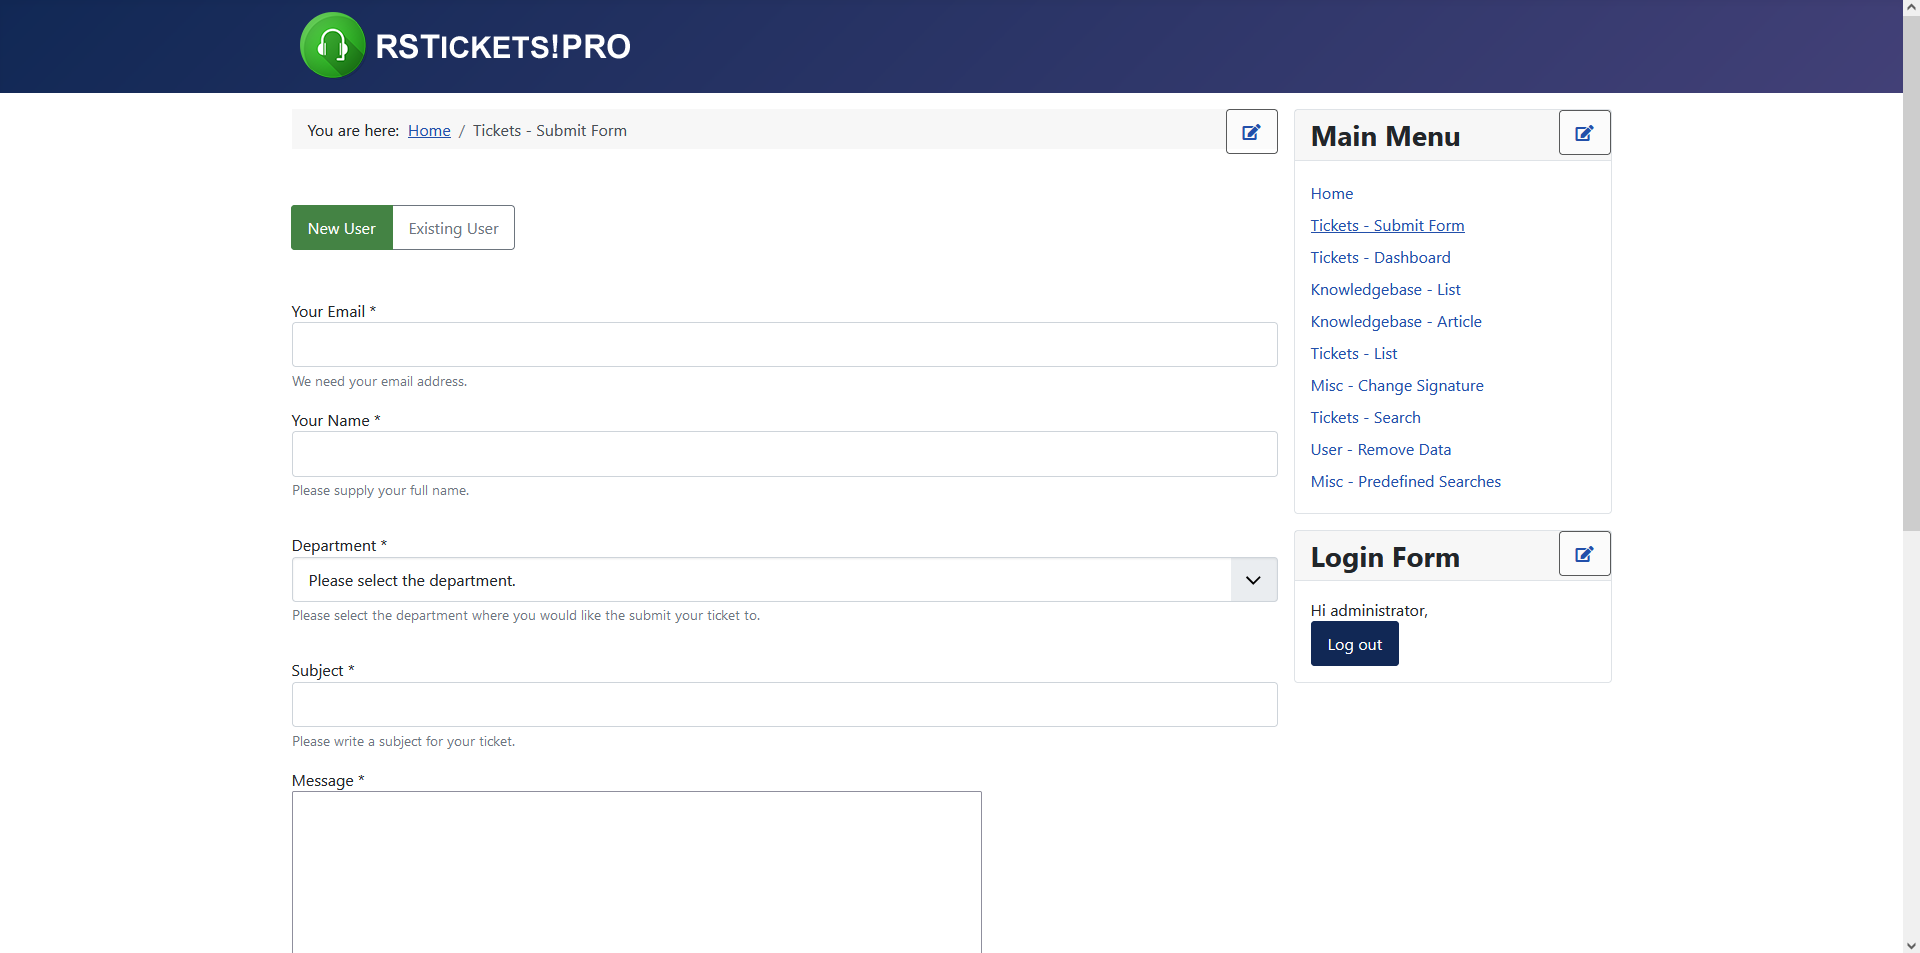
Submit Layout
The Submit Layout will allow one to post new tickets. It is basically the ticket submission form.
- Default Department This is the default department that should be selected. This way you can create different layouts for each department. (Note that if the department is excluded for the assigned group of the logged in user, this option will not be taken in consideration.)
- Default Message This is the default message you want to display in the 'Message' box.
- Show Submit Form Headings: By enabling this, the submit ticket form will have headings for each section.
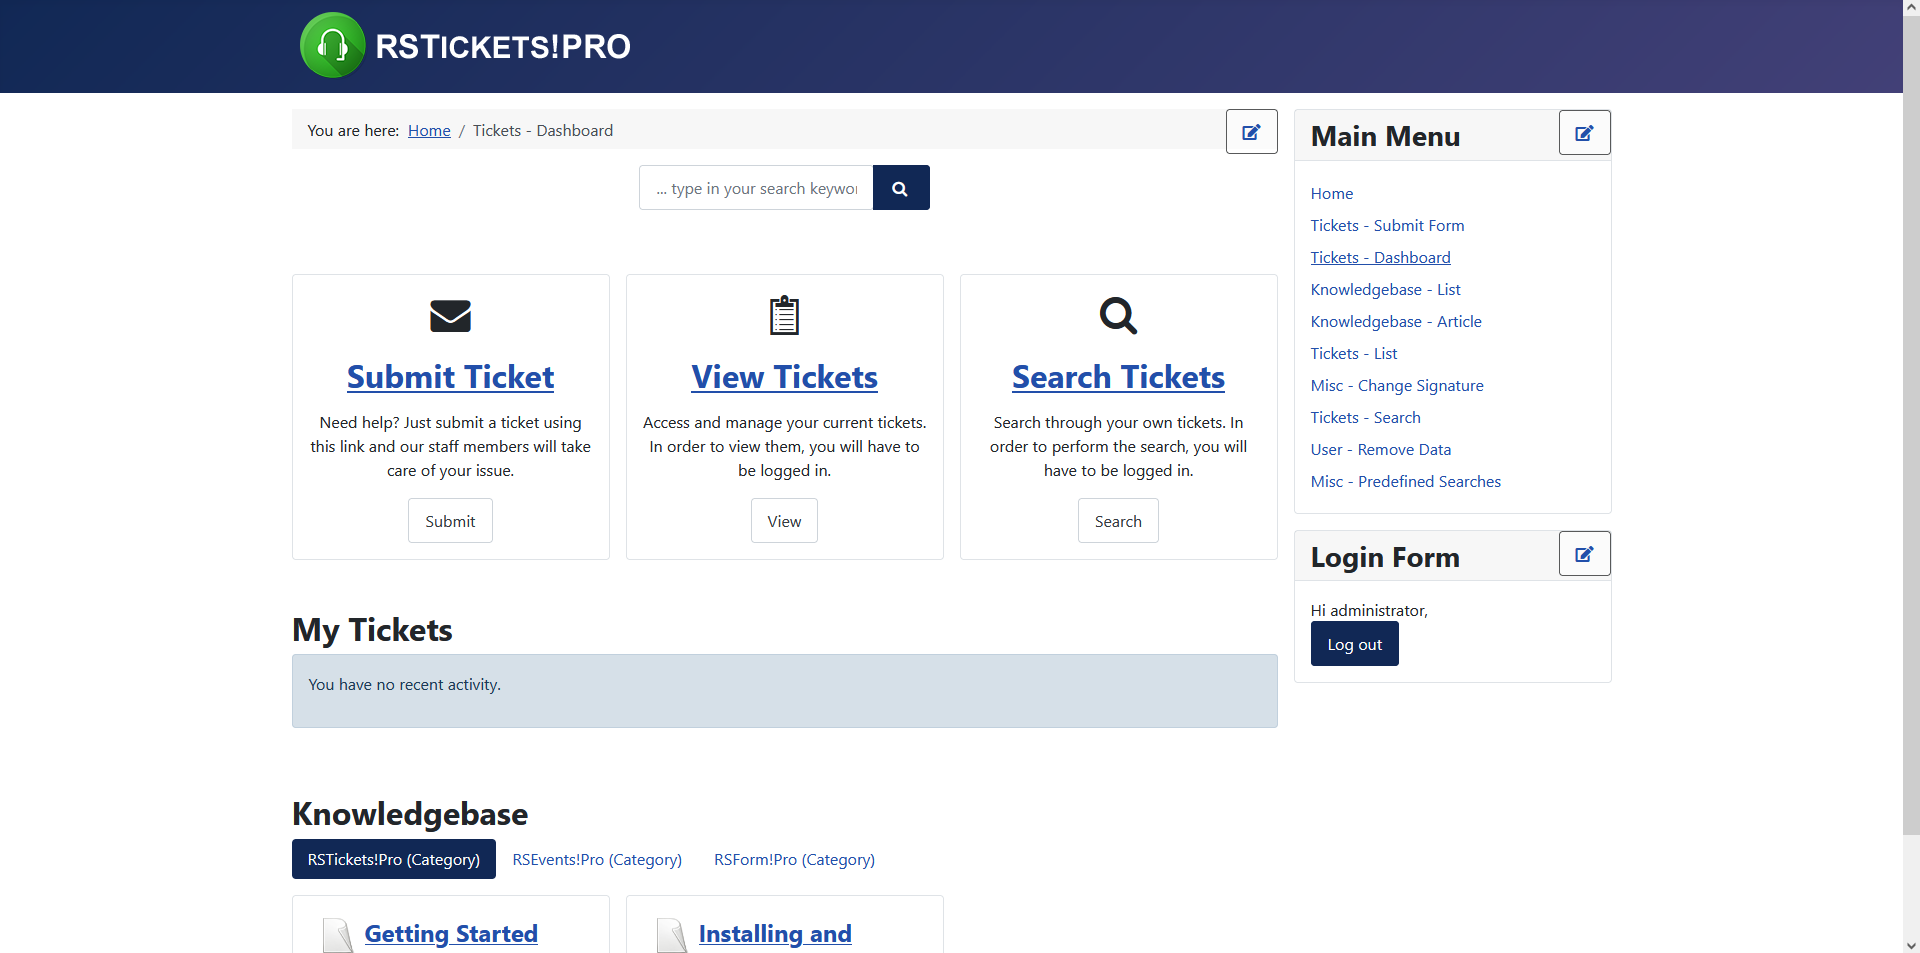
Dashboard Default Layout
The Dashboard Layout introduces a single frontend focal point for RSTickets!Pro actions. Accessing the dashboard view, the user will be able to: search the knowledgebase, submit new tickets, view existing tickets, search for tickets, browse through the knowledgebase or directly view the current tickets of the logged in user. This greatly reduces the number of required function specific RSTickets!Pro menu items, by having a single focal point.
The menu item includes the following configuration options:
- Show Search: If enabled, a search field will be displayed in the tickets dashboard.
- Thumbs Type: Choose which way you would like the sections thumbs to be displayed, either Icons or Images. If the Images type is selected, you can configure an image for each section.
- Submit Ticket Image: Choose the image you would like to be displayed as thumb for Submit Ticket section.
- Submit Ticket Description: Text area, add a description for the Submit Ticket link here.
- View Tickets Image: Choose the image you would like to be displayed as thumb for View Tickets section.
- View Tickets Description: Text area, add a description for the View Tickets link here.
- Search Ticket Image: Choose the image you would like to be displayed as thumb for Search Ticket section.
- Search Tickets Description: Text area, add a description for the Search Tickets link here.
- Knowledgebase Item ID: Provide an item ID for the Submit Ticket, View Tickets and Search Tickets. The pages these links redirect the user to will be displayed in the same manner as the page that has the item ID provided here.
- Show Knowledgebase Categories: Set this to Yes in order to display the Knowledgebase categories.
- Show Knowledgebase Subcategories: Choose the maximum number of subcategories to display for each knowledgebase category.
- Split Knowledgebase To Tabs: Enable this options if you want the Knowledgebase Categories to be splitten into tabs. If enabled, the following option will be revealed:
- Top Knowledgebase Category: Choose the Knowledgebase Category you would like to be the top category for the tabs display.
- Show Latest Tickets: Set this to Yes in order to display the latest added tickets
- Number of Tickets: Used in correlation with the Show Latest Tickets option, sets a number of tickets to be displayed
User Remove Data
The User - Remove Data displays a simple option where logged in users can request, according to the GDPR legislation, to have their data removed. In order for this to work, you will need to enable the 'Allow Self Anonymisation' from Components > RSTickets!Pro > Configuration > Data Protection area.

9 persons found this article helpful.
You Should Also Read
Configuration HOT |
Departments HOT |
Manage tickets HOT |
Email Messages HOT |
What is RSTickets!Pro ? HOT |