RSFirewall Configuration
The RSFirewall! Configuration panel is composed out of the following elements:
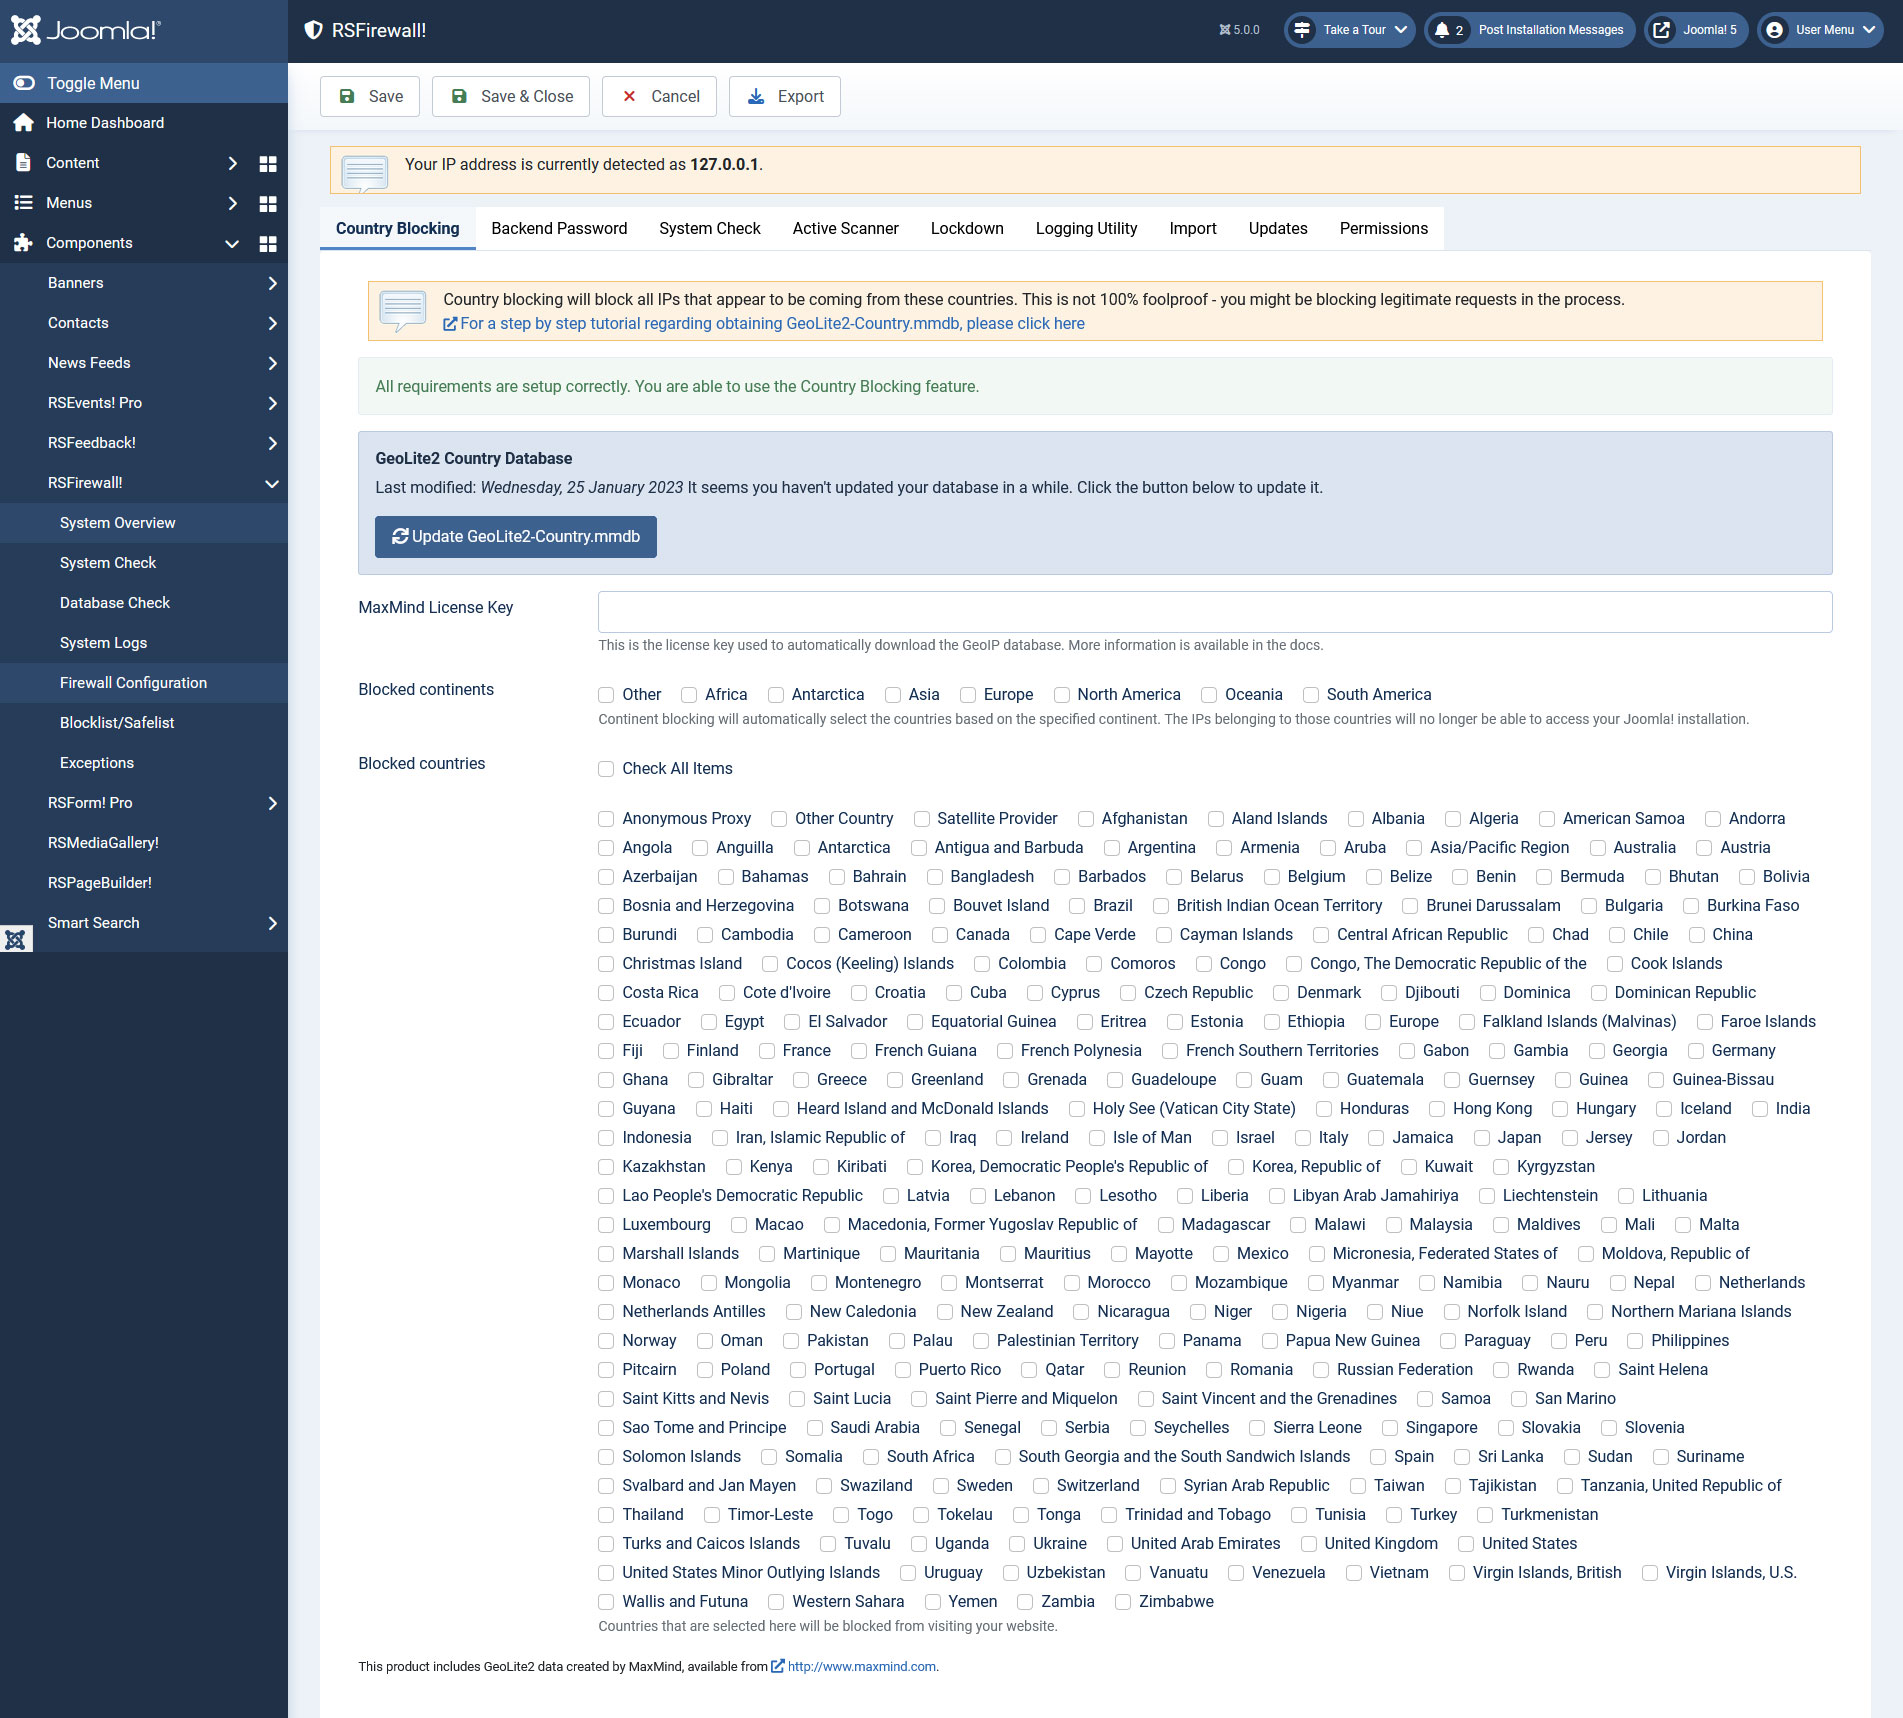
Country Blocking
- Using this feature you can block all IPs that appear to be coming from specific countries. A country checkbox list will be shown for you to allow/disallow access.
- MaxMind License Key - the country blocking feature will not work unless you install an IP database package; for a step by step tutorial regarding obtaining GeoIP.dat, please click here.
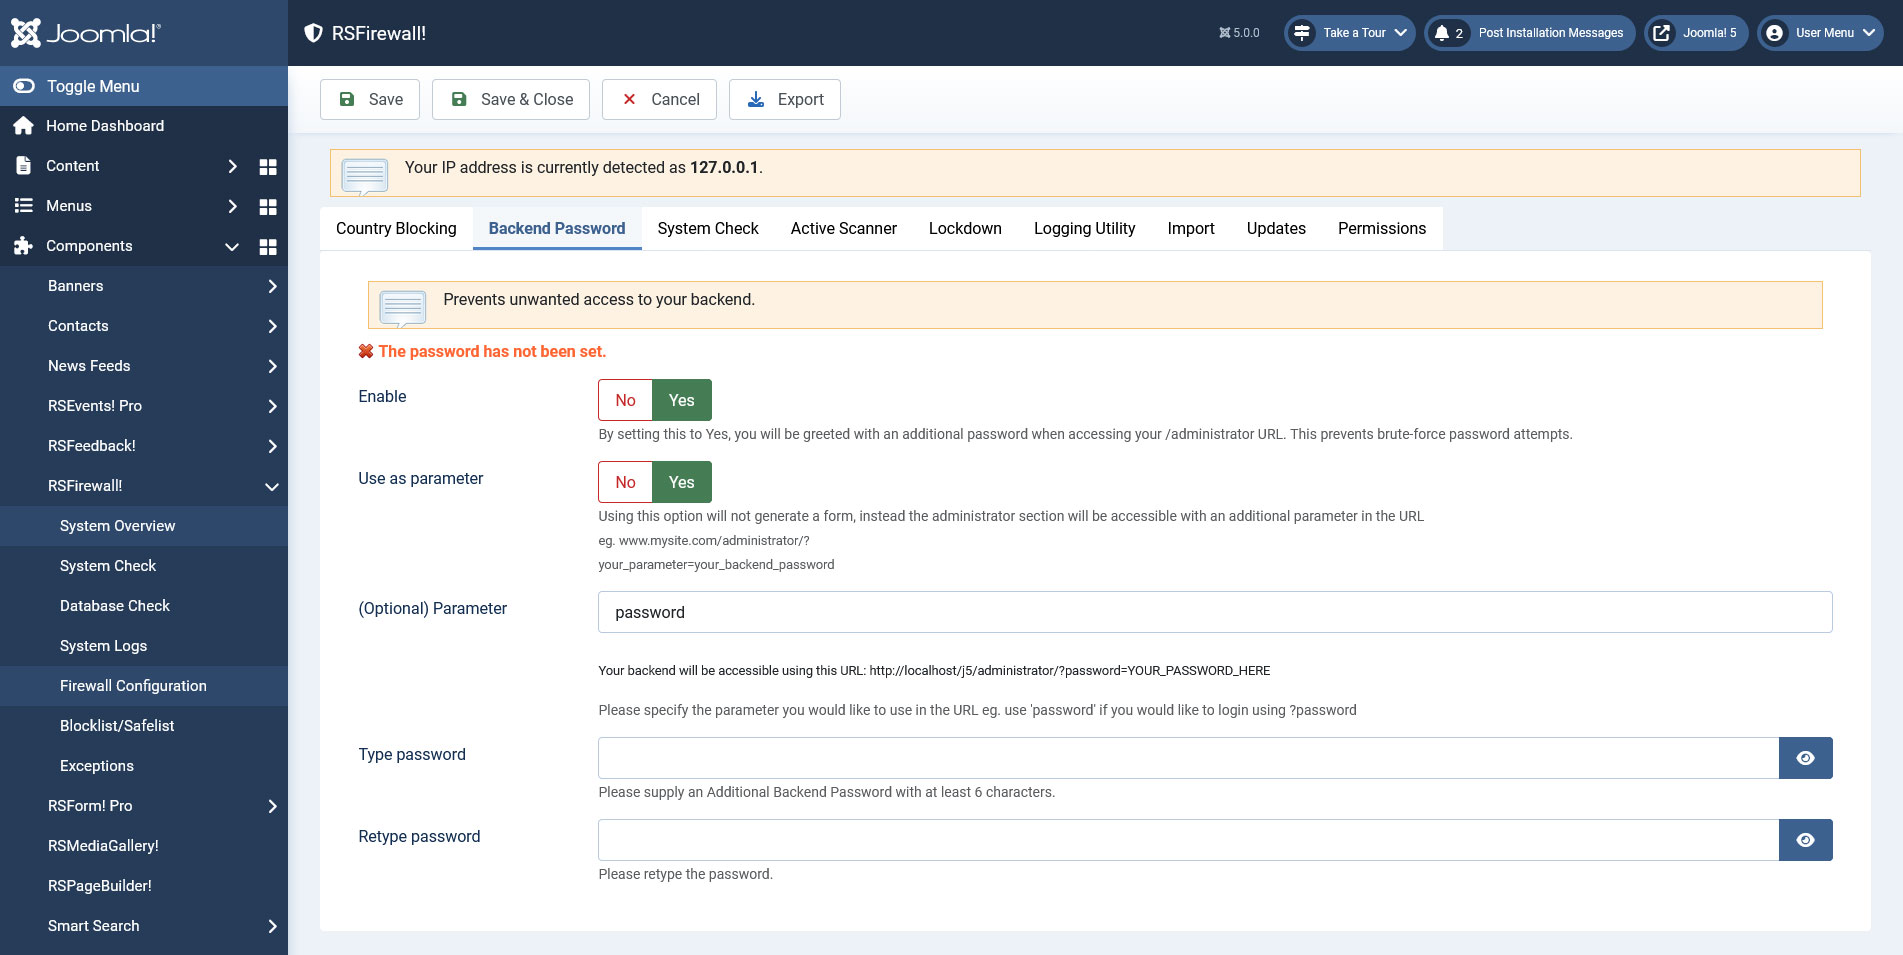
Backend Password
Prevents unwanted access to your Joomla! installation by setting up an additional backend password.
- Enable: Yes / No - set to Yes in order to enable this feature
- Use as parameter:Yes / No - Using this option will not generate a form, instead the administrator section will be accessible with an additional parameter in the URL (eg. www.mysite.com/administrator/?your_parameter=your_backend_password
- (Optional) Parameter: Type in the parameter you would like to use in the URL eg. use 'password' if you would like to login using ?password
- Type password: Type in the desired password
- Retype password: Retype the desired password for verification
Ep.10 - How to add a Joomla! additional back-end password with RSFirewall!
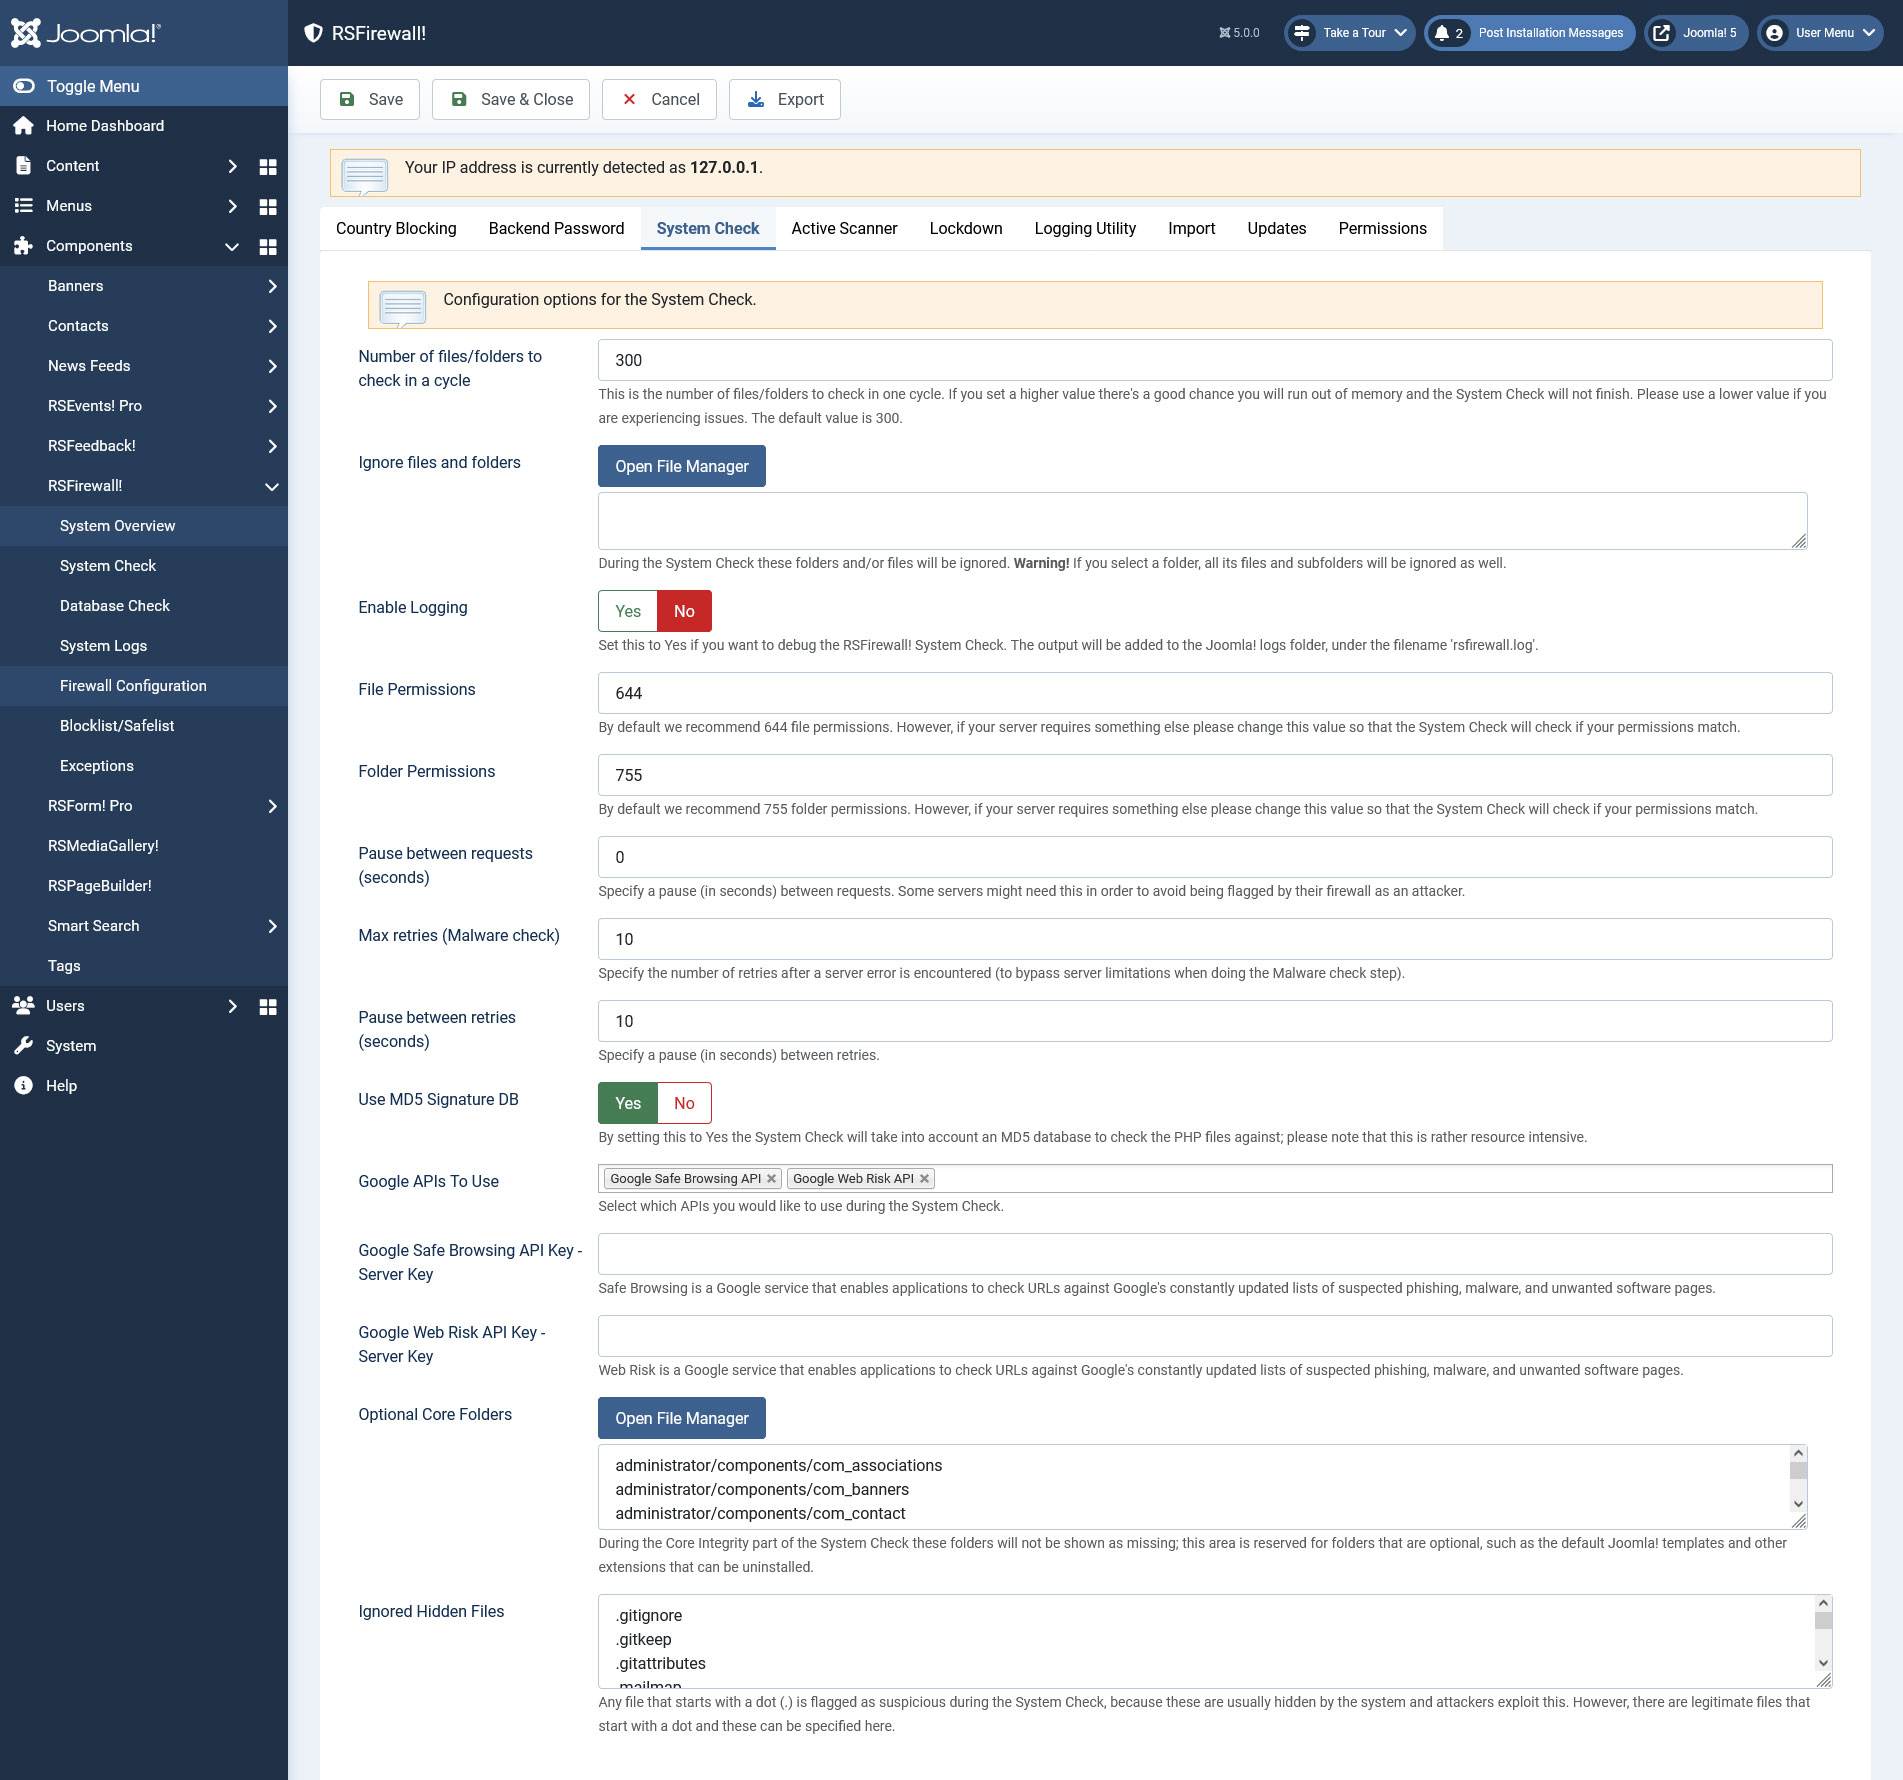
System Check
Here you can find some some configurable options for the System Check:
- Number of files/folders to check in a cycle: This is the number of files/folders to check in one cycle. If you set a higher value there's a good chance you will run out of memory and the System Check will not finish. Please use a lower value if you are experiencing issues. The default value is 300.
- Ignore files and folders: During the System Check these folders and/or files will be ignored. Warning! If you select a folder, all its files and subfolders will be ignored as well. Files and folders can be added in the ignore list by clicking on the Open File Manager button which will open a modal in which you can browse through your website's file system.
- Enable Logging: Set to Yes to enable debugging the System Check. The output will be added to Joomla!'s log folder, in the rsfirewall.log file.
- File Permissions: Defaulted to 644 but you can change this value should your server require other permissions. RSFirewall! will check your files for the permissions set here when running the System Check.
- Folder Permissions: Defaulted to 755 but you can change this value should your server require other permissions. RSFirewall! will check your folders for the permissions set here when running the System Check.
- Pause between requests (seconds): you can set up an interval, in seconds, between requests that are sent to the server when the System Check is being performed. This is useful if your hosting provider's server is too sensitive about these requests and regards you as an attacker.
- Max retries (Malware check): you can specify the number of retries after a server error is encountered (to bypass server limitations when doing the Malware check step).
- Pause between retries (seconds): you can specify a pause in seconds between retries.
- Use MD5 Signature DB: Yes / No - if this option is enabled, the System Check will take into account an MD5 database to check the PHP files against; please note that this is rather resource intensive.
- Google APIs To Use: choose which Google APIs to use from: Google Safe Browsing API and or Google Web Risk API.
- Google Safe Browsing API Key: RSFirewall! checks your website against Google's constantly updated lists of suspected phishing, malware, and unwanted sofrware pages. Generating this API key can be done as instructed here.
- Google Web Risk API Key: Web Risk is a Google service that enables applications to check URLs against Google's constantly updated lists of suspected phishing, malware, and unwanted software pages. Generating this API key can be done as instructed here.
- Optional Core Folders: During the Core Integrity part of the System Check these folders will not be shown as missing; this area is reserved for folders that are optional, such as the default Joomla! templates and other extensions that can be uninstalled.
- Ignored Hidden Files: Any file that starts with a dot (.) is flagged as suspicious during the System Check, because these are usually hidden by the system and attackers exploit this. However, there are legitimate files that start with a dot and these can be specified here.
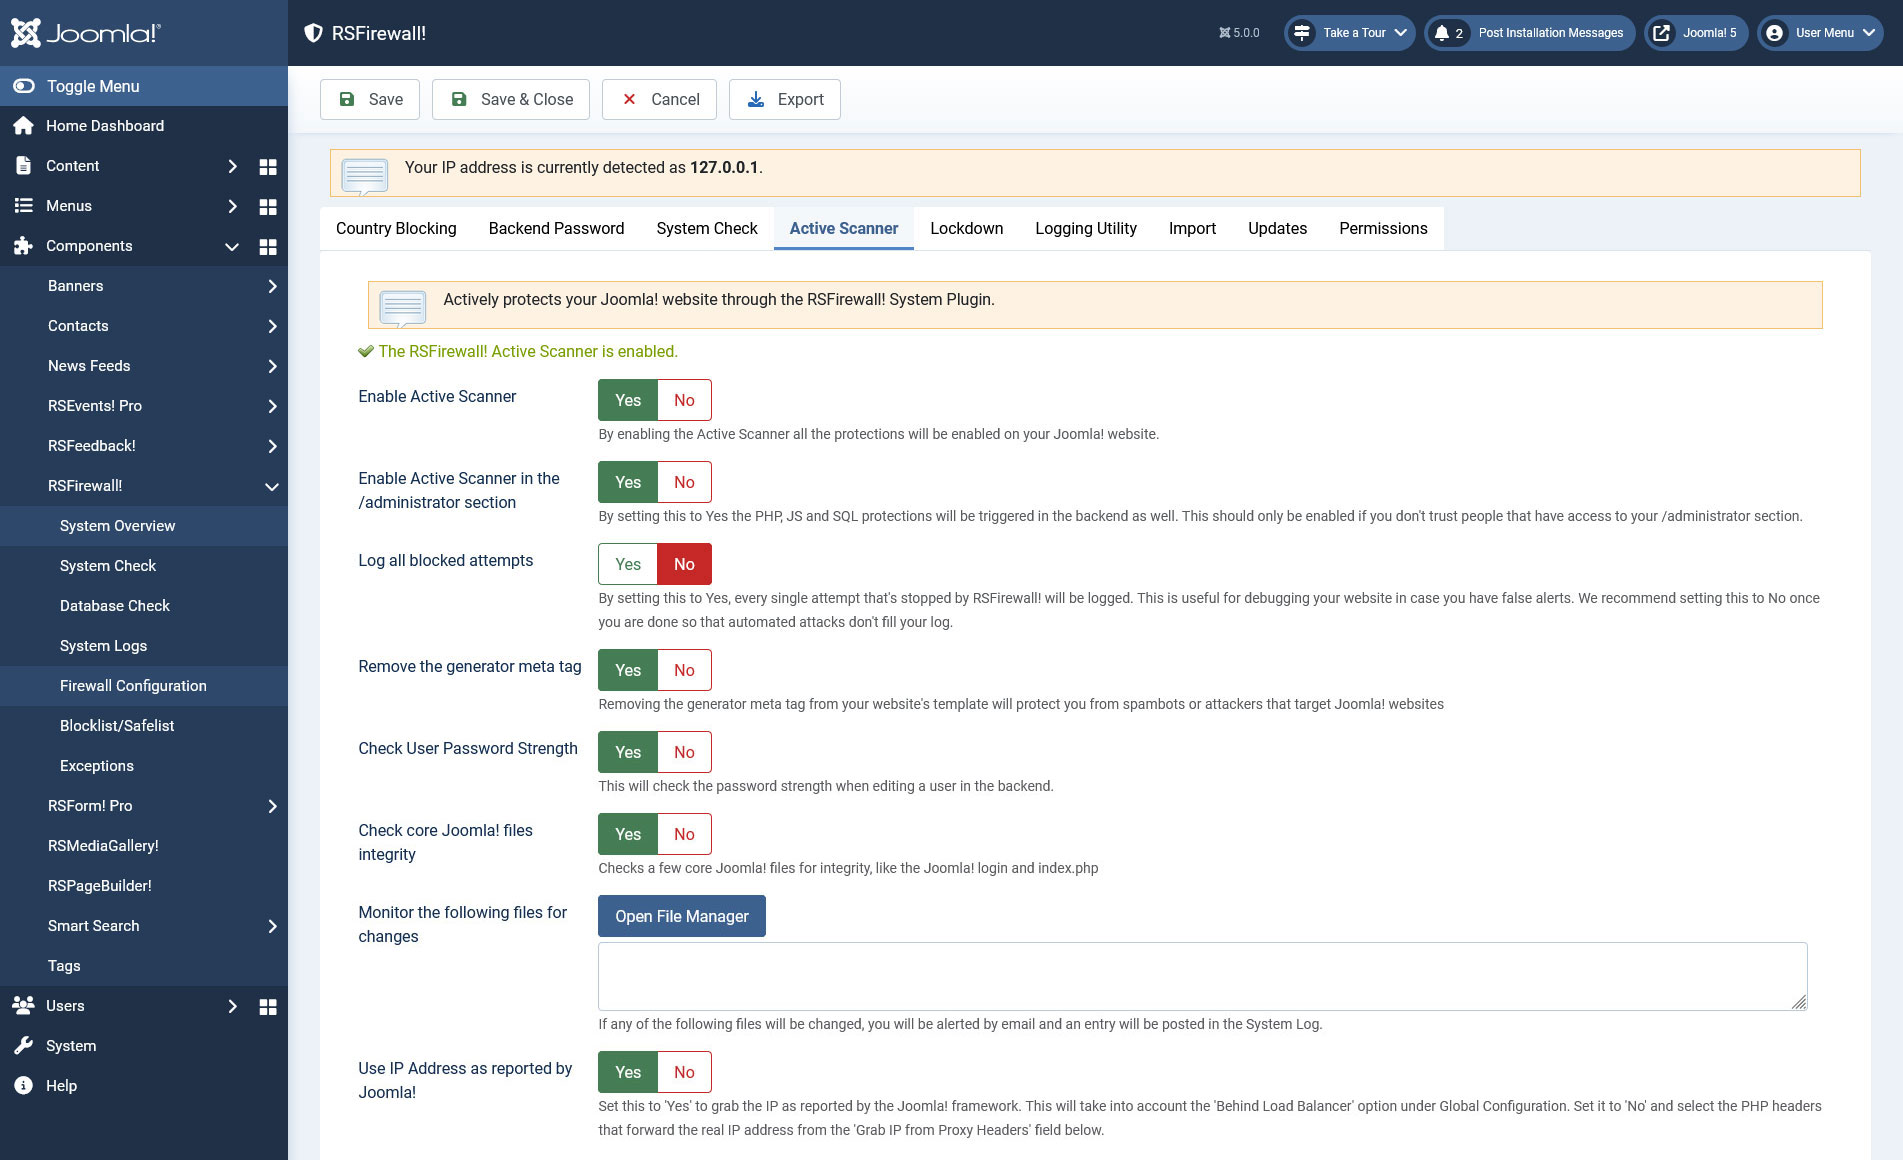
Active Scanner
Provides a configuration tool for the RSFirewall! Active scanner which actively protects your Joomla! website, offering the following configurable options:
- Enable / Disable Active Scanner: By enabling the Active Scanner all the protections will be enabled on your Joomla! website.
- Enable Active Scanner in the administrator(backend) section: this is useful if you don't trust people that have access to your administration.
- Log all blocked attempts: Set to Yes in order to log all blocked attempts. Use this option to identify false alerts on your website. Turn it off once you are done to make sure that automated attempts don't fill up your logs.
- Remove the generator meta tag: Removing the generator meta tag from your website's template will protect you from spambots or attackers that target Joomla! websites
- Check User Password Strength: This will check the password strength when editing a user in the backend.
- Check core Joomla! files integrity: Checks a few core Joomla! files for integrity, like the Joomla! login and index.php.
- Monitor the configured list of files for changes: If any of the following files will be changed, you will be alerted by email and an entry will be posted in the System Log.
- Use IP Address as reported by Joomla!: Set this to 'Yes' to grab the IP as reported by the Joomla! framework. This will take into account the 'Behind Load Balancer' option under Global Configuration. Set it to 'No' and select the PHP headers that forward the real IP address from the 'Grab IP from Proxy Headers' field below.
- Grab IP from Proxy Headers: some servers are behind a proxy or firewall and will not provide the correct IP. If this is your case, contact the proxy provider and ask them through what header are they sending the real IP. Otherwise just leave these all checked by default and RSFirewall! will attempt to grab the IP by looking through all of them.
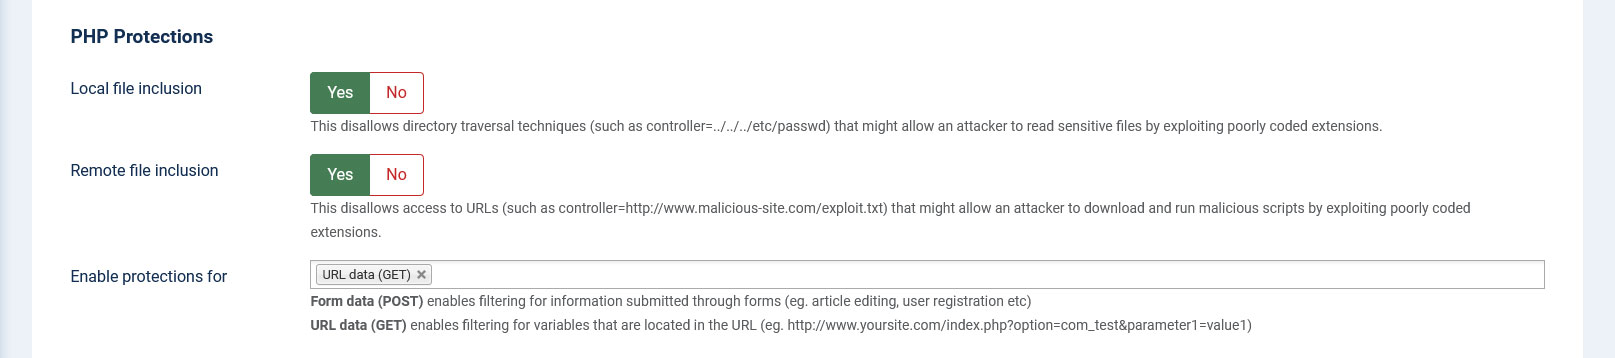
PHP Protections:
- Local file inclusion - disallows directory traversal techniques that might allow an attacker to read sensitive files by exploiting poorly coded extensions.
- Remote file inclusion - disallows attackers to download an run malicious scripts by exploiting poorly coded extensions
- Enable protections for - Form data (POST) enables filtering for information submitted through forms (eg. article editing, user registration etc). While URL data (GET) enables filtering for variables that are located in the URL (eg. http://www.yoursite.com/index.php?option=com_test¶meter1=value1)
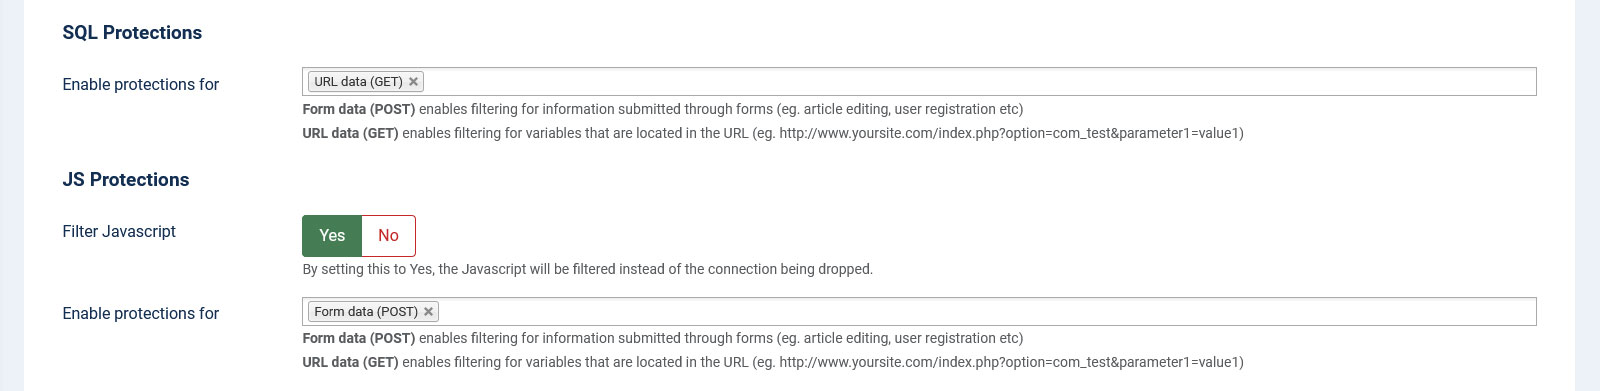
SQL Protections:
- Enable protections for - Form data (POST) enables filtering for information submitted through forms (eg. article editing, user registration etc). While URL data (GET) enables filtering for variables that are located in the URL (eg. http://www.yoursite.com/index.php?option=com_test¶meter1=value1)
JS Protections:
- Filter Javascript - by setting this to Yes, the Javascript will be filtered instead of the connection being dropped.
- Enable protections for - Form data (POST) enables filtering for information submitted through forms (eg. article editing, user registration etc). While URL data (GET) enables filtering for variables that are located in the URL (eg. http://www.yoursite.com/index.php?option=com_test¶meter1=value1).
Denial of Service:
- Deny access to the following User Agents: Protect against DoS (Denial of Service) attacks for User Agents (perl, cURL, Java, Mozilla Impersonators or empty User Agents)
- Protect forms from abusive IPs - checks if IPs of form submitters exist in the Spamhaus XBL and SBL lists.
- PBL lists: Search the following PBL lists (public blocklists) when checking for abusive IPs. These lists are added by default: Tornevall, The Spamhaus Project and JustSpam.org
- DNS for resolving lists: Leave this empty to query the lists using one of the public DNS; in some cases, the PBL lists will deny querying using public DNS - if you have your own network DNS, supply the IP here. Multiple IPs can be provided, each on a new line.
- Deny access to the following referrers - Referers are visitors coming from another website(domain). You can block multiple domains by specifying them each on a new line. You can also use wildcards, such as *.domain.com which will block any request coming from all subdomains of domain.com(e.g www.domain.com, images.domain.com etc.).
- Don't block Google or Bing Bot - When this is set to Yes, a reverse DNS lookup is performed on the IP address that triggered a protection. If the reverse DNS returns a Google or Microsoft domain, the bot won't be blocked as this could result in your website not being indexed anymore.

Automatic Blocklisting:
- Automatic blocklisting: if repeated threats are detected with the same IP address, this will automatically be added to the Blocklist area
- Automatic blocklisting for /administrator login: with this option enabled, failed backend logins will lead to an automatic ban. This option is independent from the CAPTCHA configurable below.
- # of attempts: this is the minimum number of attempts before the attacker will be added to the blocklist and banned from your website.

CAPTCHA:
- Enable CAPTCHA: when enabled this will prompt a CAPTCHA security code when trying to login in the /administrator section. CAPTCHA will appear every time unless your IP is safelisted.
- Font Size: specify the font size for the CAPTCHA image. The default is 32.

Backend login:
- Capture login attempts: By enabling this, everytime a user fails to login in the /administrator section will trigger an event in the System Logs.
- Store the password attempts: Set whether to store the passwords used in the failed login attempts or not.

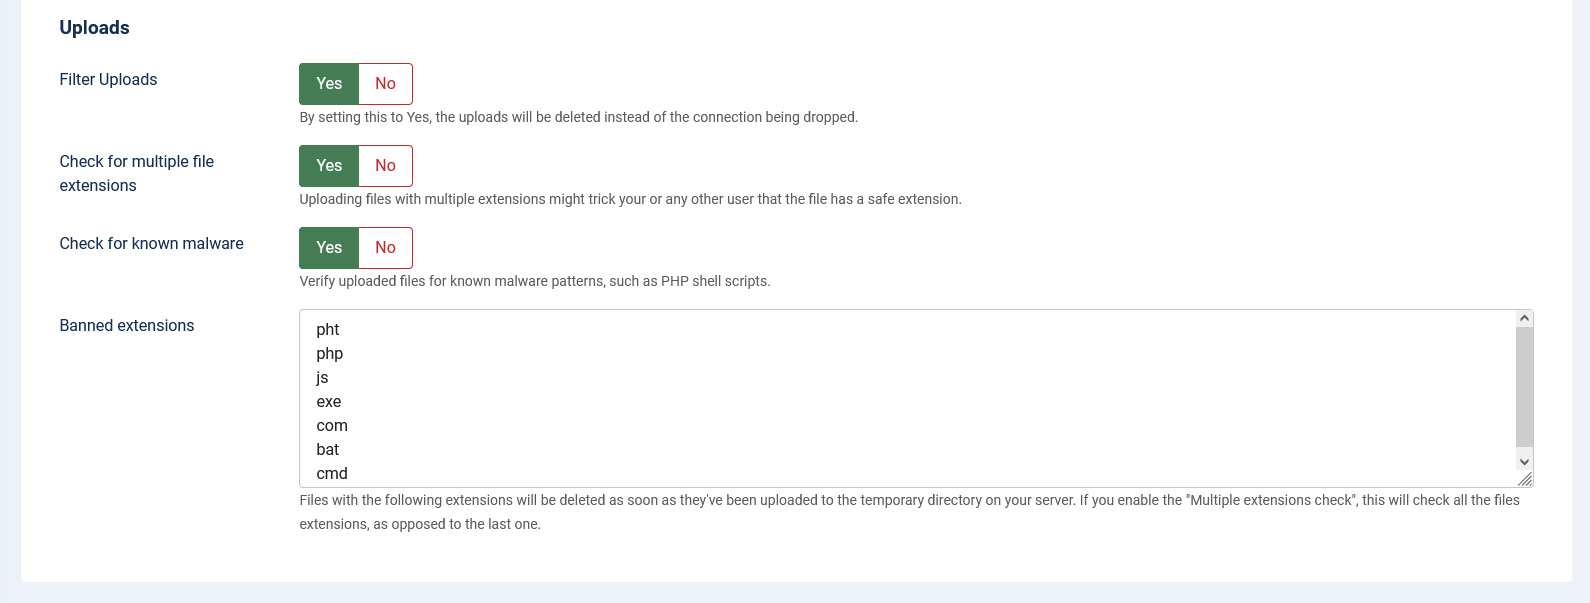
Uploads:
- Filter uploads: By setting this to Yes, the uploads will be deleted instead of the connection being dropped.
- Check for multiple file extensions: Uploading files with multiple extensions might trick your or any other user that the file has a safe extension.
- Check for known malware: Verify uploaded files for known malware patterns, such as PHP shell scripts.
- Banned extensions: Files with the following extensions will be deleted as soon as they've been uploaded to the temporary directory on your server. If you enable the "Multiple extensions check", this will check all the files extensions, as opposed to the last one.
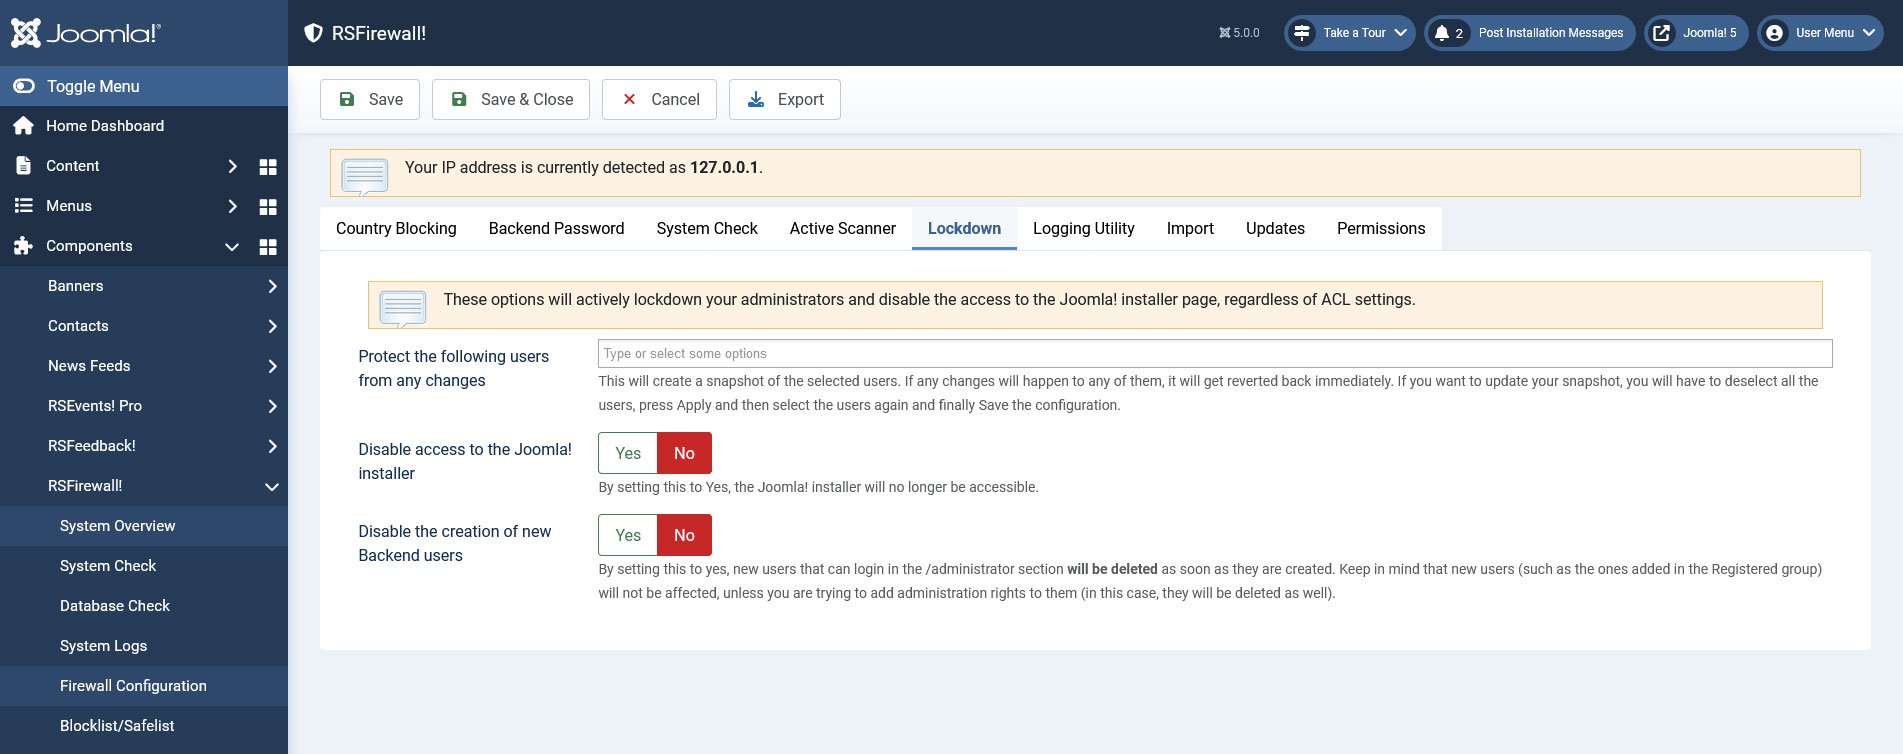
Lockdown
- Protect the following users from any changes - this will create a snapshot of the selected users. If any changes will happen to any of them, it will get reverted back immediately. If you want to update your snapshot, you will have to deselect all the users, press Apply and then select the users again and finally Save the configuration.
- Disable access to the Joomla! installer - by setting this to Yes, the Joomla! installer will no longer be accessible.
- Disable the creation of new Backend users - by setting this to yes, new users that can login in the /administrator section will be deleted as soon as they are created. Keep in mind that new users (such as the ones added to the Registered user group) will not be affected, unless you are trying to add Super Administrator rights to them (in this case, they will be deleted as well).
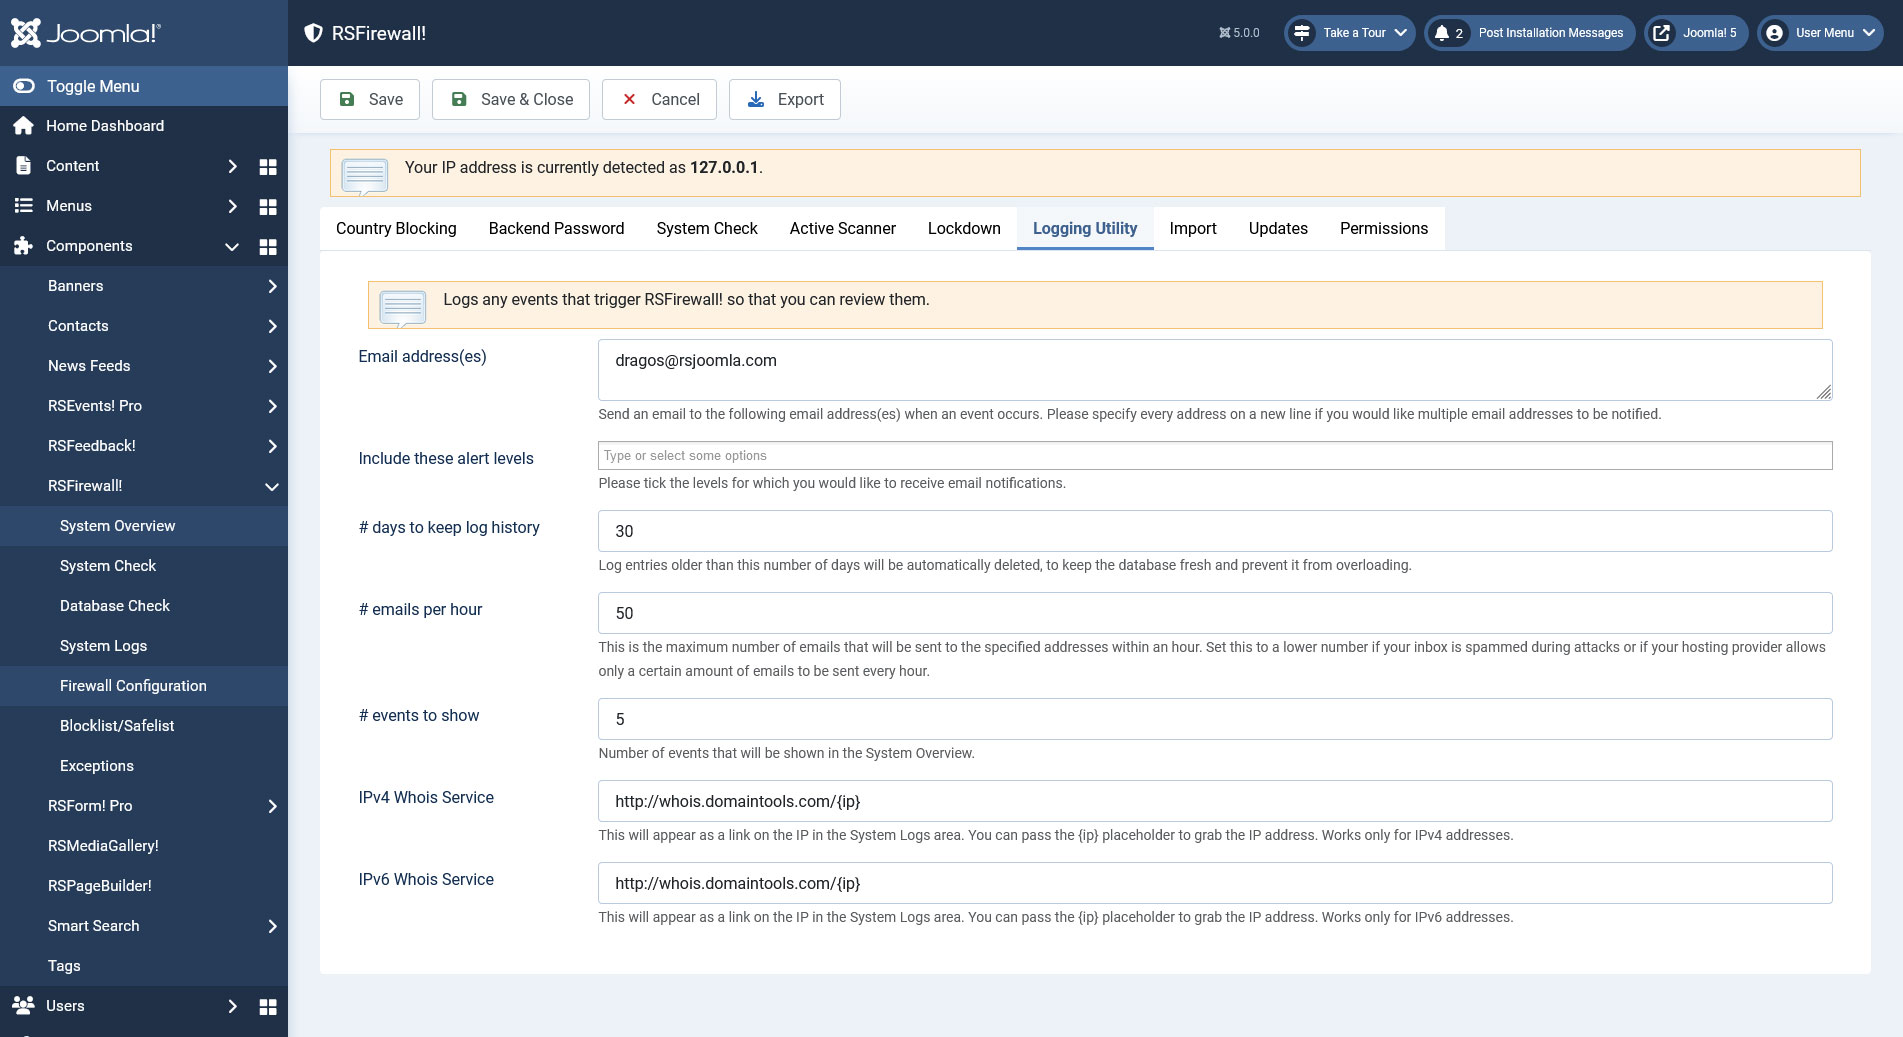
Logging utility
- Logs any events that trigger RSFirewall! so that you can review them. The logging utility also offers the possibility to send out an email if security events are recorded with certain security levels (low, medium, high, critical).
- To keep the database fresh and prevent if from overloading, a days to keep log history option was added, log entries older then the number of days you set, will be automatically deleted.
- To limit the potential high number of emails (each event / attempt) can potentially generate an email, a maximum number limit of sent emails per hour option has been added. If the limit is reached, no more emails will be generated.
- Here you can also set how many RSFirewall! related events to show in the System Overview by adding a number in the events to show field.
- You can set the preferred WhoIs service for both IPv4 and IPv6. Up until this point, http://whois.domaintools.com/ was used by default. You can use the {ip} placeholder to transmit the IP directly though the URL.
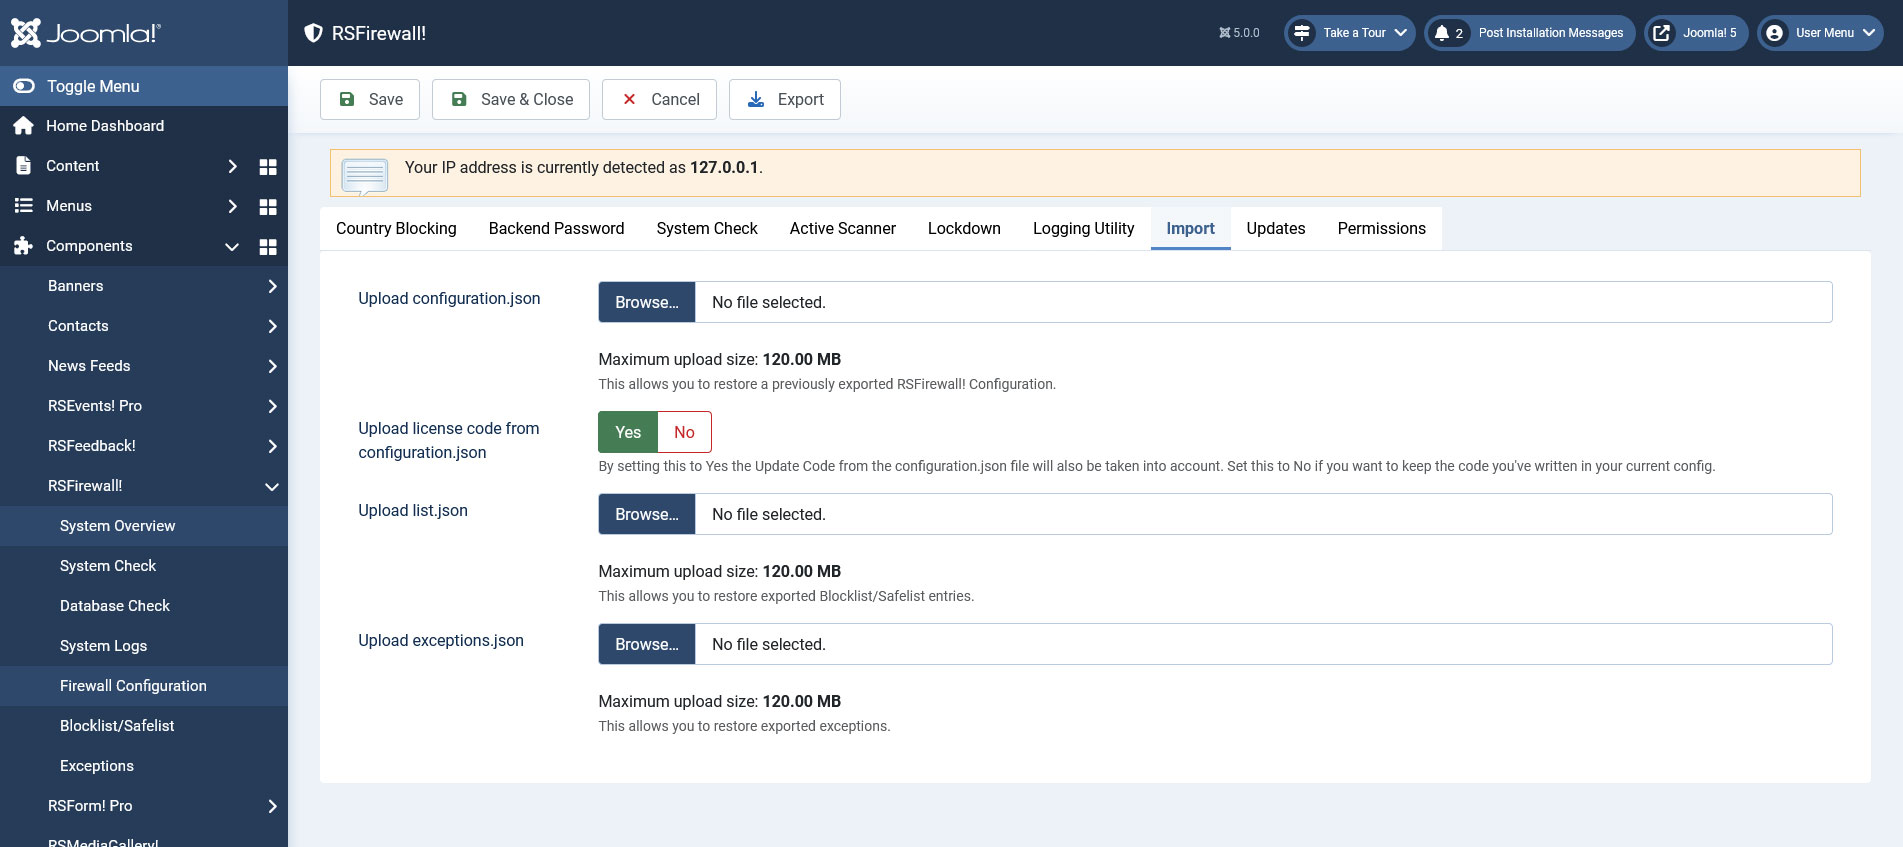
Import
- Upload configuration.json: RSFirewall! allows exporting all the configuration settings in order to migrate them on another RSFirewall! installation. The export button is available at the top of the "Firewall Configuration" tab and when is pressed it will generate a configuration.json file which can later be imported using the "Import" tab.
- Upload license code from configuration.json: by setting this to Yes the Update Code from the configuration.json file will also be taken into account. Set this to No if you want to keep the code you've written in your current config.
- Upload list.json: this allows you to restore the exported Blocklist/Safelist entries.
- Upload exceptions.json: this allows you to restore the exported exceptions.
After choosing a file to be uploaded, click the top Save button to initiate the upload.
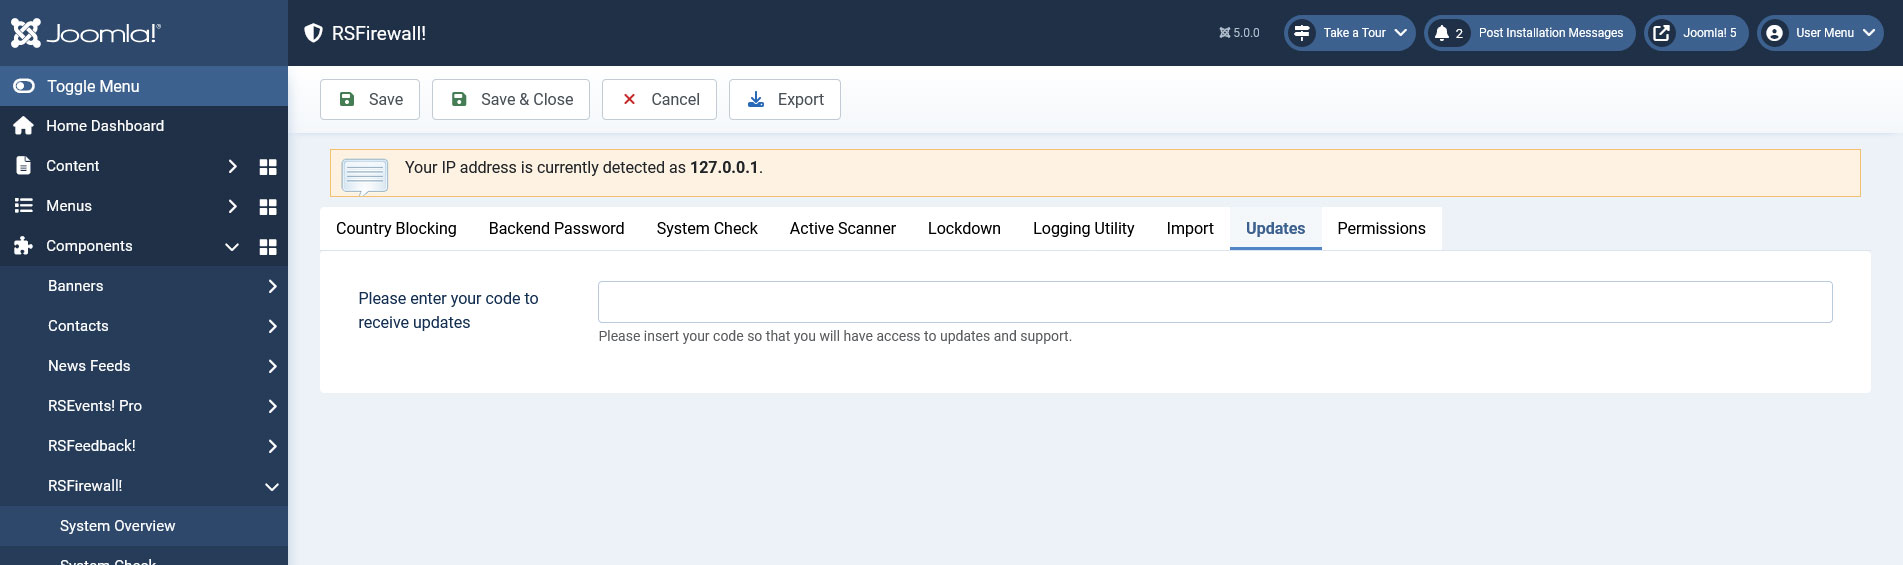
Updates
- Here you need to enter the license code in order to receive update. The license code is generated after you have registered a domain.
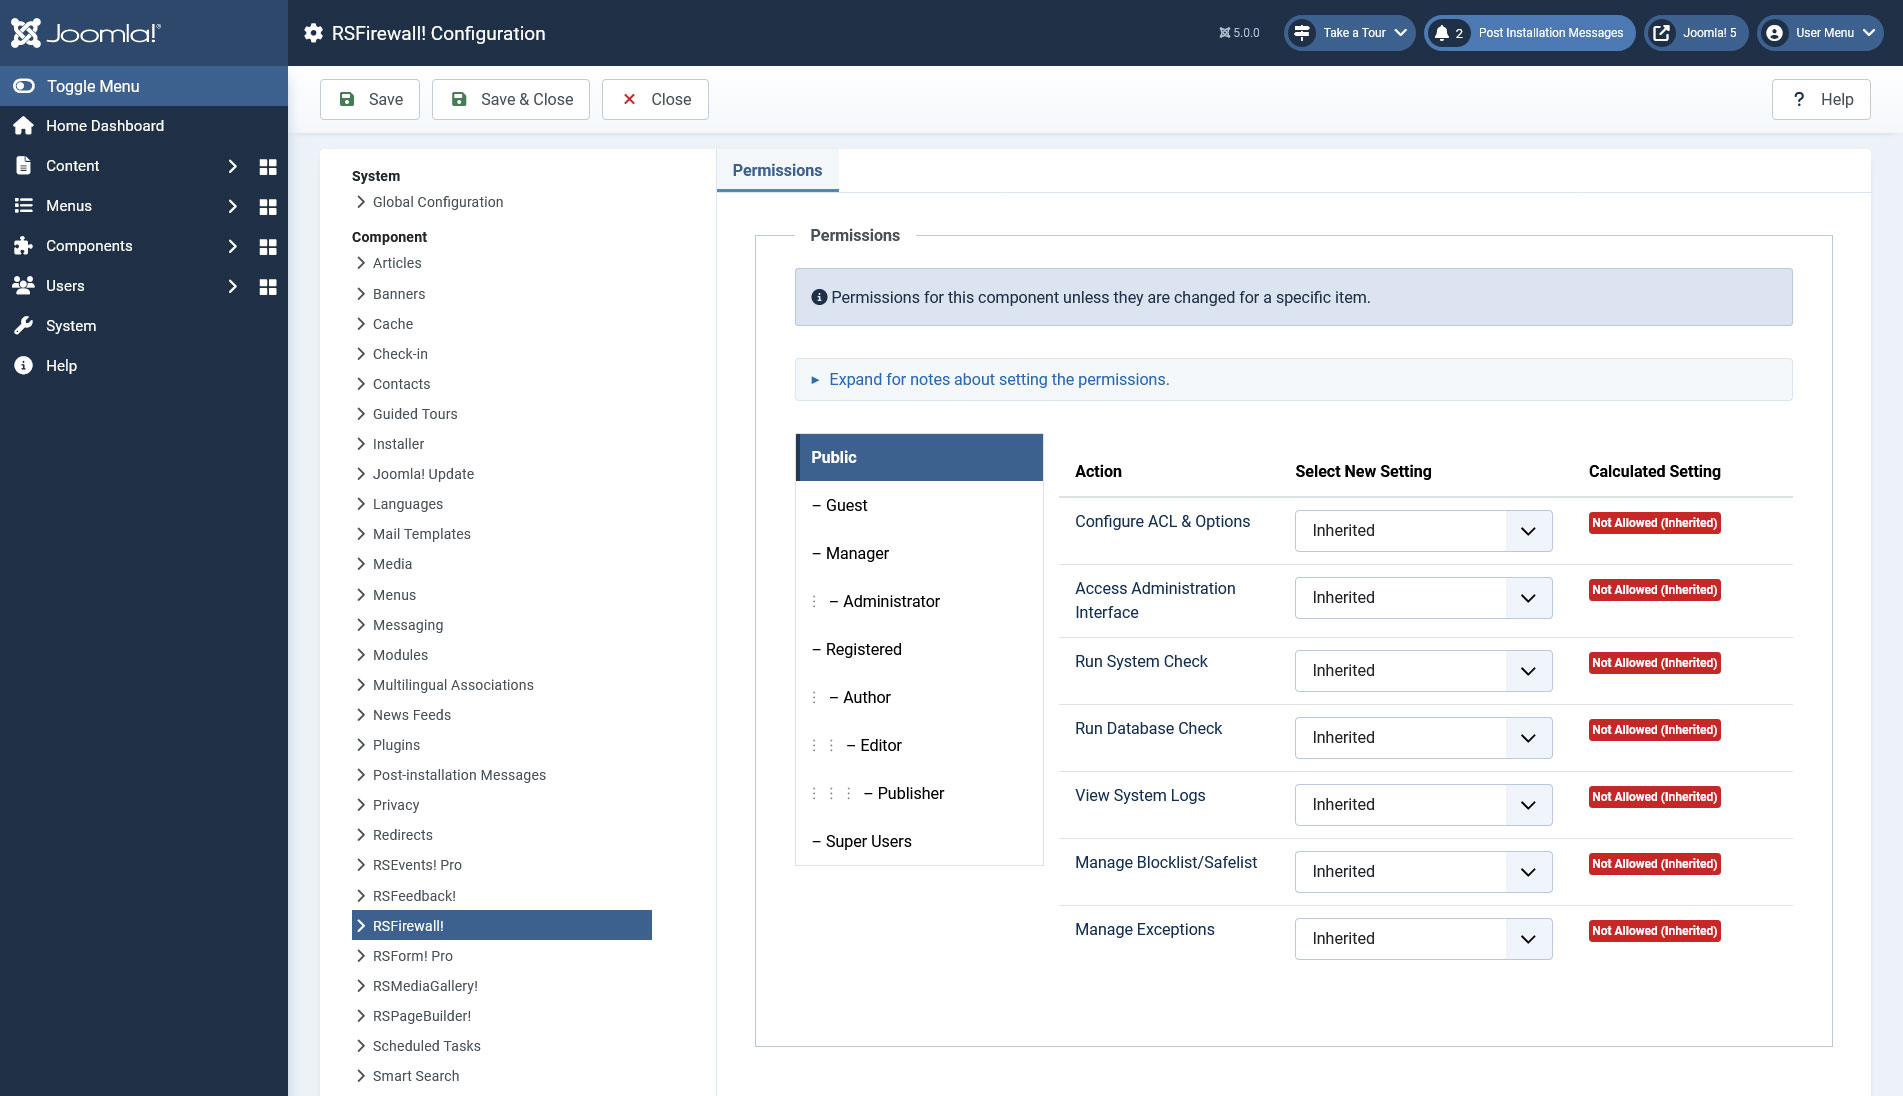
Permissions
- Allows you to gain more control over what your backend users can edit or manage within RSFirewall!.
Note:
- If, for example you have configured RSFirewall! to send email notifications to 3 email addresses, the email counter will be incremented by 3, as each event will generate three emails in this case.
- The more options you have enabled the more protection is offered by the RSFirewall! component however note that these options may affect the overall performance of your site.
8 persons found this article helpful.