
Add/Edit event
Though you can add events from the site back-end and front-end the configuration is basically the same for both instances. To add or edit an event from the back-end area, head to Components > RSEvents!Pro > Events > New.
Tip: The instant you click on the New button a unpublished event is created. The cool thing about this is that you can now save your event at any given point, without having to fill in x number of fields before you can save it. If all required information hasn't been filled it will be marked in the listing area as being incomplete and will be excluded from all front-end listings.
If you have a multilanguage website, RSEvents!Pro allows you to setup translations for the fields marked with a Flag icon (descriptions as well, even though these don't display the Flag). You will notice a language dropdown selector where you can switch between your configured website languages.
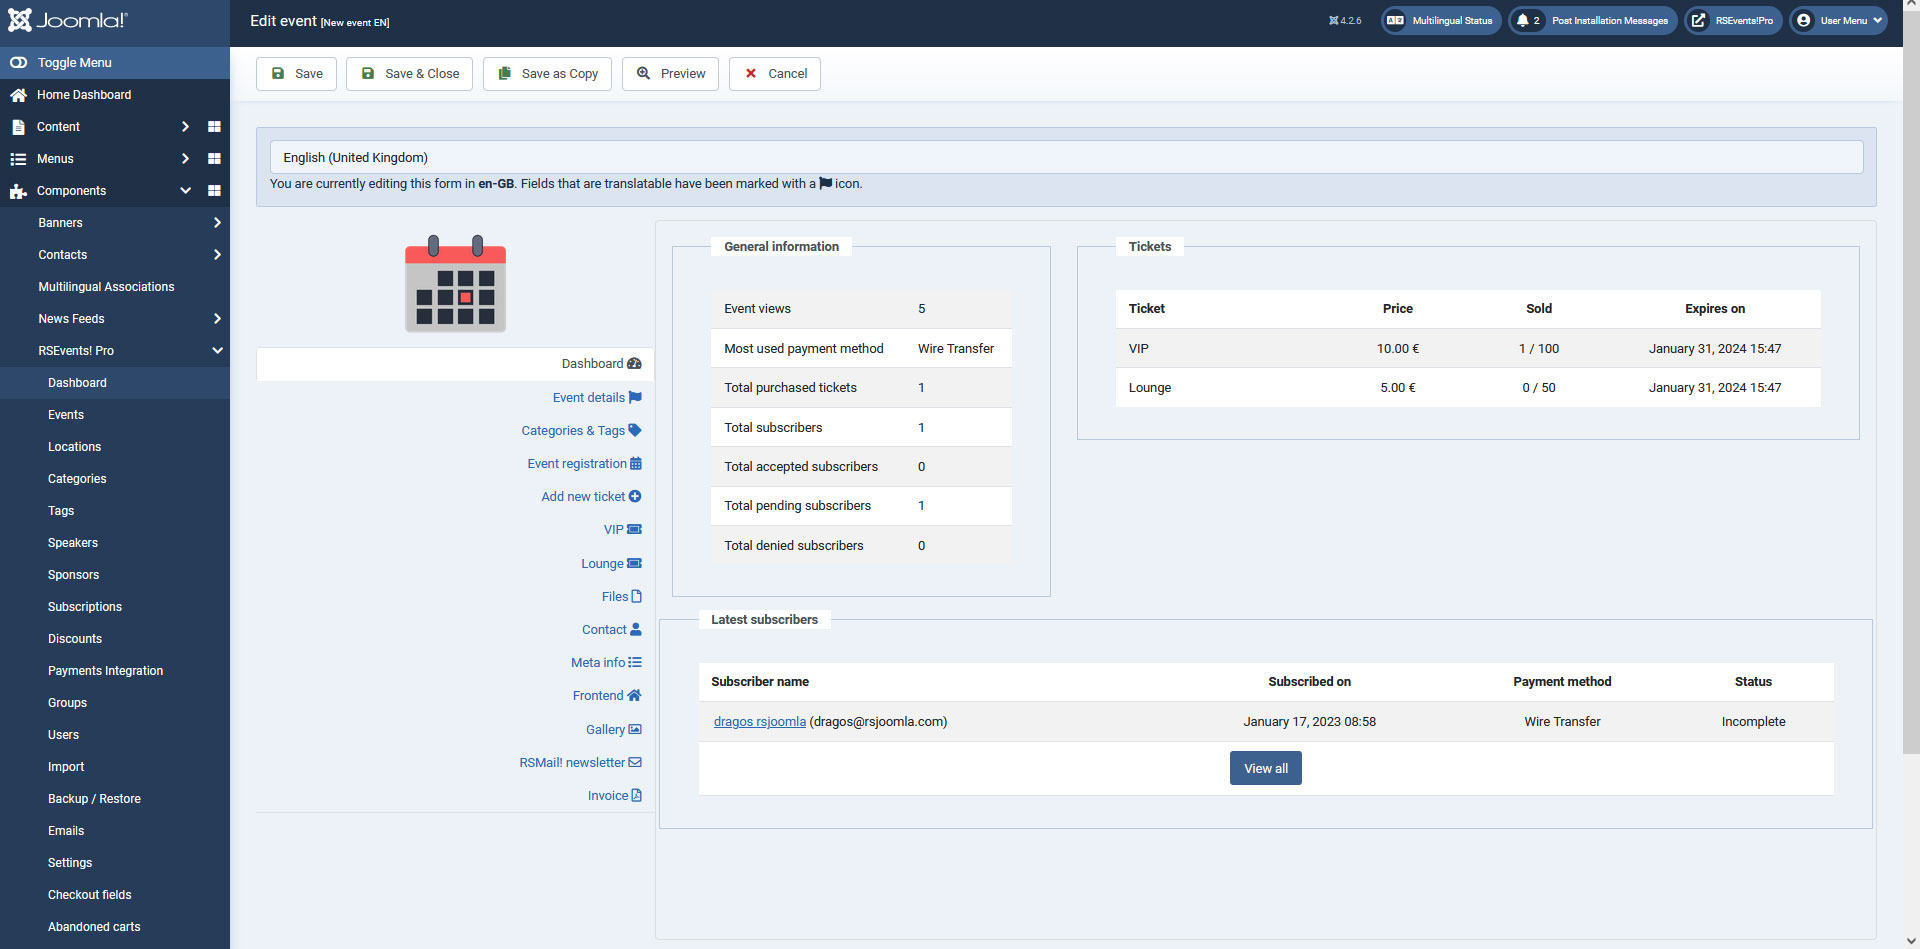
Event Dashboard
The following options are displayed:
- General Event Information
- Tickets
- Latest subscribers
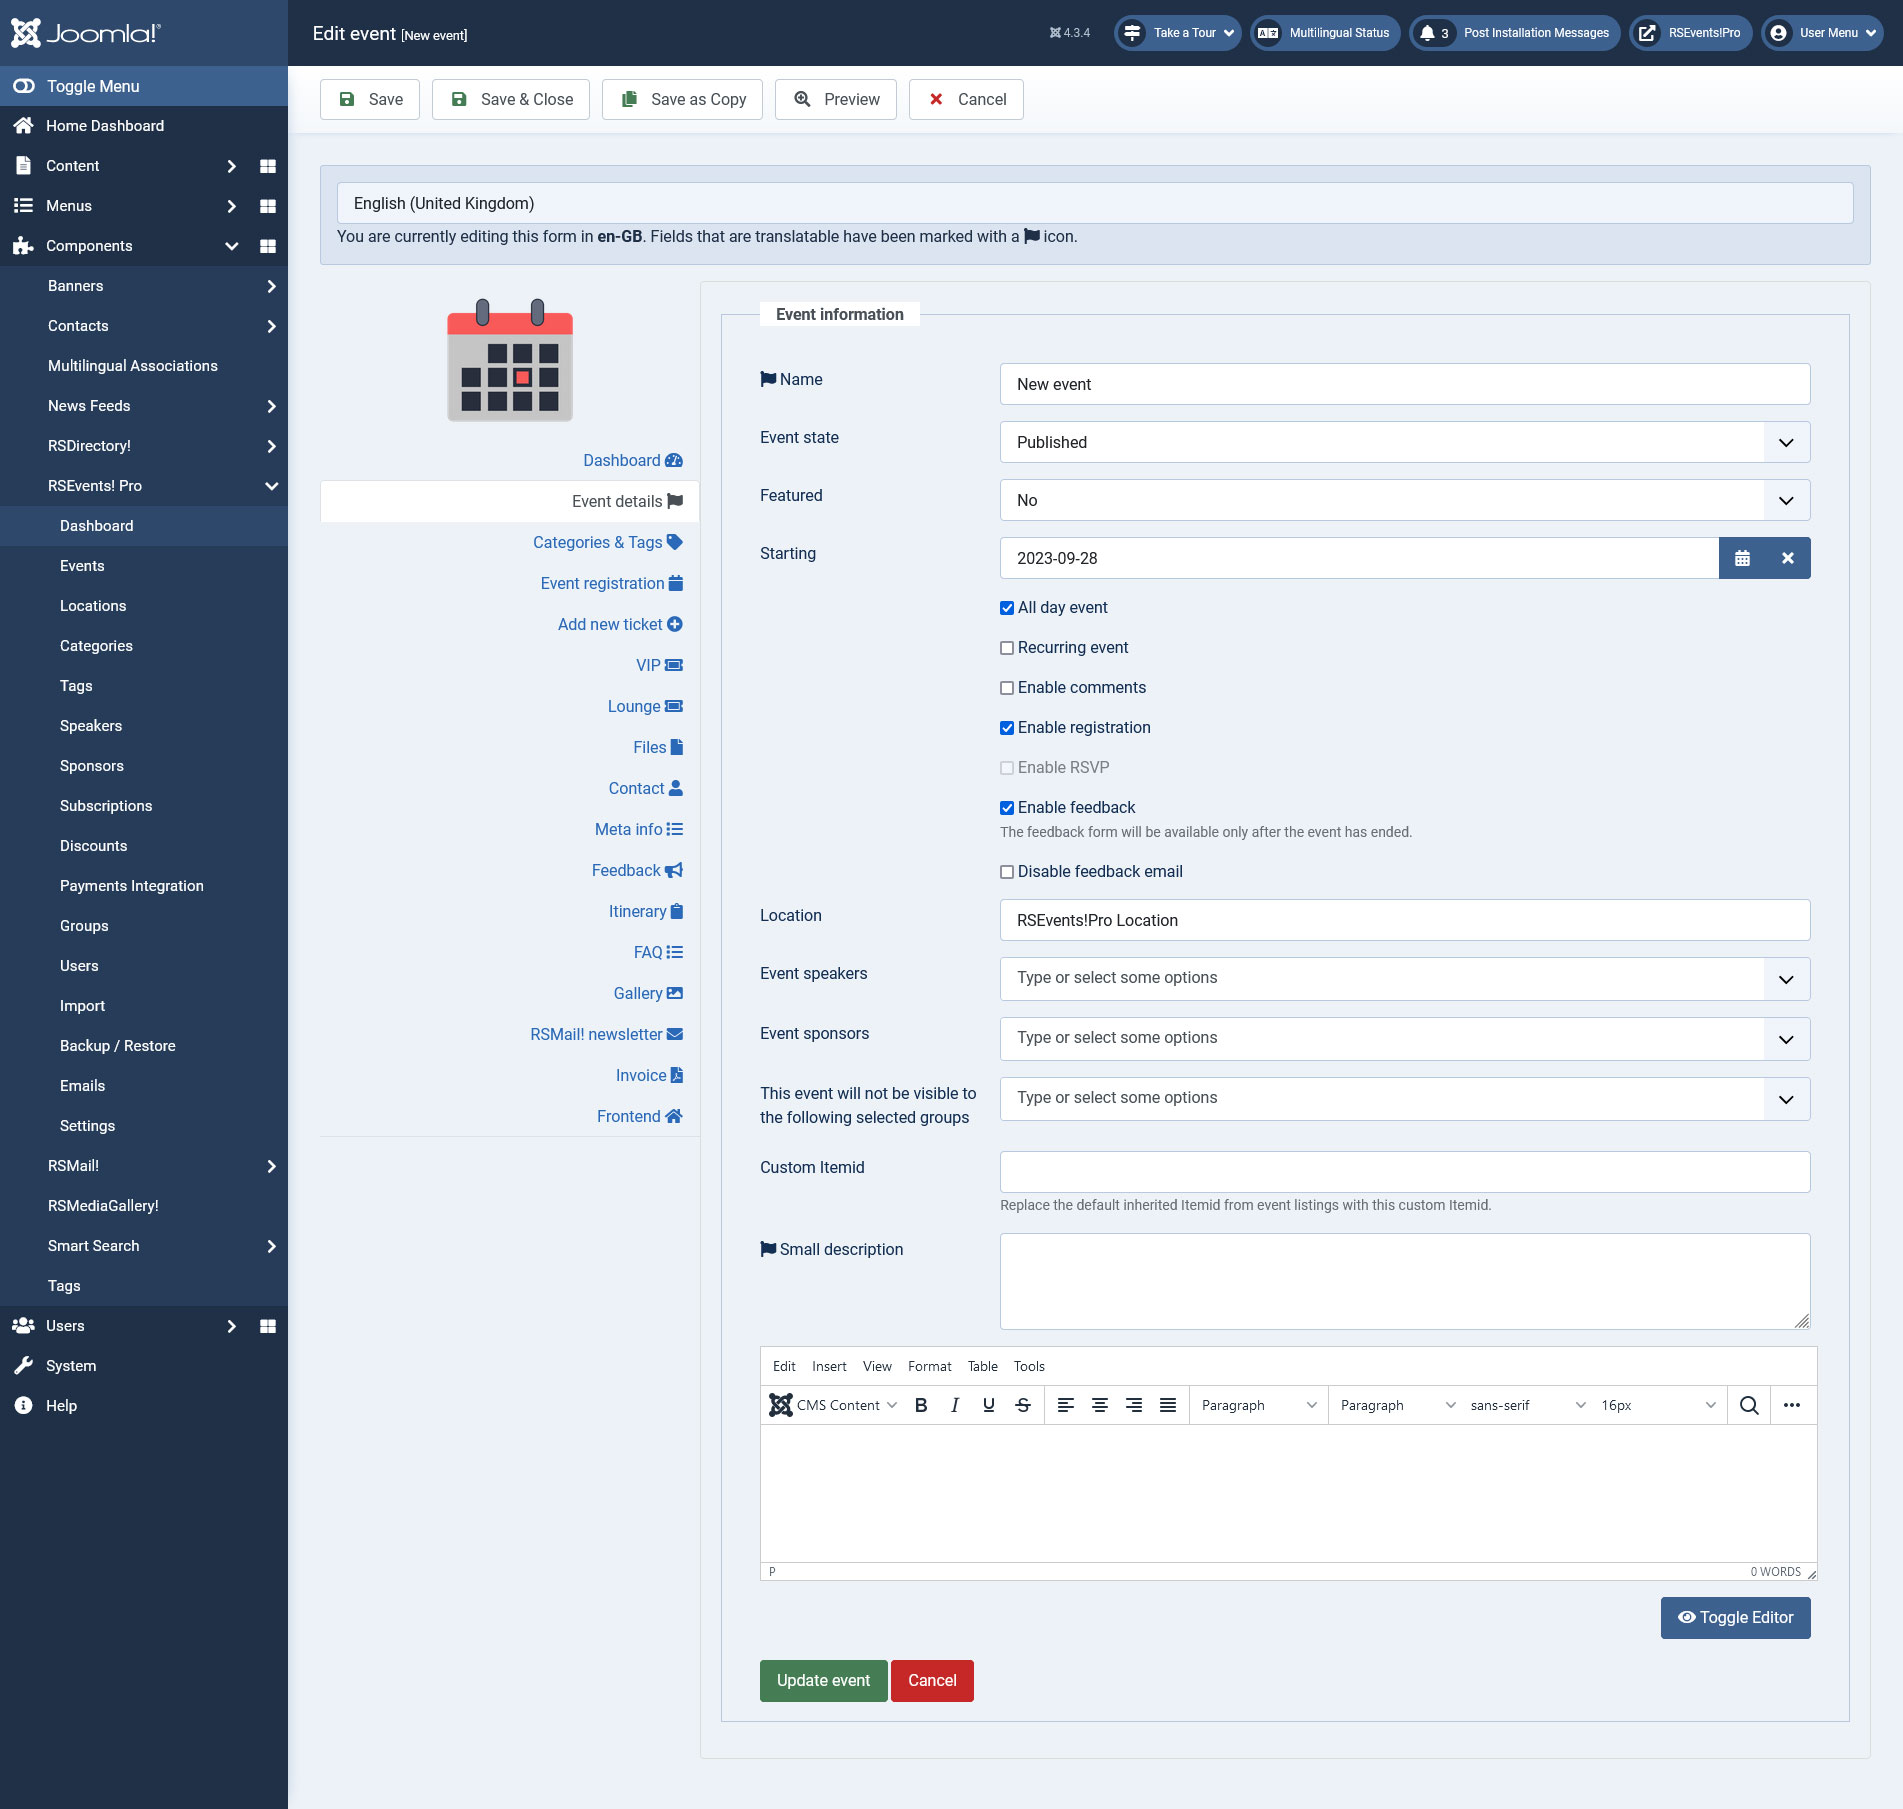
Event details
The following options are available for configuration:
- Event name: the name of the event. Only text input is allowed.
- Event state: Published / Unpublished / Archived.
- Starting: the date on which the event will start.
- Ending: the date on which the event will end. This needs to be higher then the starting date.
- All day event: check / uncheck. Check this if your event does not extend more than one day. This will hide the Ending date field and remove the time (hours, minutes and seconds).
- Recurring event: check / uncheck. If checked, this will provide an additional Recurring configuration step. This is particular useful when you have an event that occurs on a regular basis.
- Enable Comments: check / uncheck. If checked, commenting options will appear on the event page.
- Enable Registration: check / uncheck. If checked, visitors will be able to subscribe to an event or purchase tickets. For more details see the optional Event Registration step.
- Enable RSVP: This option is available for events having the registration disabled
- Enable feedback: The feedback form will be available only after the event has ended.
- Disable feedback email: if checked, the feedback email will not be sent.
- Location: by typing in a keyword, a list of results that match your string will be displayed. If your string doesn't match anything, you can add new location (as well as an URL), without leaving this page. You can read more on adding a location here.
- Event Speakers: Select the event speakers after adding them in the component configuration
- Event Sponsors: Select the event sponsors after adding them in the component configuration
- This event will not be visible to the following selected groups: You can select what RSEvents!Pro group cannot view / participate at this event.
- Custom Itemid: you can replace the inherited Itemid from the event listings with this custom Itemid (more details on Itemid here). This will be appended to the event URL when previewing it from the admin panel.
- Small description: you can add a short description of your event which will be included in the event listing.
- Description: a WYSIWYG area that allows you to offer a more in depth description of your event. Here you can also embed Youtube videos or add Flash widgets.
Clicking on the default event icon, will allow you to upload a new icon. Since version 1.9.0 the event icon can be also selected locally, from the images folder.
A cropping tool is also provided, so you can properly select the thumb image.
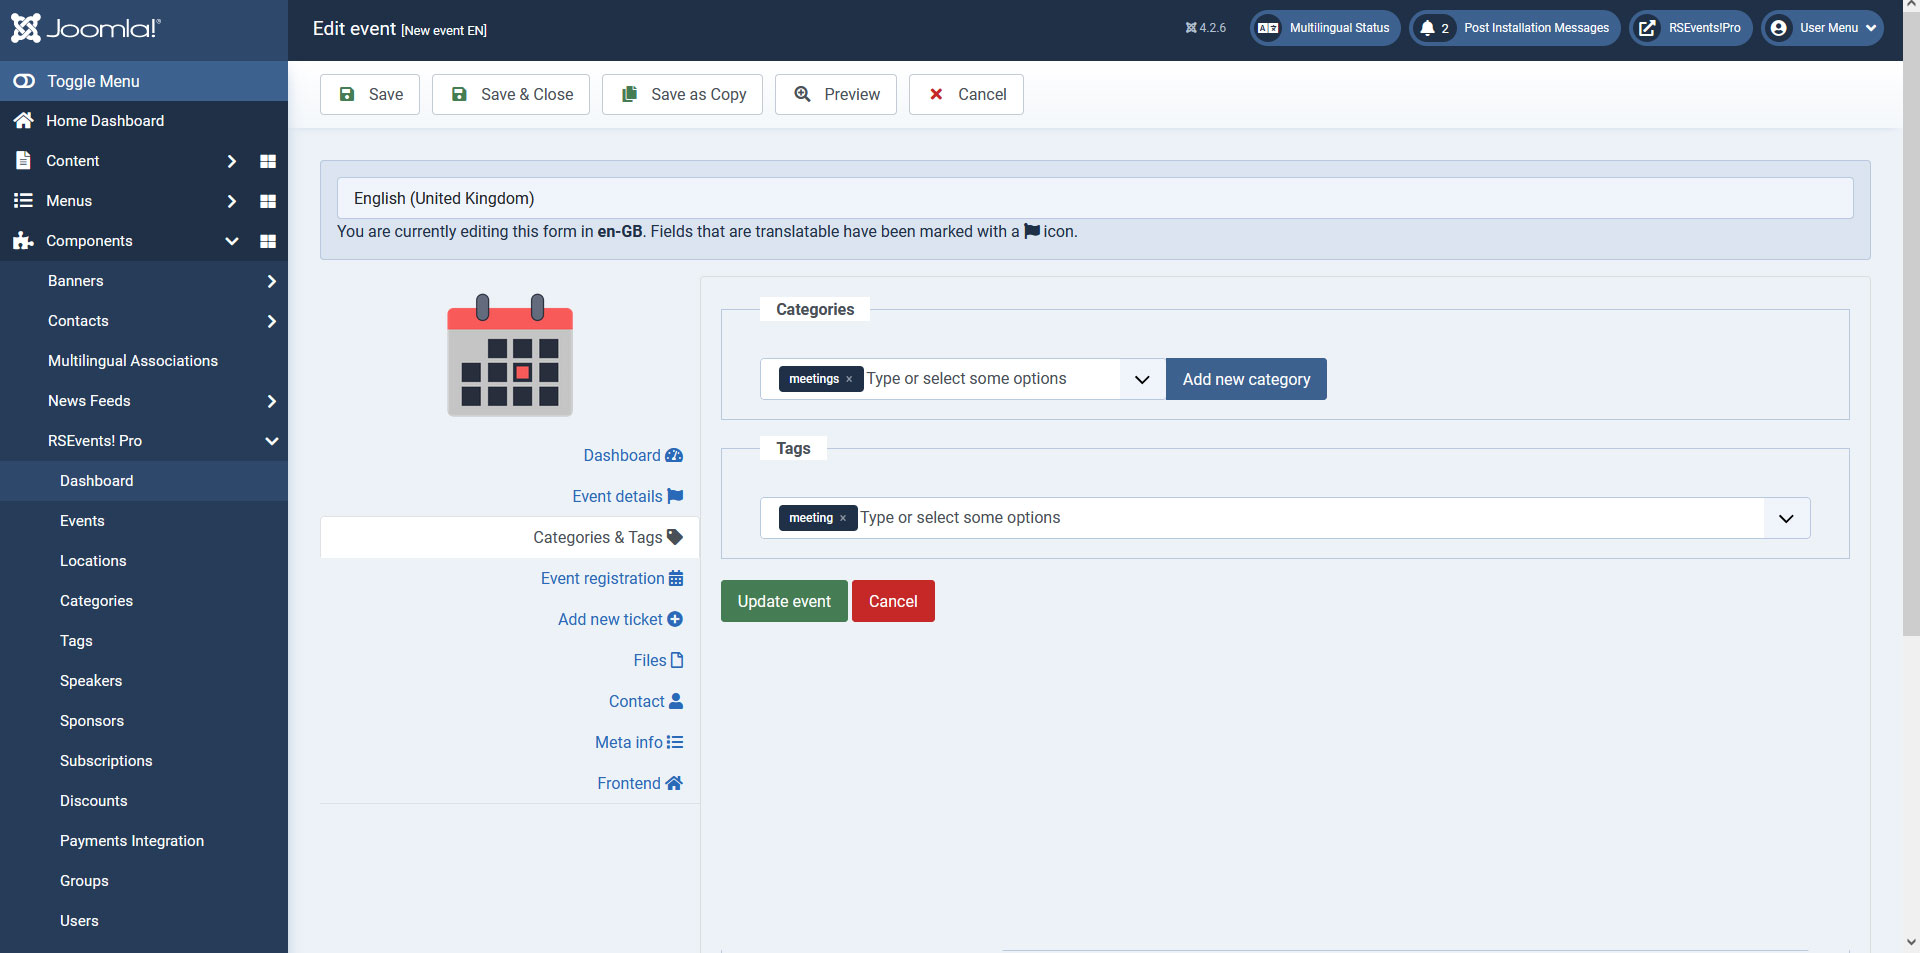
Categories & Tags
An event can be associated with multiple categories and tags. This is particularly useful for filtering events according to specific criteria.
You can select as many categories as you like. You can even quickly add a new category by clicking on the Add new category button. The newly opened modal window will allow you to set up the basic category information. At a later point you can edit it and specify the rest of the information, such as color code and description. Read more on RSEvents!Pro categories...
The tags input allows you to specify as many tags as you like, separated by comma. You can read more on managing tags here.
Event registration (optional)
This step is required only if you have checked the Enable registration option within the Event details area.
The From and To calendar fields allow you to restrict the period in which a user can subscribe to the event.
Other configuration options:
- Registration closed: You can close registration anytime, or it will turn on automatically when 'Force Close Registration' in the Waiting List section is active and all requirements are met.
- Unsubscription end date: Users can also unsubscribe from events. This date allows you to set up a limit for this. From the configured date on, users will not be able to unsubscribe from an event.
- Payment methods: choose what payment methods will be available for the event. The following are available: PayPal, Offline payment, Credit Card (via Authorize.Net) and Wire transfer (along with the configured options within the Payment integrations area.
- Maximum number of tickets: When tickets are available for this event (either a single or multiple tickets type), you can set a tickets limit that can be purchased.
- Allow overbooking: if this option is checked then users will be able to subscribe to an event even though the configured tickets ran out. The amount of tickets that can be purchased at this point is provided by the Overbooking amount field.
- Allow maximum attendance: if allow overbooking is not checked, you can specify a maxim attendance limit. This basically limits the number of tickets that can be purchased, regardless of the ticket type. The actual amount can be specified within the Maximum attendance amount field. For example, if set this to 10, you will be able to have a maximum of 10 subscriptions to your event, regardless of the configured ticket(s) quantity.
- You cannot use the maximum attendance option with the tickets configuration option.
- Show registered guests on the event page: If enabled, the subscribers will be displayed below the event details. How these are displayed can be controlled by the RSEvents!Pro > Settings > Events: Event registration section. Read more on the RSEvents!Pro Settings section...
- Automatically approve free registrations: having this enabled will allow you to automatically approve registrations that are free of charge.
- Enable tickets configuration: If this option is checked, a new tab will be added in the tabs listing, Tickets Configuration. This tab works in conjunction with the tickets you have configured, you can read more about it below.
- Registration form: by default RSEvents!Pro comes with a standard event registration form. This form can be changed if you are using the RSform!Pro along on the same site, via a specialized integration plugin. Read more on the RSEvents!Pro - RSform!Pro integration plugin...
- Paypal Email: available only when the 'Event hosters can sell their own tickets through PayPal' option is enabled. (it does not work with the Cart Plugin).
- Delete RSForm!Pro submissions when the user unsubscribes: if you are using the RSEvents! Pro - RSForm! Pro integration plugin, you will be able to enable this option in order to have the RSForm! Pro submissions deleted when a subscriber unsubscribes from the event.
- Enable discounts: if checked, a discount configuration area will be available. Basically this allows you to set up discount coupons for your event.
- Enable waiting list: If enabled, you will be able to set the total number of people who can join the waiting list, through the Waiting list limit field. Afterwards, the user will have a certain amount of time to claim his ticket, through the Waiting list - time to respond fields. The event registration will close when all tickets are purchased if the 'Force close registration' option is selected. This means that after all tickets are purchased, and someone unsubscribes, the registration for this event will still be closed. The Waiting list approval type can be either Manually: You manually choose who receives a claim, or Automatically: when a registration is canceled, a claim is automatically offered to the first person on the waiting list. Waiting Lists can also be exported from the backend area.
- Disable registration email: if checked, the registration email will not be sent.
- Disable activation email: if checked, the activation email will not be sent.
- Disable denied email: the denied email will not be sent.
- Disable refund email: if checked, the refund email will not be sent.
- Notify the owner on new subscriptions: if this is checked a notification email will be delivered to the event owner. The email body and subjected can be configured directly from the Emails tab. Additional emails can be configured to receive this notification.
- Notify the owner when the subscription is paid: an email will be sent to the event owner notifying him that a user has paid the event subscription. The email body and subjected can be configured directly from the Emails tab. Additional emails can be configured to receive this notification.
- Notify the owner when users unsubscribe: an email will be sent to the event owner notifying him that a user has unsubscribed from the event. Additional emails can be configured to receive this notification.

Event RSVP (optional)
This step is required only if you have checked the Enable RSVP option within the Event details area.
The From and To calendar fields allow you to restrict the period in which a user can RSVP to the event.
Other configuration options:
- Send the 'Going' email
- Send the 'Interested' email
- Send the 'Not going' email
- Show RSVP guests on the event page
- RSVP Quota: Set the total number of people that will attend this event. This reffers to the total number of people that are 'Going' to this event.

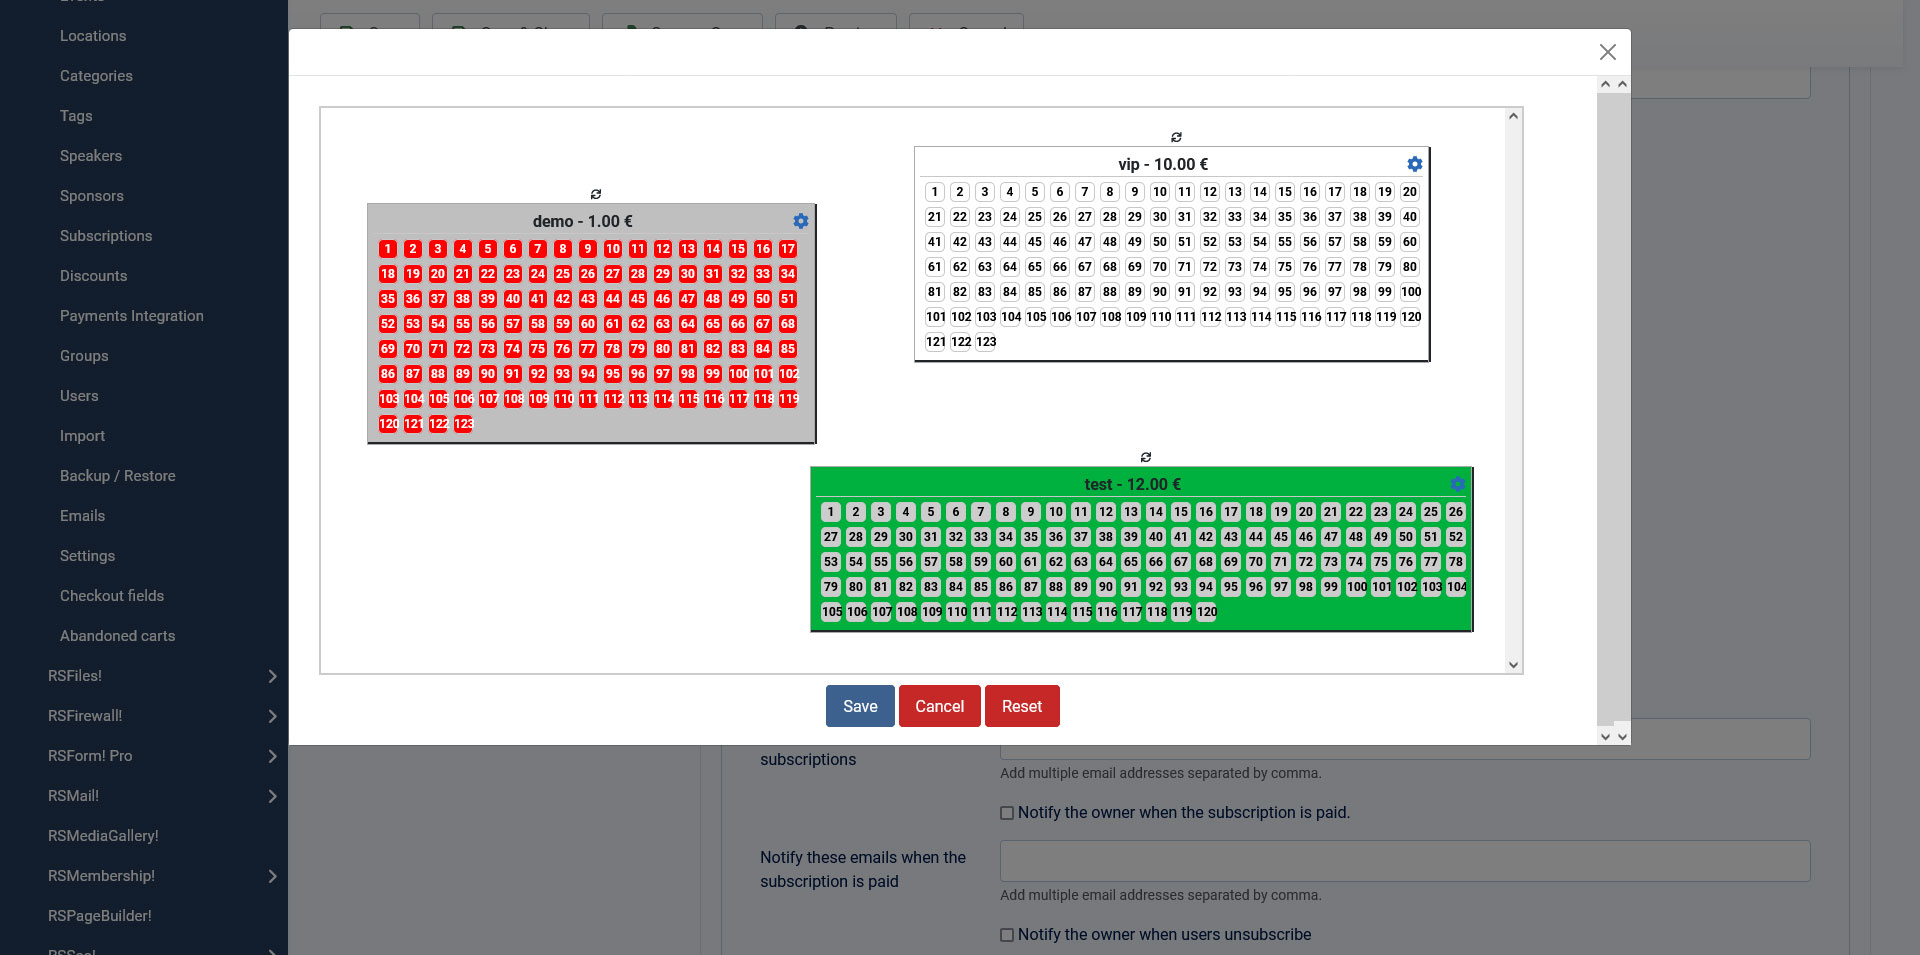
Tickets Configuration
This tab enables you to customize a ticket chart that will be available in the frontend when the subscriber chooses the ticket(s) for his event. All available seats will be displayed and the subscriber can select them in the custom tables available for each ticket type.
Ticket Seats configurable options:
General tab:
- First seat number
- Disabled seats type: Auto / Manual
- Number of available seats between the disabled ones
- Number of disabled seats between seats
- Disable from available seats: Yes / No
Customization tab:
- Ticket background: Select the ticket background.
- Seat background: Select the ticket seat background.
- Seat text color: Select the ticket seat text color.
- Selected seat background: Select the ticket selected seat background.
You can easily duplicate your tickets by clicking on the blue 'Duplicate' button. Note that this will only be available after creating a ticket.
You can also rotate your tickets by clicking and dragging the two arrows icon located at the top of the ticket.
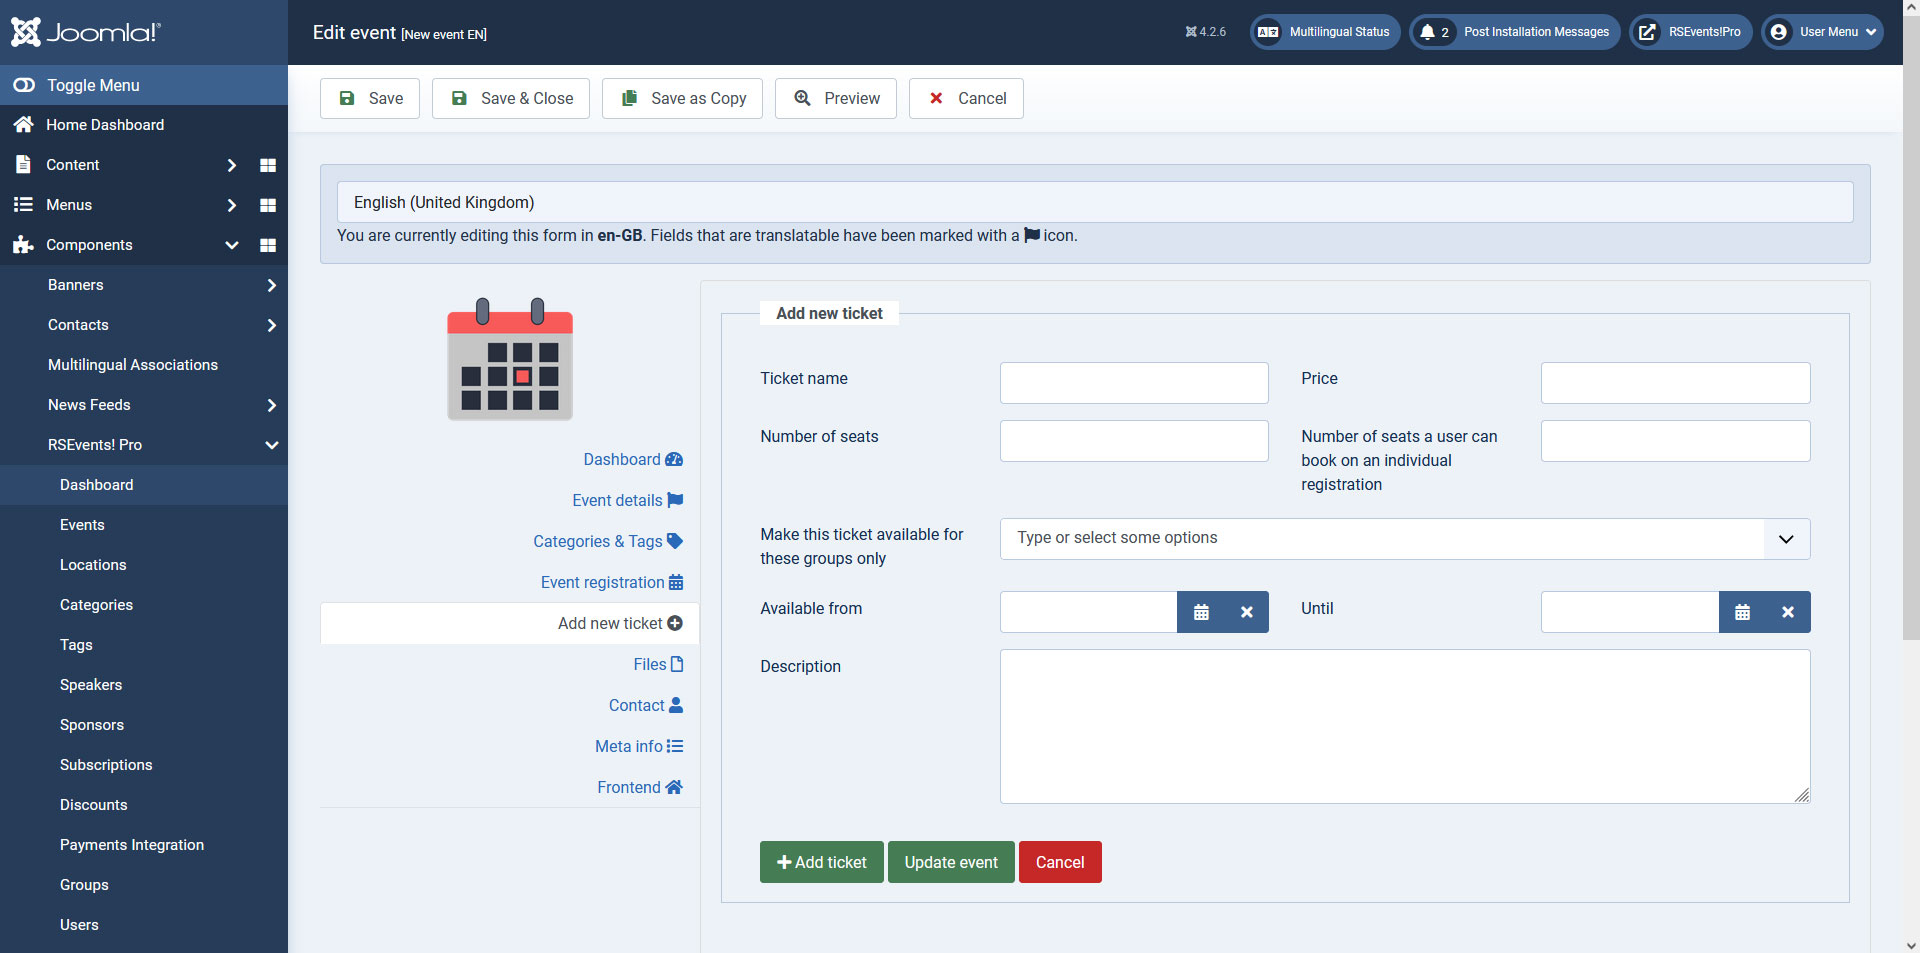
Add new ticket (optional)
If the registration (event details area) option has been enabled, you can set up tickets for your event.
- Ticket name: the name of the ticket. This will be displayed within the registration form.
- Price: the price of the actual ticket. You can use two decimals. Example: 25.50. Note that currency should not be added. This is configurable within the RSEvents!Pro Settings area.
- Number of seats: this is basically the ticket count. If you wish to have unlimited seats, simply type in Unlimited or 0 (zero).
- Number of seats a user can book: this the maximum amount of tickets (of this type) that a user can order.
- Make this ticket available for these groups only: You can select which RSEvents!Pro groups will be able to see (and purchase) the ticket.
- Description: this is a simple text area that allows you to type in a description for the ticket. This will be displayed during the registration process.
Once a ticket has been saved, this will appear below the New Ticket label. Accessing the ticket tab displays additional configuration about the ticket separated in 3 areas:
1. General: this displays the above options where you can edit the actual ticket information.
2. Custom fields: available while using the "RSEvents!Pro Cart" plugin. This allows adding custom fields to your event registration, per individual tickets (you can choose between Textbox, Texarea, Dropdown, Radio, Checkbox, Free text, File upload, Calendar or hidden form elements).
3. Conditional Fields: available while using the "RSEvents!Pro Cart" plugin. This allows to either Show or Hide Custom Fields based on user's selection.
4. Ticket info: available while using the "RSEvents!Pro Cart" plugin. This allows using or overriding the {TicketInfo} placeholder. Other placeholders can be added as well, more precisely: {TicketName}, {TicketPrice}, {TicketSeat}.
5. Ticket layout: available while using the "RSEvents!Pro Ticket PDF" plugin. This allows you to attach a PDF file to the subscription activation email. The content of the actual PDF can be configured here.

You can change your tickets order by simply drag and dropping them vertically while editing an event.
When adding Custom fields to your event tickets, available while using the "RSEvents!Pro Cart" plugin, you can also use:
- [c] (radio, dropdown, checkbox) - check an item by default. E.g.: myItem[c]
- [d] (radio, dropdown, checkbox) - disable an item. E.g.: myItem[d]
- [p ] (radio, dropdown, checkbox) - add a price to an item. E.g. this has a price of 10: myItem[p10]
- [g] (dropdown) - select options can be grouped and the group title can't be selected. E.g. marking an item as a group title: myItem[g]
You can also generate your items or field values via scripting by using PHP code within the default Value area, for example (this has to be enclosed using //<code> tags):
    //<code>
    $myVariable = 'stringExample';
    return $myVariable;
    //</code>
Recurring (optional)
If the Recurring option has been checked within the Event details area, this screen will become available. RSEvents!Pro offers the necessary tools to cover all aspects regarding recurring events.
- Repeat every: days / weeks / months / years - allows you to specify an interval and time frame. Example - repeat every 2 weeks. Choosing months will allow selecting, in the Repeat on field (explained below), a scenario in which, for example, you can repeat an event every 3rd Friday of each month.
- End repeat: allows you to set on which date the repeat process will end.
- Repeat on: allows you to select the days on which the events will be repeated (from Monday to Sunday). This is available for the daily, weekly and monthly repeating time frames only.
- Repeat also on: if you don't have a fixed interval for repeating events, you can select the actual dates on when the event will occur.
- Apply changes to all occurrences: by checking this option during the event editing process, you can choose to apply the modifications to all instances of your repeated event.
- Show repeated events: This is a drop-down menu that contains all of the child events, along with their start date and end date. Only available when editing a parent event.
Find out how to create recurring events here.

Using the repeating events feature, implies that event duplicates will be created.
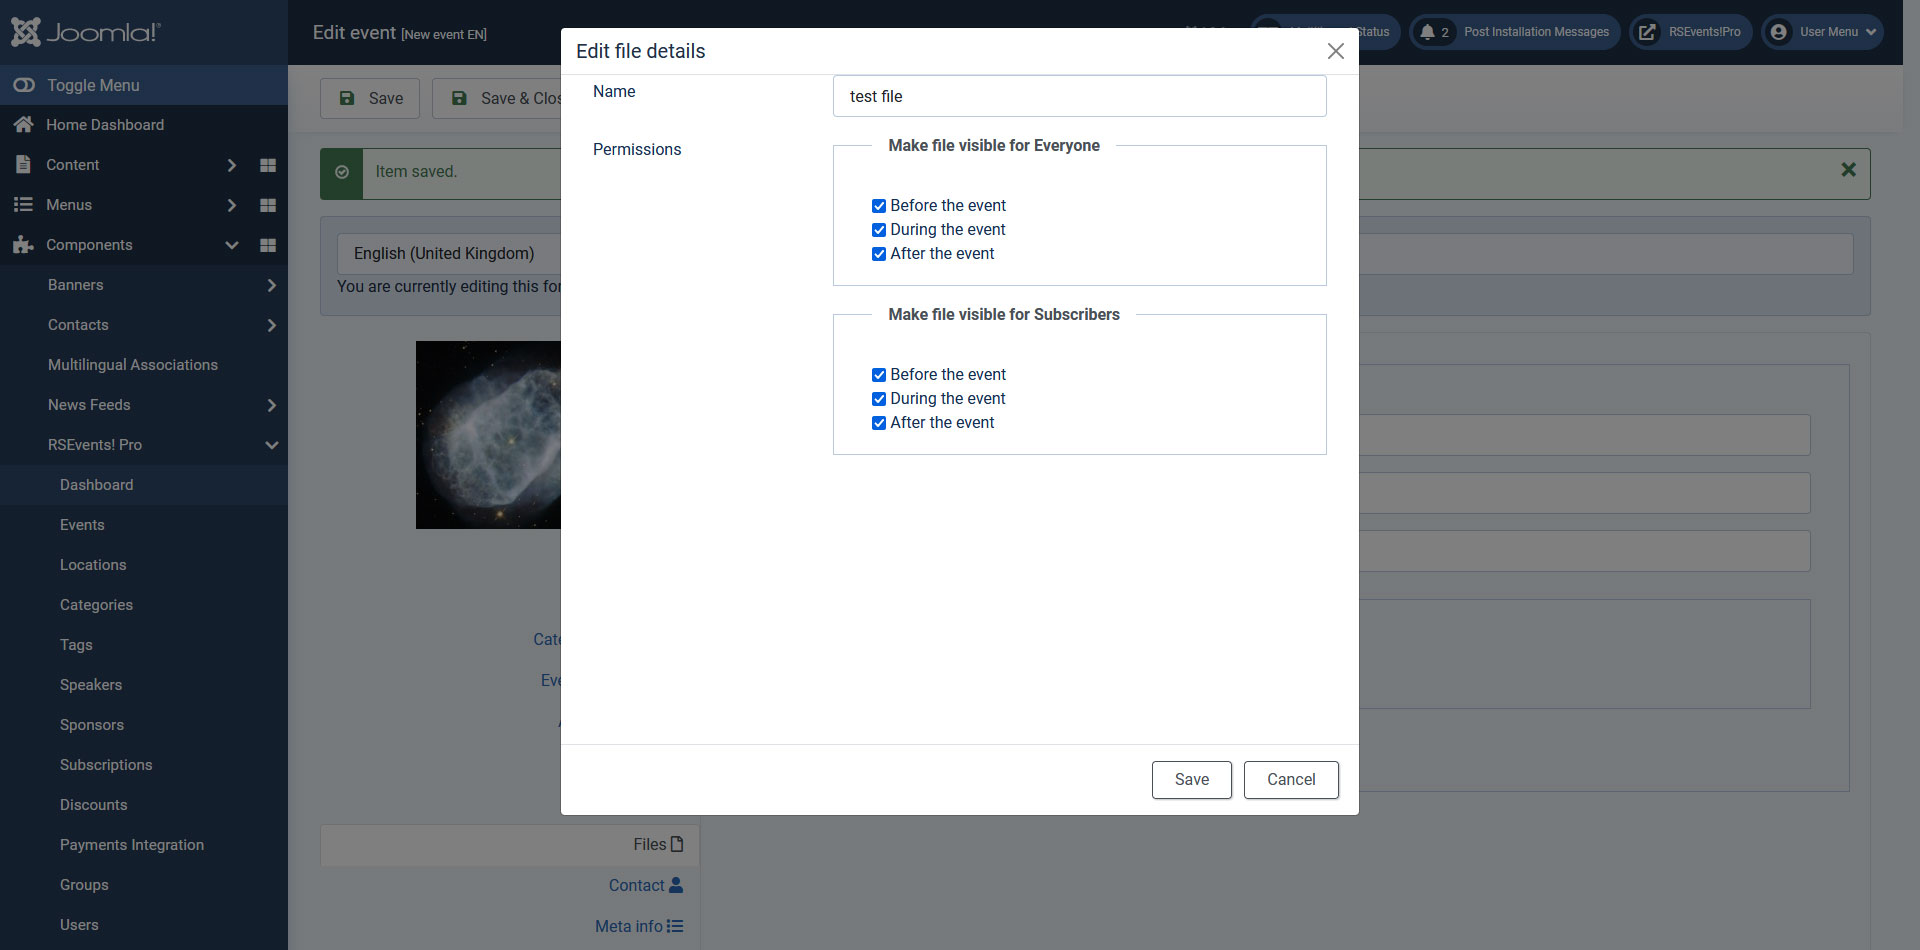
Files
For each event you can add some downloadable files. By default, these will be listed below the main event information. You can add as many files as you need, by clicking on the Add more files button.

You can edit each uploaded file and configure its:
- Name
- Permissions:
- Before the event
- During the event
- After the event
- Before the event
- During the event
- After the event
Make file visible for Everyone
Make file visible for Everyone
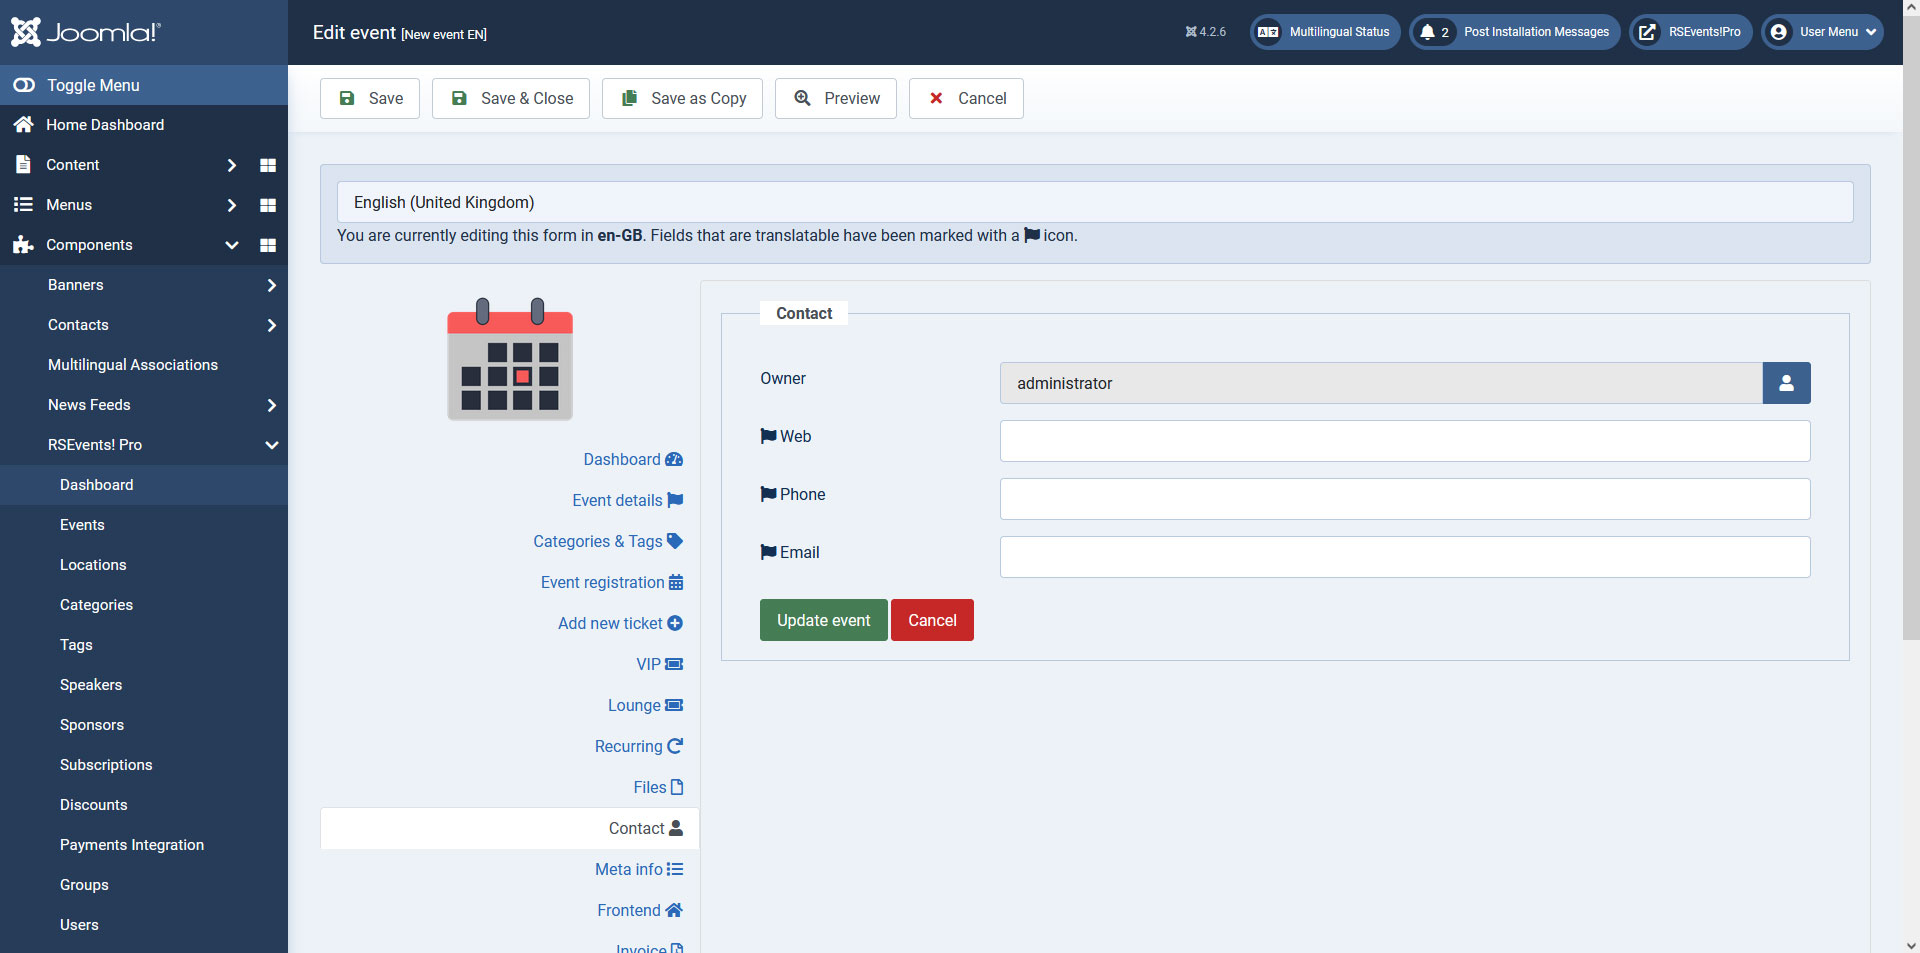
Contact
The event contact information can be specified here. Here you can add / adjust the event owner, web address, phone and a contact email address.
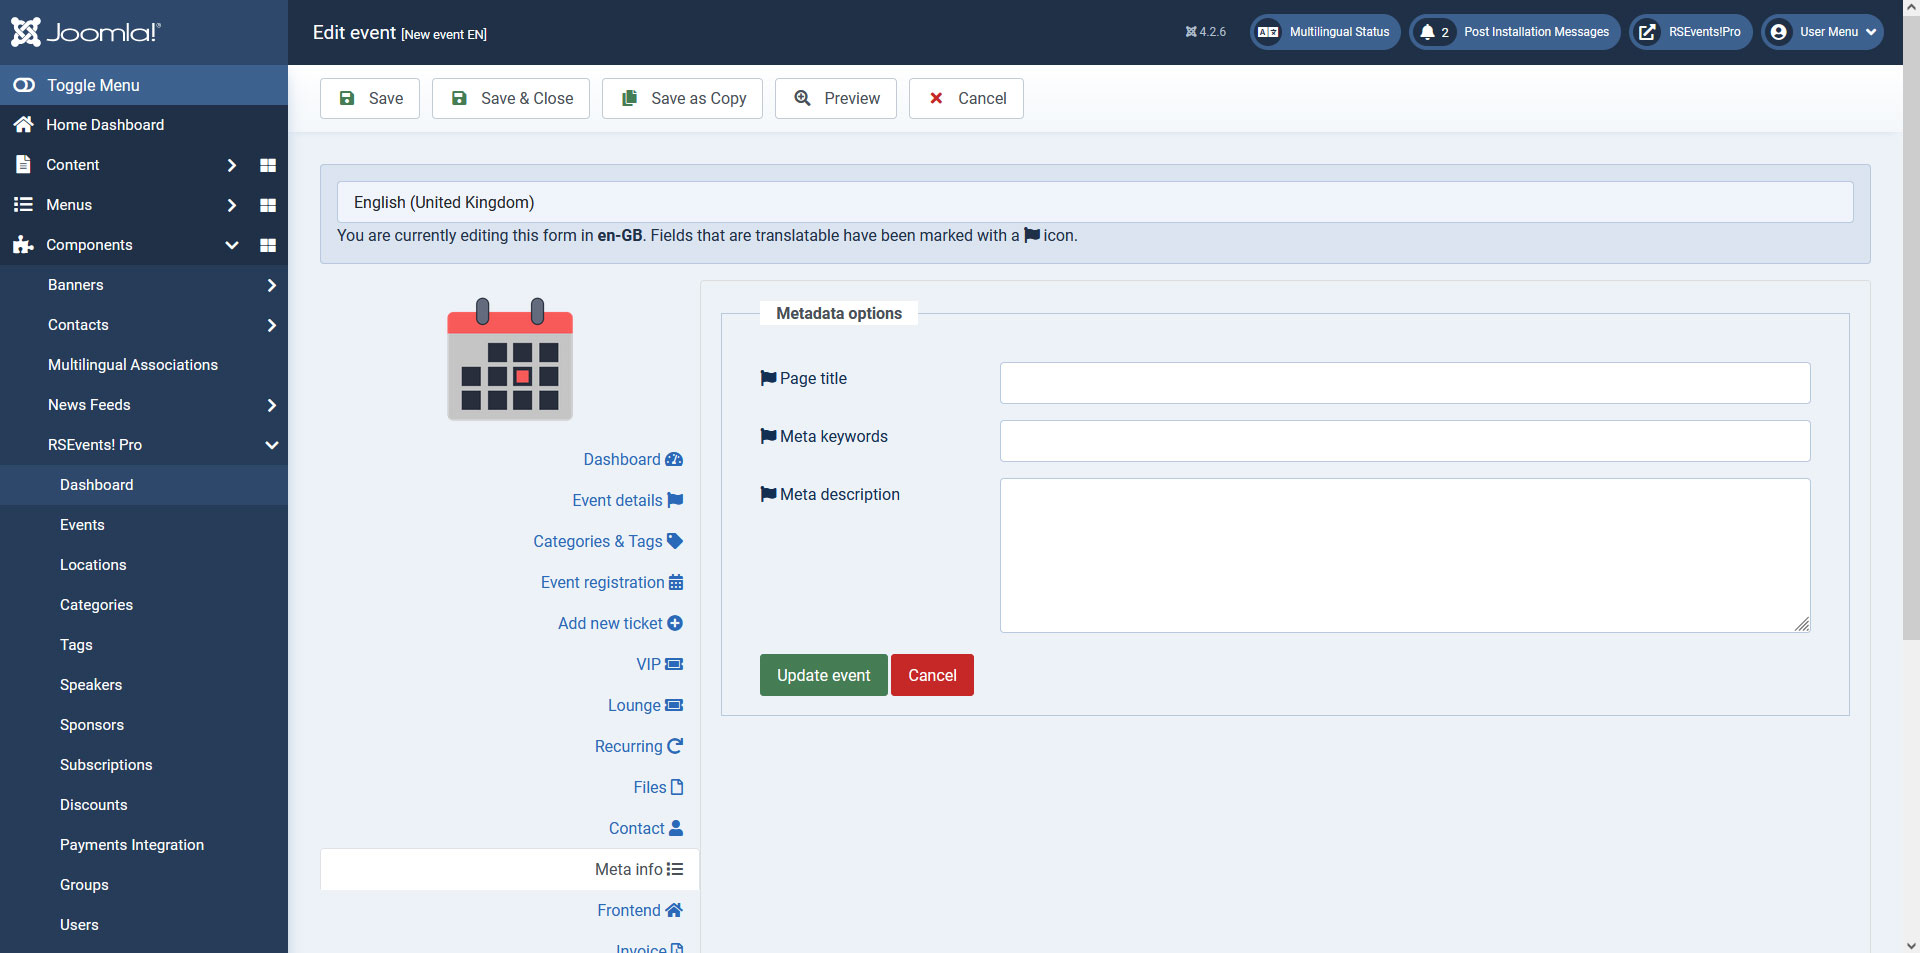
Meta info
Standard meta data information can be specified here: title, keywords and description. You can also use event related placeholders such as the following:
| Placeholder name | Description |
|---|---|
| {EventName} | this placeholder will return the name of the event |
| {EventDescription} | the event description |
| {EventSmallDescription} | the event small description |
| {EventStartDate} | this will output the event Start date and time |
| {EventStartDateOnly} | this will return only the event start date, without the time |
| {EventStartTime} | the event start time, without the date |
| {EventEndDate} | the event end date and time |
| {EventEndDateOnly} | only the event end date will be returned, without the time |
| {EventEndTime} | the end time, without the end date |
| {Owner} | the event owner |
| {OwnerUsername} | the event owner username |
| {OwnerName} | the event owner name |
| {OwnerEmail} | the event owner email address |
| {EventPhone} | the event phone number |
| {EventEmail} | the event email address |
| {LocationName} | the event location name |
| {LocationLink} | the location link |
| {LocationDescription} | this will output the location description |
| {LocationURL} | the location URL |
| {LocationAddress} | the address oh the location |
| {EventCategories} | the event categories on which this is assigned |
| {EventTags} | the assigned event tags |
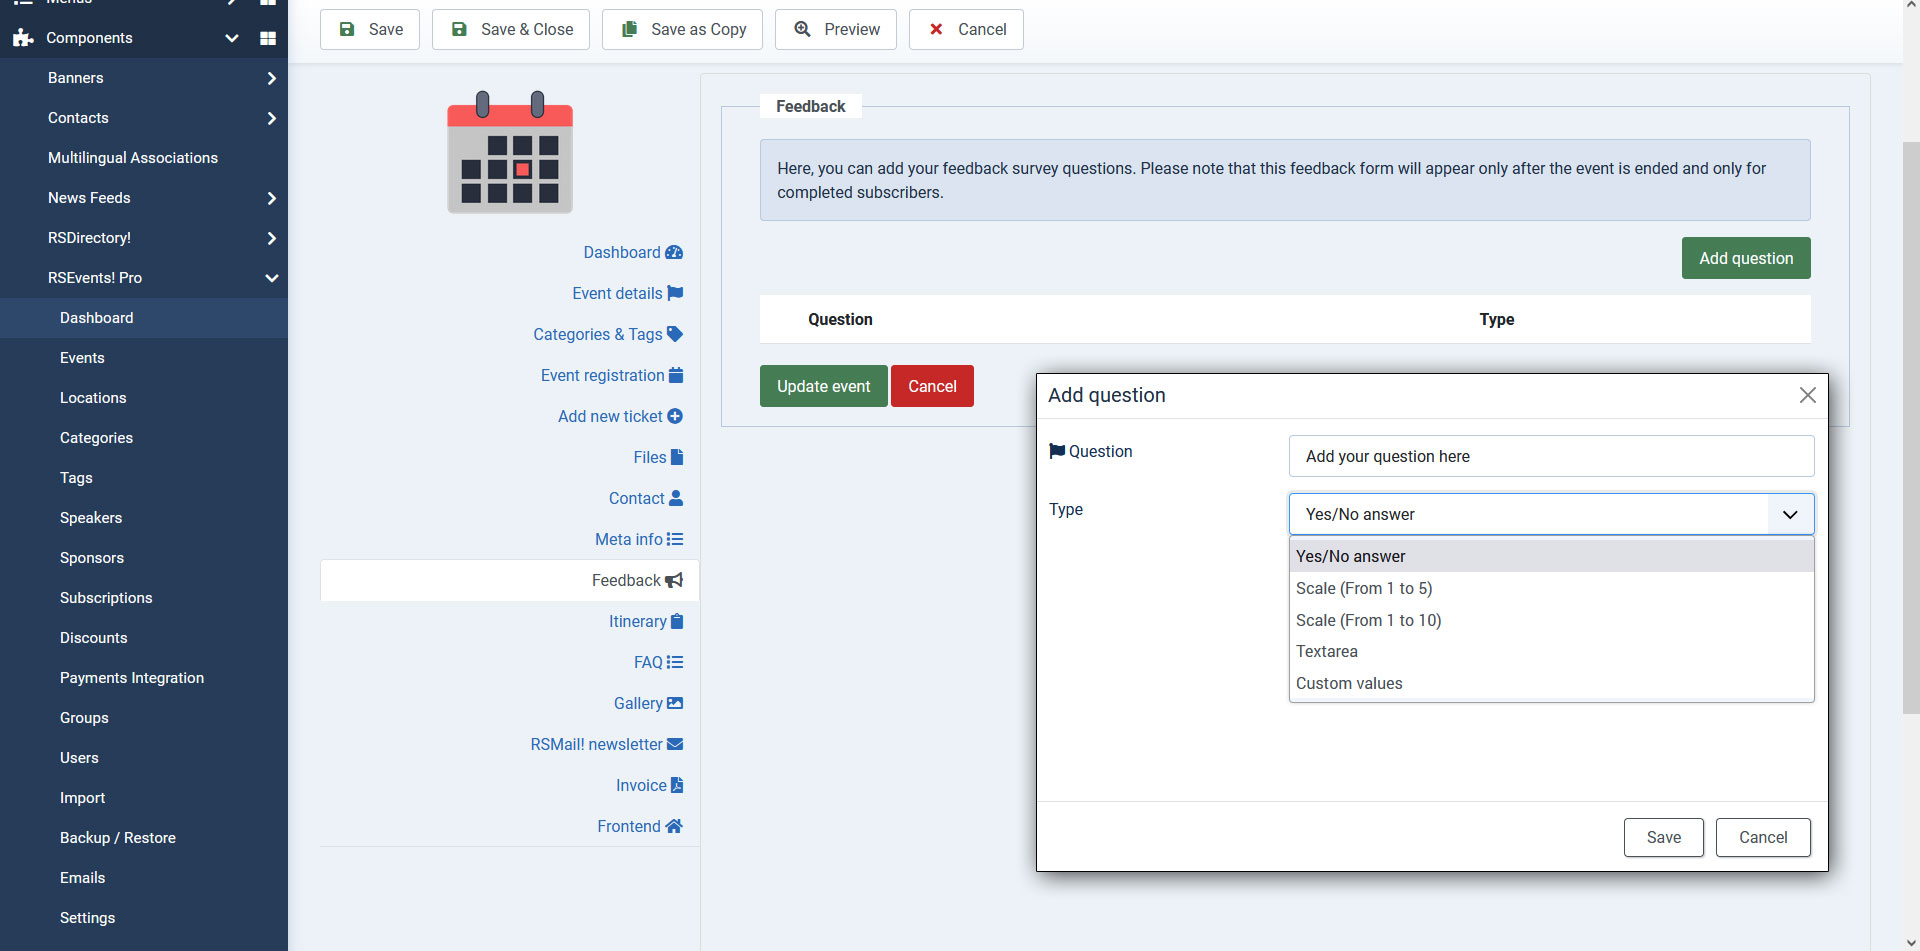
Feedback
Here, you can add your feedback survey questions. Please note that this feedback form will appear only after the event is ended and only for completed subscribers.
Available options while adding a question:
- Question - add your feedback question here
- Type - select from 'Yes/No answer' / 'Scale (from 1 to 5)' / 'Scale (from 1 to 10)' / 'Textarea' / 'Custom values'.
- Values - when the above 'Custom Values' is selected, you can add each option on a new separate line.
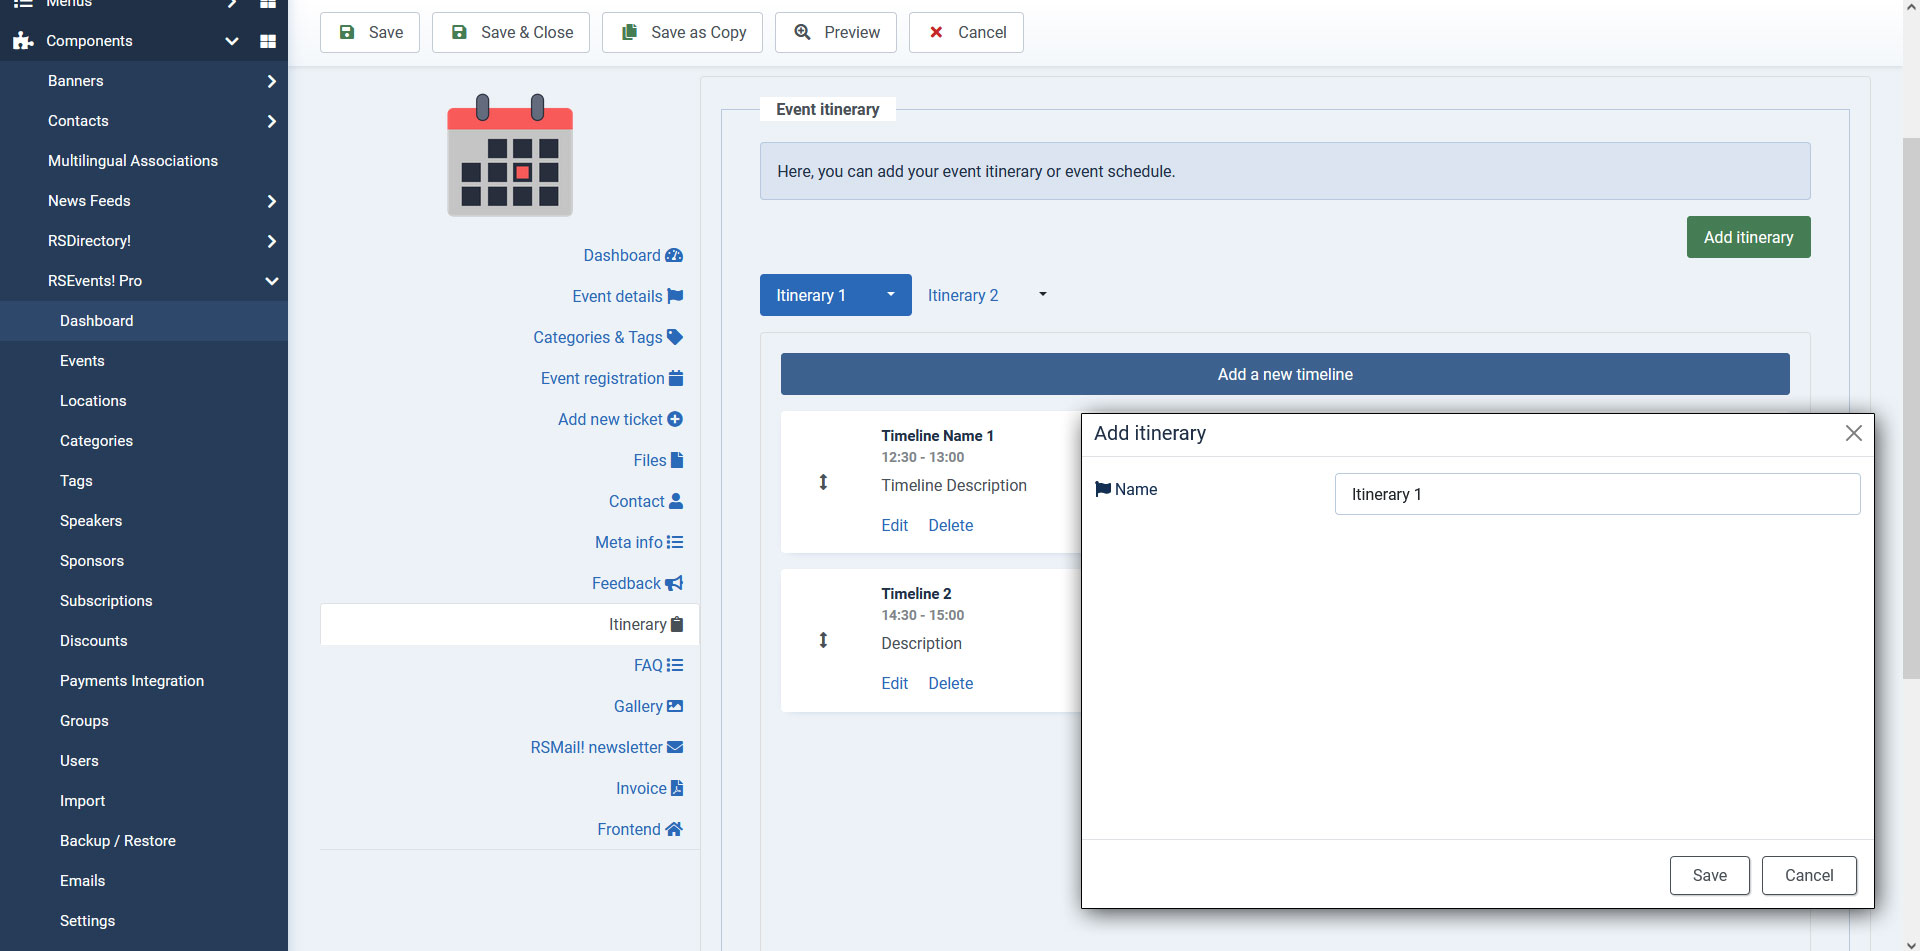
Itinerary
Here, you can add your event itinerary or event schedule.
Available options while adding an itinerary:
- Name - add your itinerary name here
- Add a new timeline - for each itinerary you can add a timeline where you can configure the following options:
- Name - the timeline name
- Start - the timeline start
- End - the timeline end
- Description - the timeline description
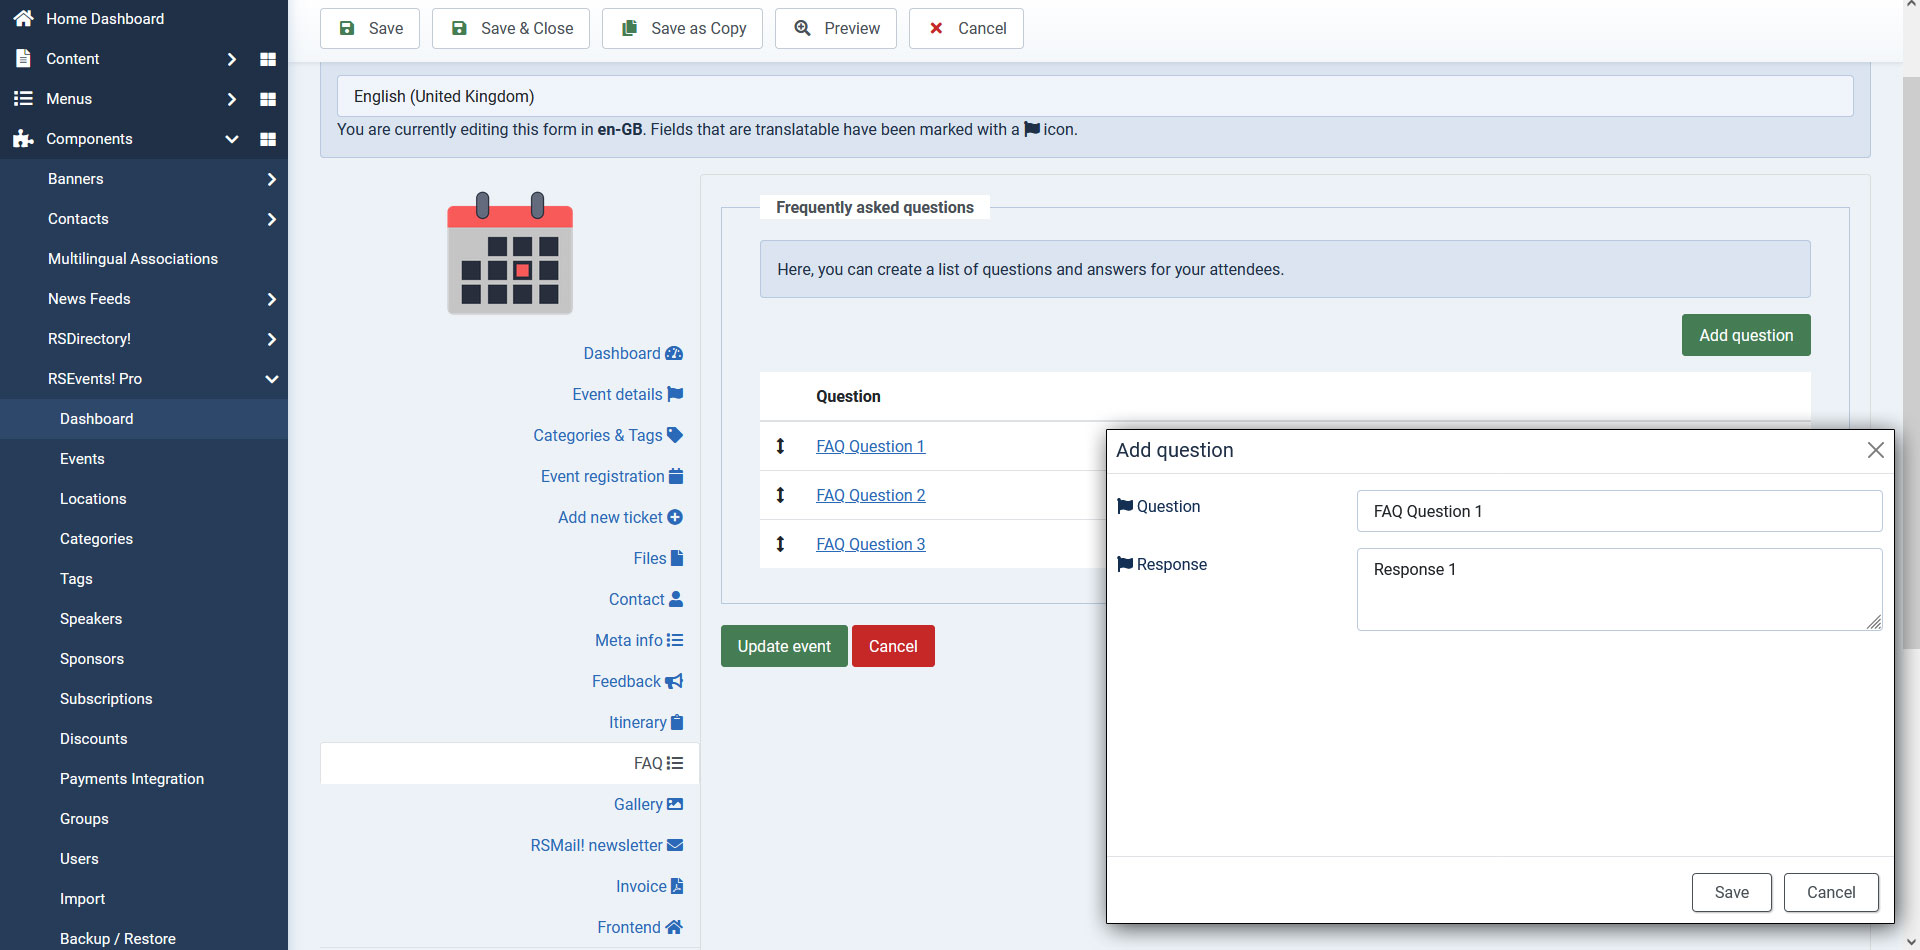
FAQ
Here, you can create a list of questions and answers for your attendees.
Available options while adding a question:
- Question - add your question here
- Response - add your response here
Rich Snippets
The following Rich Snippets are used to provide additional valuable information within the event's structured data.
| Name | Description |
|---|---|
| field "name" | the event title |
| field "endDate" | the event Ending date |
| field "url" | the event URL |
| field "image" | the event photo URL will be displayed |
| field "description" | description of the event |
| field "eventAttendaceMode" | will be displayed properly if you have the latest component version installed |
| field "eventStatus" | automatic added http://schema.org/EventScheduled |
| field "location" "Place" | the event Location name |
| field "address" | this will be populated from the Location field |
| field "offer" | will be displayed if your events has tickets assigned |
| field "performer" | will be displayed if you have event sponsors |
| field "organizer" | this is optional and the component does not add any information regarding this field |
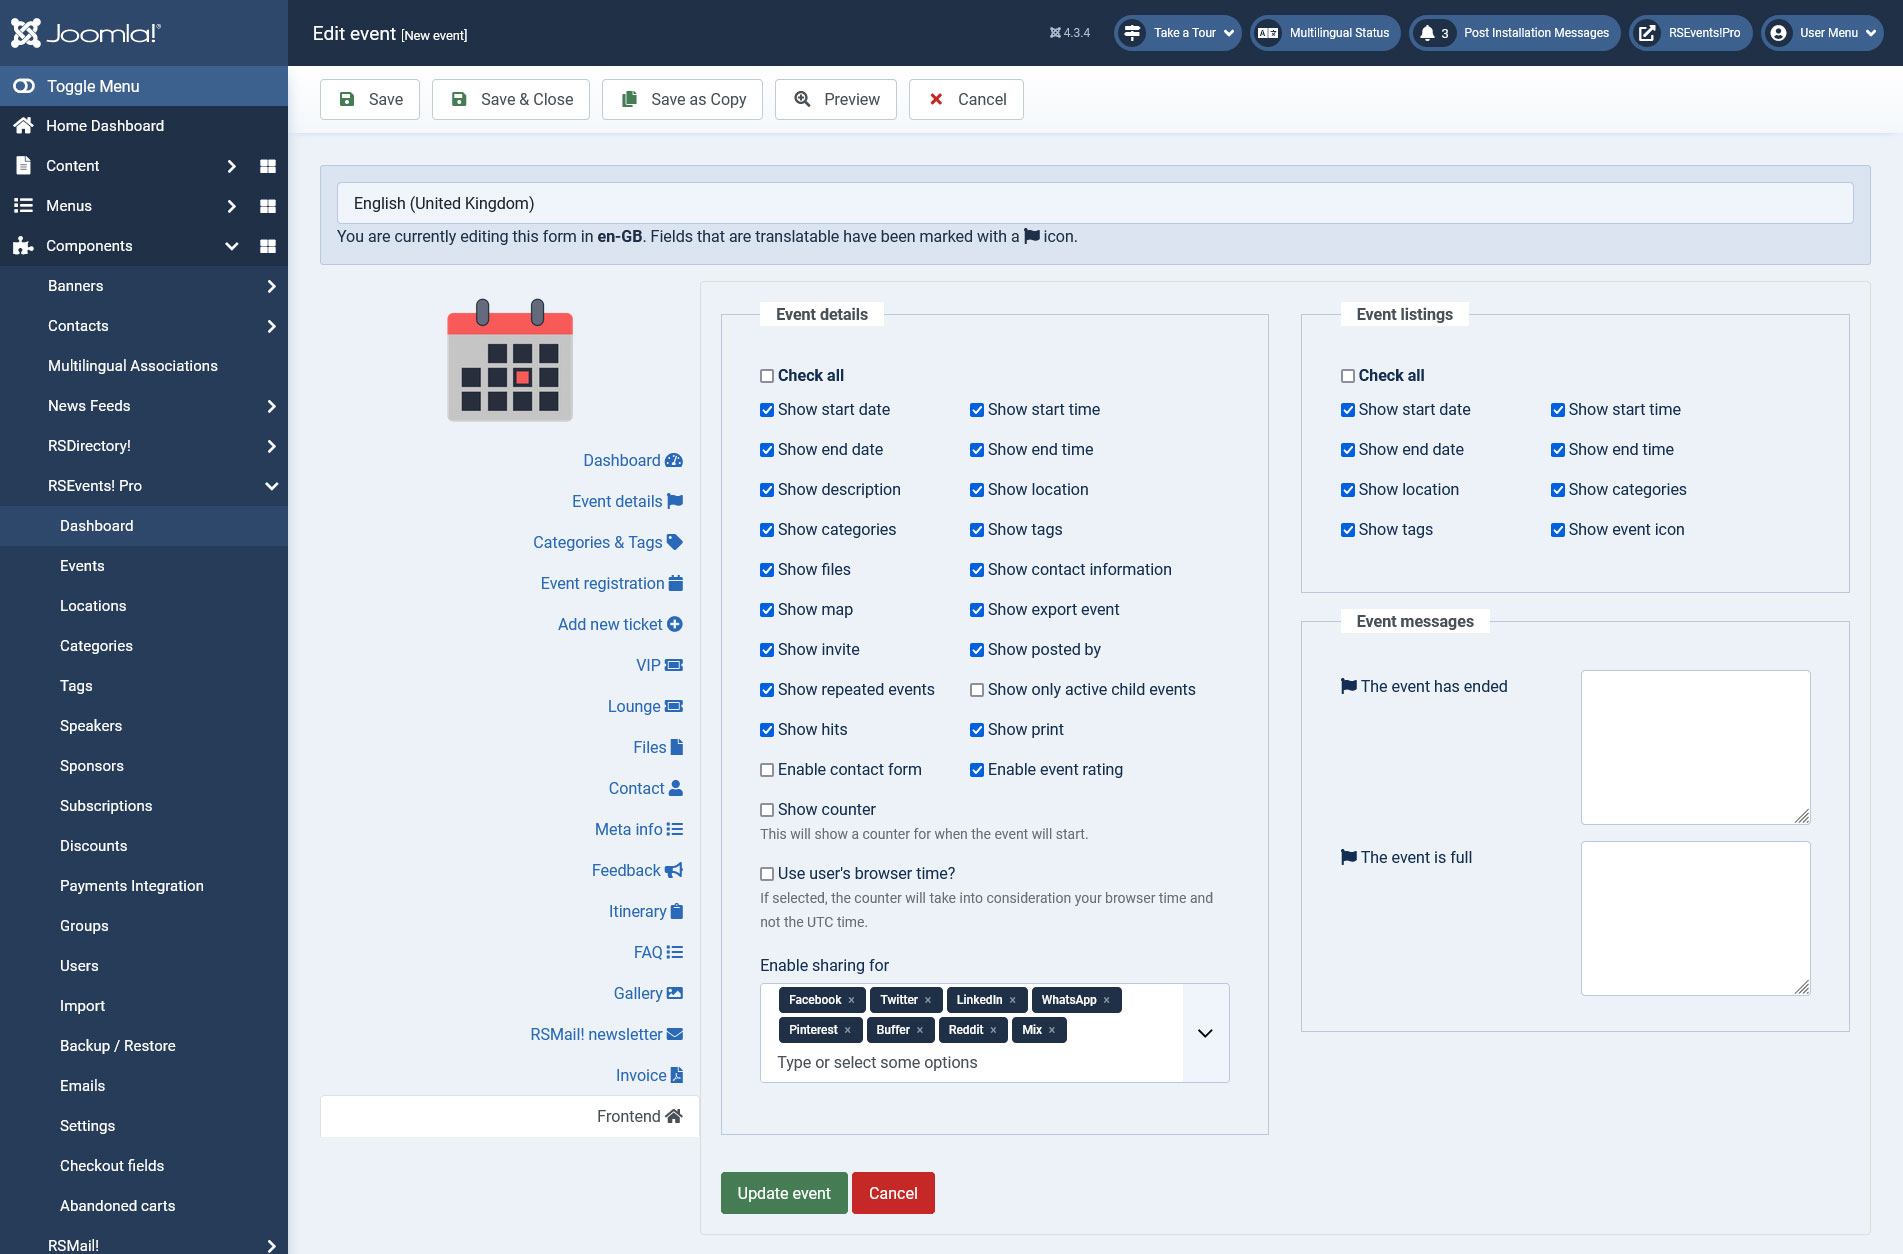
Frontend
The Frontend configuration options allows you to control what is displayed on the event details page.
Event details
- Show start date: the start date of the event will be displayed. The format will be according to the RSEvents!Pro date format setting.
- Show start time: If checked, the event's start time will be displayed both in the events listing and on the event page. Un-check if you wish to not have it displayed.
- Show end date: the end date will be displayed.
- Show end time: If checked, the event's end time will be displayed both in the events listing and on the event page. Un-check if you wish to not have it displayed.
- Show description: the event description will be displayed.
- Show location: location info will be displayed.
- Show categories: the categories in which the event has been published. Note that you can assign an event to multiple categories.
- Show tags: enabling this option will display the tags of the event.
- Show files: enabling this will display a download link for each of the configured event files.
- Show contact information: having this enabled will display the information added within the Contact area.
- Show map: if the Google Maps is being used, you can choose whether to display it or not.
- Show export event: if enabled, an export to calendar option will be displayed. This generates a standard ICS file.
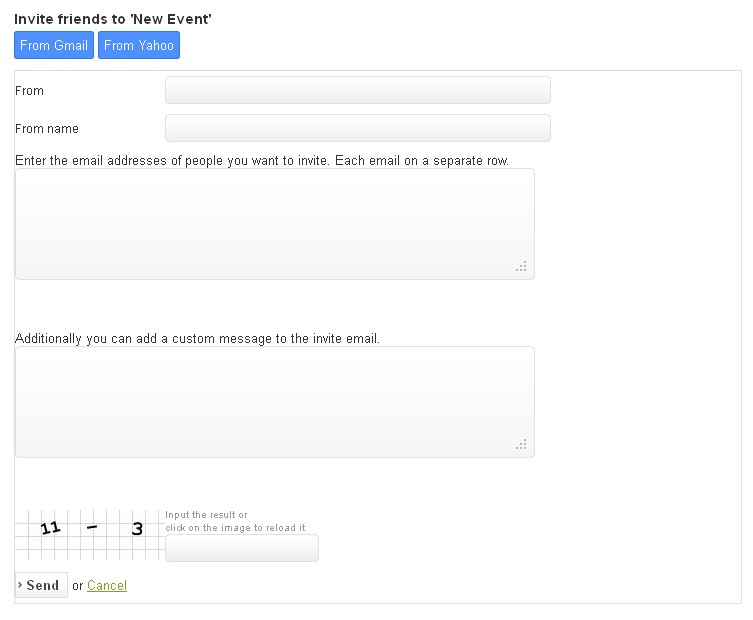
- Show invite: if enabled, an invite button will be displayed on the event details page. Clicking on it will open a standard invitation form. This also allows you to import contact from Gmail and Yahoo (follow these steps in order to enable the Gmail contacts invite functionality).
- Show posted by: if enabled, the event poster will be displayed within the front-end area.
- Show repeated events: Check this option to show all of the event's repetitions on the event page
- Show only active child events: Check this option to show only the active child events on the event page
- Show hits: Check this option to show the number of times the event's page was accessed
- Show print: Check this option to add a Print button to the event's page
- Show counter: This will show a counter for when the event will start.
- Use user's browser time?: If checked, the counter will take into consideration your browser time and not the UTC time.
- Enable contact form: This will show a contact form which can be used to contact the event owner.
- Enable event rating: if enabled, this will allow you to grade the event from a scale of 1 to 5 (star pattern).
- Enable sharing for: choose from the following available options: Facebook, Twitter, LinkedIn, WhatsApp, Pinterest, Buffer, Reddit, Mix.
Event listings
Set up what information should be displayed in the event listings
- Show start date: Display the event's starting date
- Show start time: Display the event's starting time
- Show end date: Display the event's ending date
- Show end time: Display the event's ending time
- Show location: Display the event's location
- Show categories: Display the categories that the event is associated with
- Show tags: Display the event's tags
- Show event icon: Display the event's icon
Event details and event listing areas now provides a 'Check All' box which can be used to check or uncheck all your options.
Event messages
Set up the messages you want to display when The event has ended or when The event is full
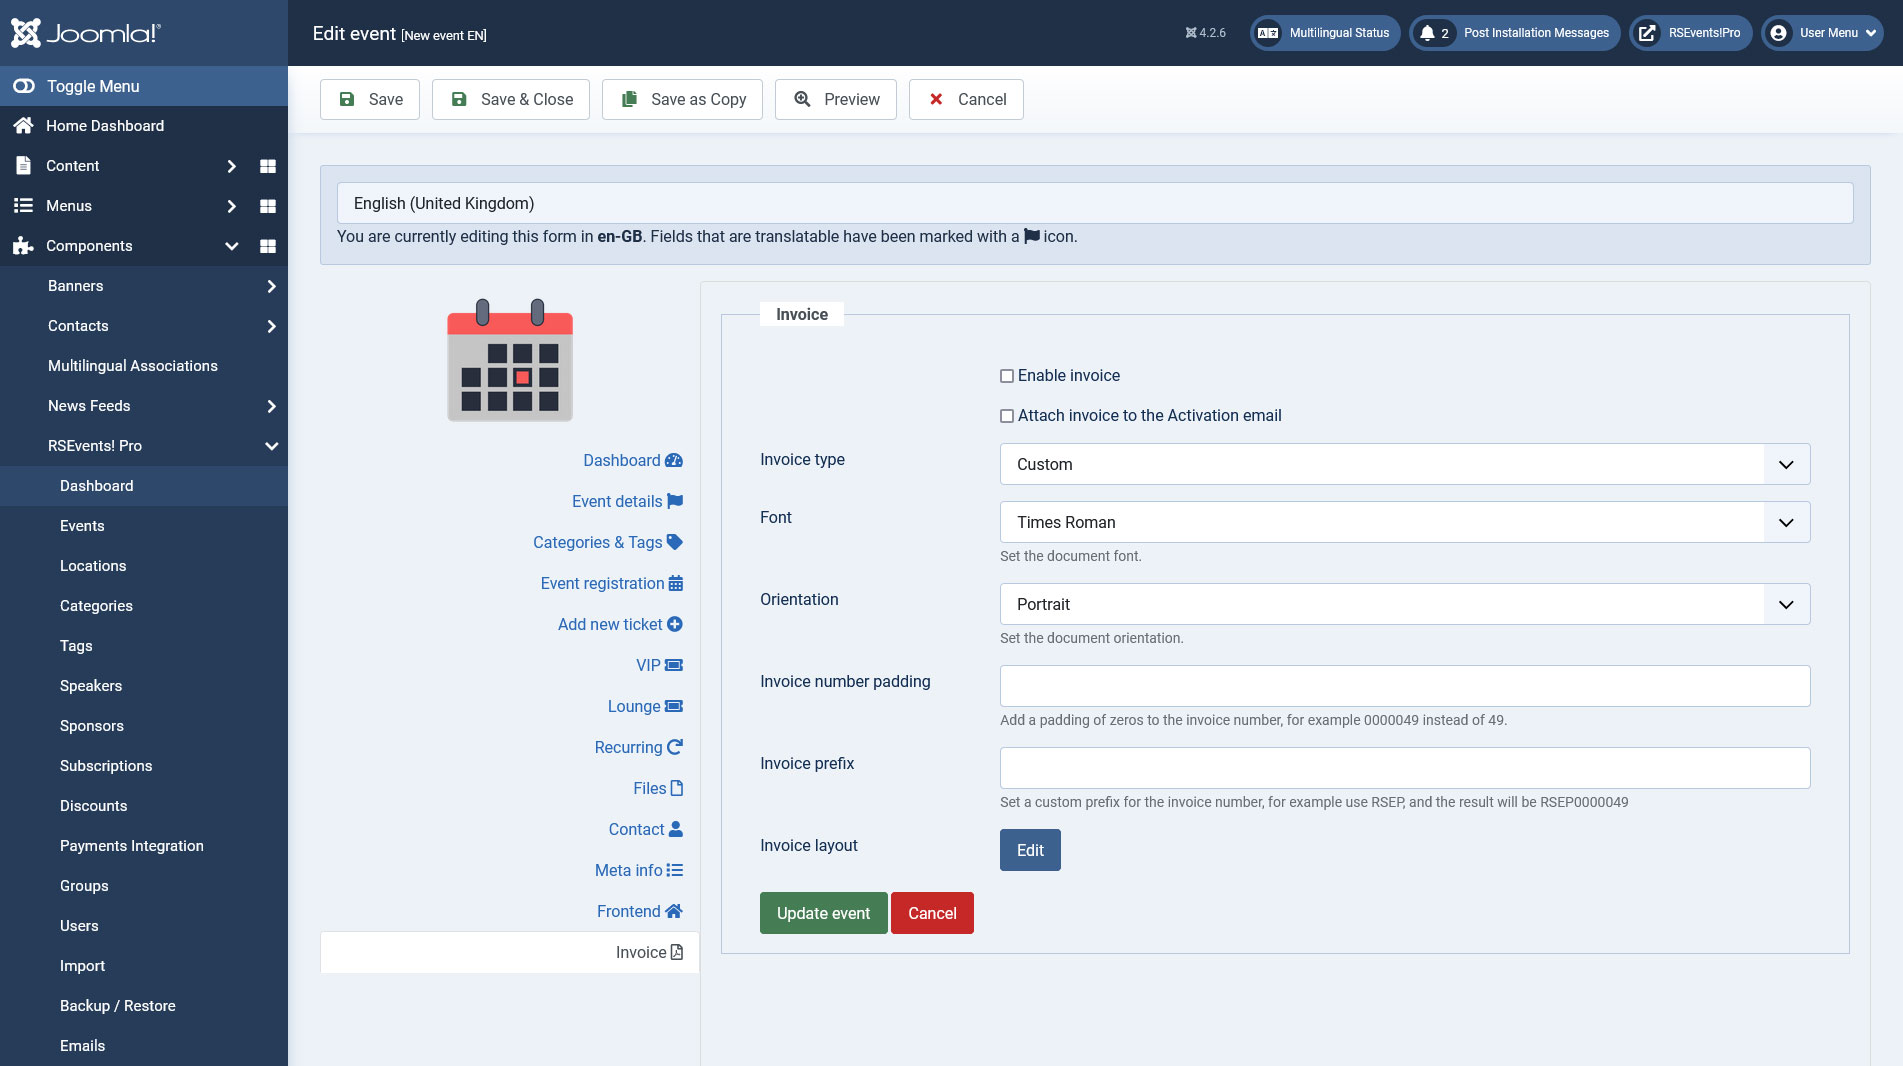
Invoice
The Invoice tab allows you to generate a PDF invoice sent out for each subscription made to a particular event. The Tickets PDF plugin is required for this to be available.
Available options:
- Enable Invoice - Check this box if you want to generate a PDF Invoice.
- Attach invoice to the Activation email
- Invoice type: - Global / Custom. The Global option will inherit the configuration setup from Components > RSEvents!Pro > Settings > Invoice area.
- Font - Choose a font to be used within the invoice.
- Orientation - Select the document orientation (Landscape or Portrait)
- Invoice number padding - Add a padding of zeros to the invoice number, for example 0000049 instead of 49.
- Invoice prefix - Set a custom prefix for the invoice number, for example use RSEP, and the result will be RSEP0000049
- Invoice title - Set the invoice title. You can also use the standard event placeholders.
- Invoice layout - Set the default invoice layout.
The following placeholders can be used:
| Placeholder name | Description |
|---|---|
| {invoice_id} | this placeholder will return the ID of the generated invoice |
| {email} | this placeholder will return the user email |
| {name} | this placeholder will return the name of the user |
| {username} | this placeholder will return the username |
| {payment} | this placeholder will return the payment method used when subscribing to the event |
| {date} | this placeholder will return the subscribing date |
| {invoice_table} | this placeholder will return the generated invoice table |
| {site_name} | this placeholder will return the site name |
| {site_url} | this placeholder will return the site url |
| {discount} | this placeholder will return the discount |
| {tax} | this placeholder will return the tax |
| {late_fee} | this placeholder will return the late fee |
| {early_fee} | this placeholder will return the early fee |
| {sitepath} | use this placeholder to display an image, you can use a similar syntax: <img src="{sitepath}/images/logo.png" /> |
If you use the RSEvents!Pro Cart Plugin and subscribe to multiple events at once, the global Invoice setup under Components > RSEvents!Pro > Settings > Invoice will be used. Otherwise, if you subscribe to a single event and you have a custom Invoice set from this event's configuration area, then this one will be taken into consideration.
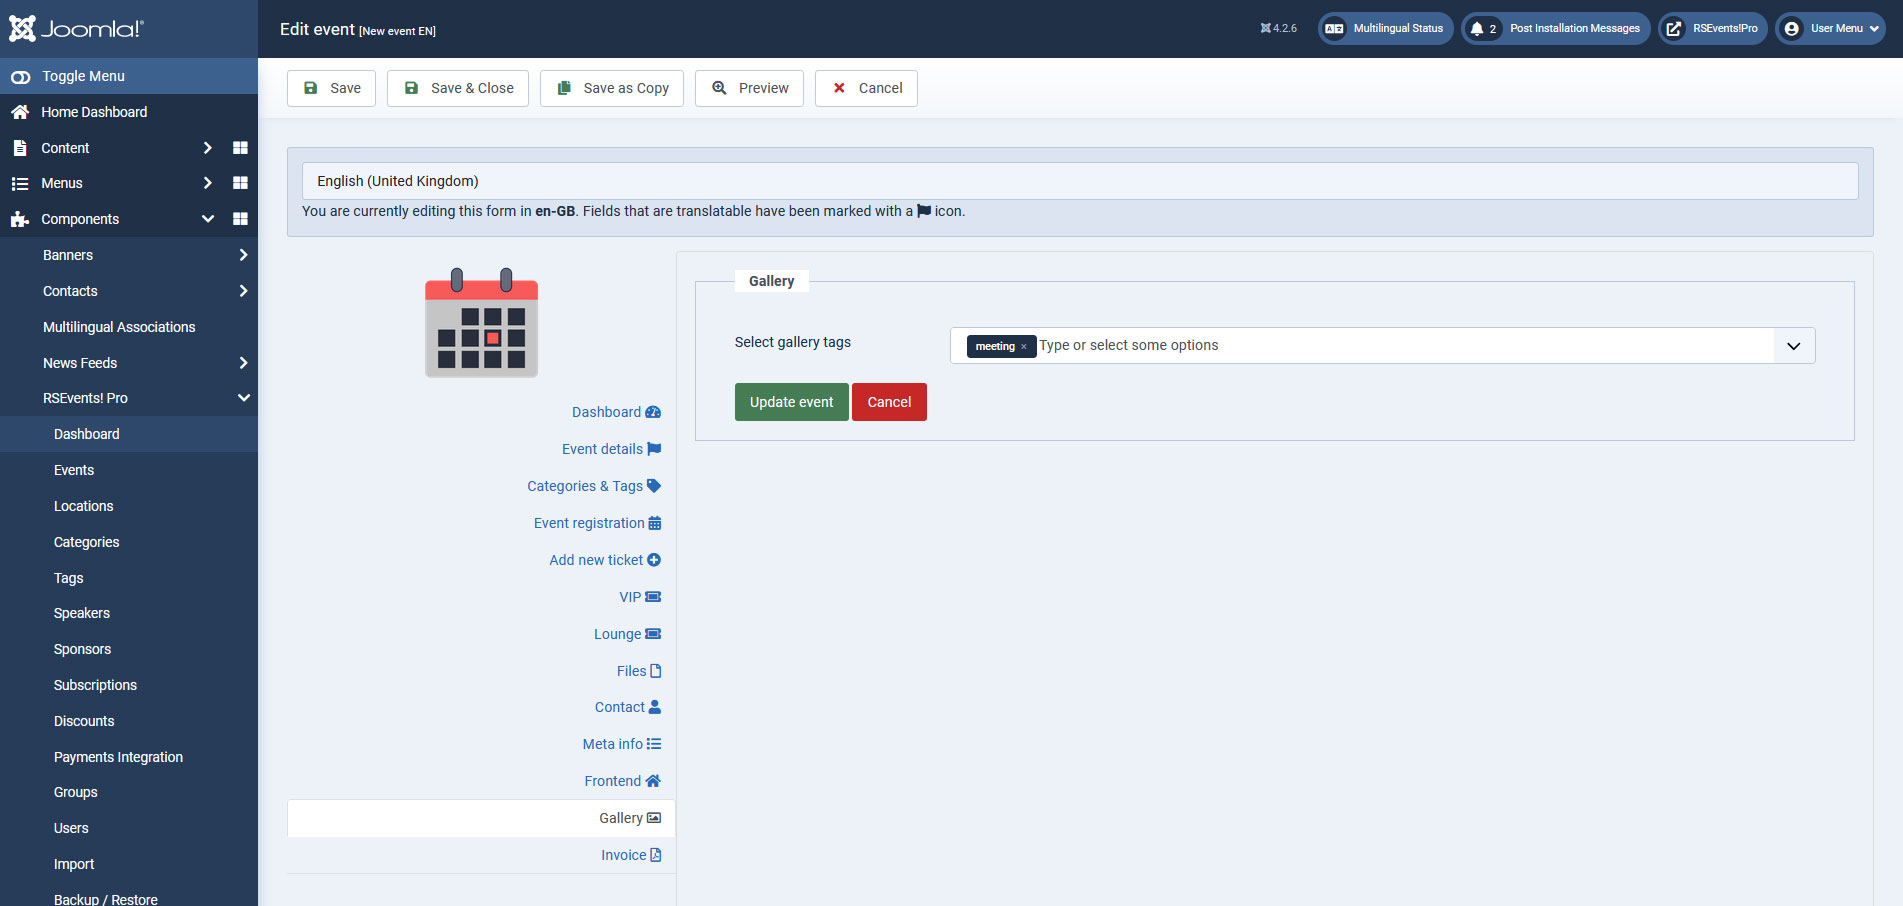
Gallery
This section has been desiged to offer an integration with our media gallery management component, RSMediaGallery!. Basically, this allows you to display event related images via RSMediaGallery!. Naturally, you will need to install RSMediaGallery! first. No integration plugin is reqired.
So, how does this work ? Head to Components > RSMediaGallery! and upload some event related images. Don't forget to assign some tags for these images. After you have done this, simply go to Components > RSEvents!Pro edit the event, open the Gallery tab and select the tags accordingly.
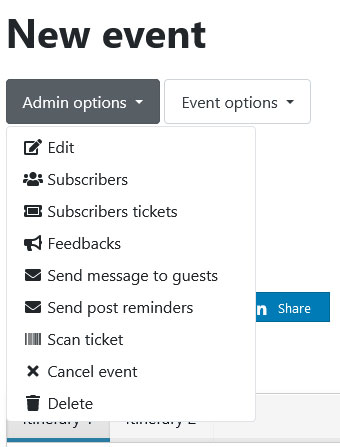
Admin Options
If you are the super administrator or the event owner, then, when accessing an event from the frontend, you will be able to access the Admin Options section of the event. Here, you will be able to access the following options:
- Edit Event: when accessing this option, you will be able to edit the event and adjust it as you wish.
- Subscribers: in this section you will be able to view the event subscribers and export them. Event subscriptions can be approved / denied / set to pending here.
- Subscribers tickets: in this section you will be able to view the tickets purchased for the event.
- Feedbacks: in this section you will be able to view the event feedbacks submitted by the registered users.
- Unsubscribers: in this section you will be able to view the unsubscribed users. These can be exported or deleted.
- Waiting list: in this area you will be able to view the users who joind your event's waiting list. Event subscriptions can be approved or deleted.
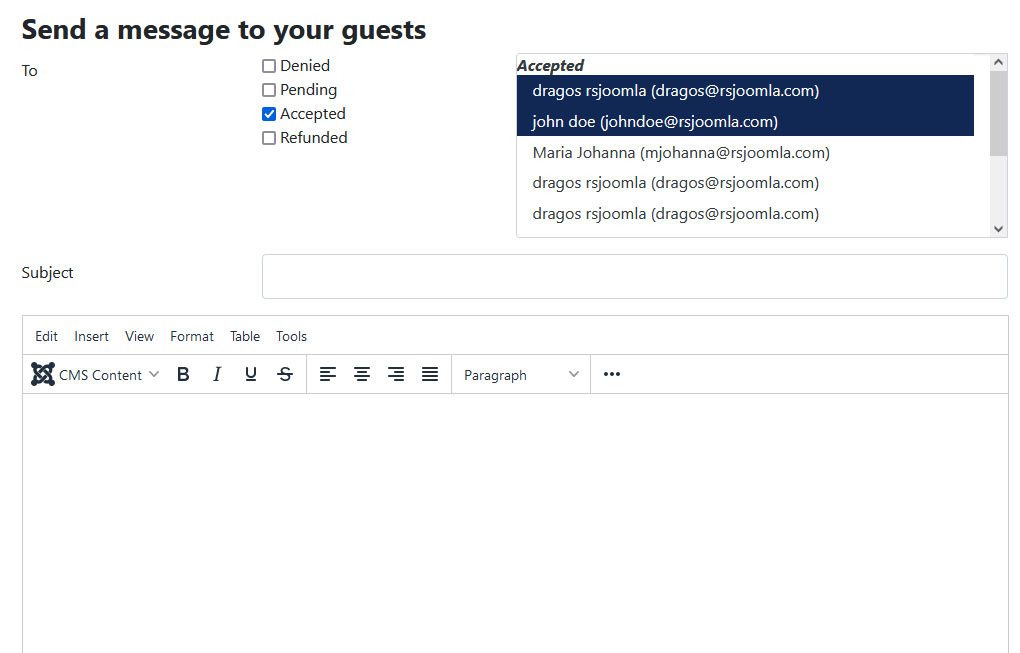
- Send Message to Guests: here you can configure a message that you can send to your event subscribers.
- Send Reminder / Post Reminder: here you will be able to send the reminder email to your subscribers. The Post Reminder option will be available for past events.
- Scan ticket: this will open the barcode scanning layout where you can enter a barcode and check if the subscription is valid.
- Cancel event: the event owner can cancel his event. This will also send an email to the subscribers telling them that this event was canceled.
- Delete Event: by accessing this option you will be able to delete the event along with it's subscribers.
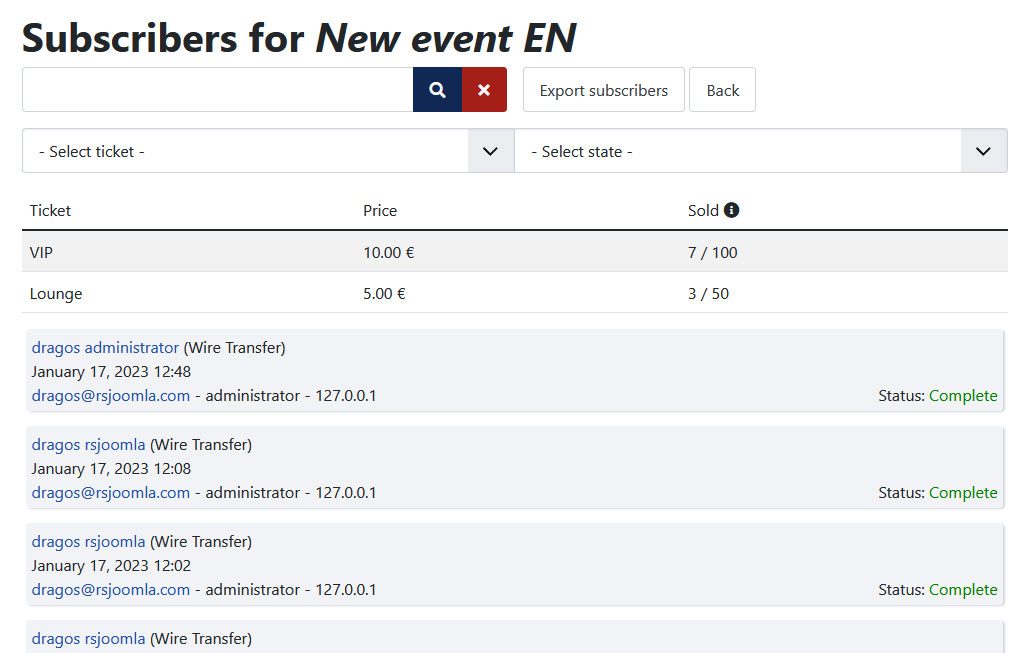
In the Subscribers layout, event owners can set the status of a subscription to Approved / Denied / Pending / Refund by clicking on the icons associated with each subscription (as seen in the third image to the right).
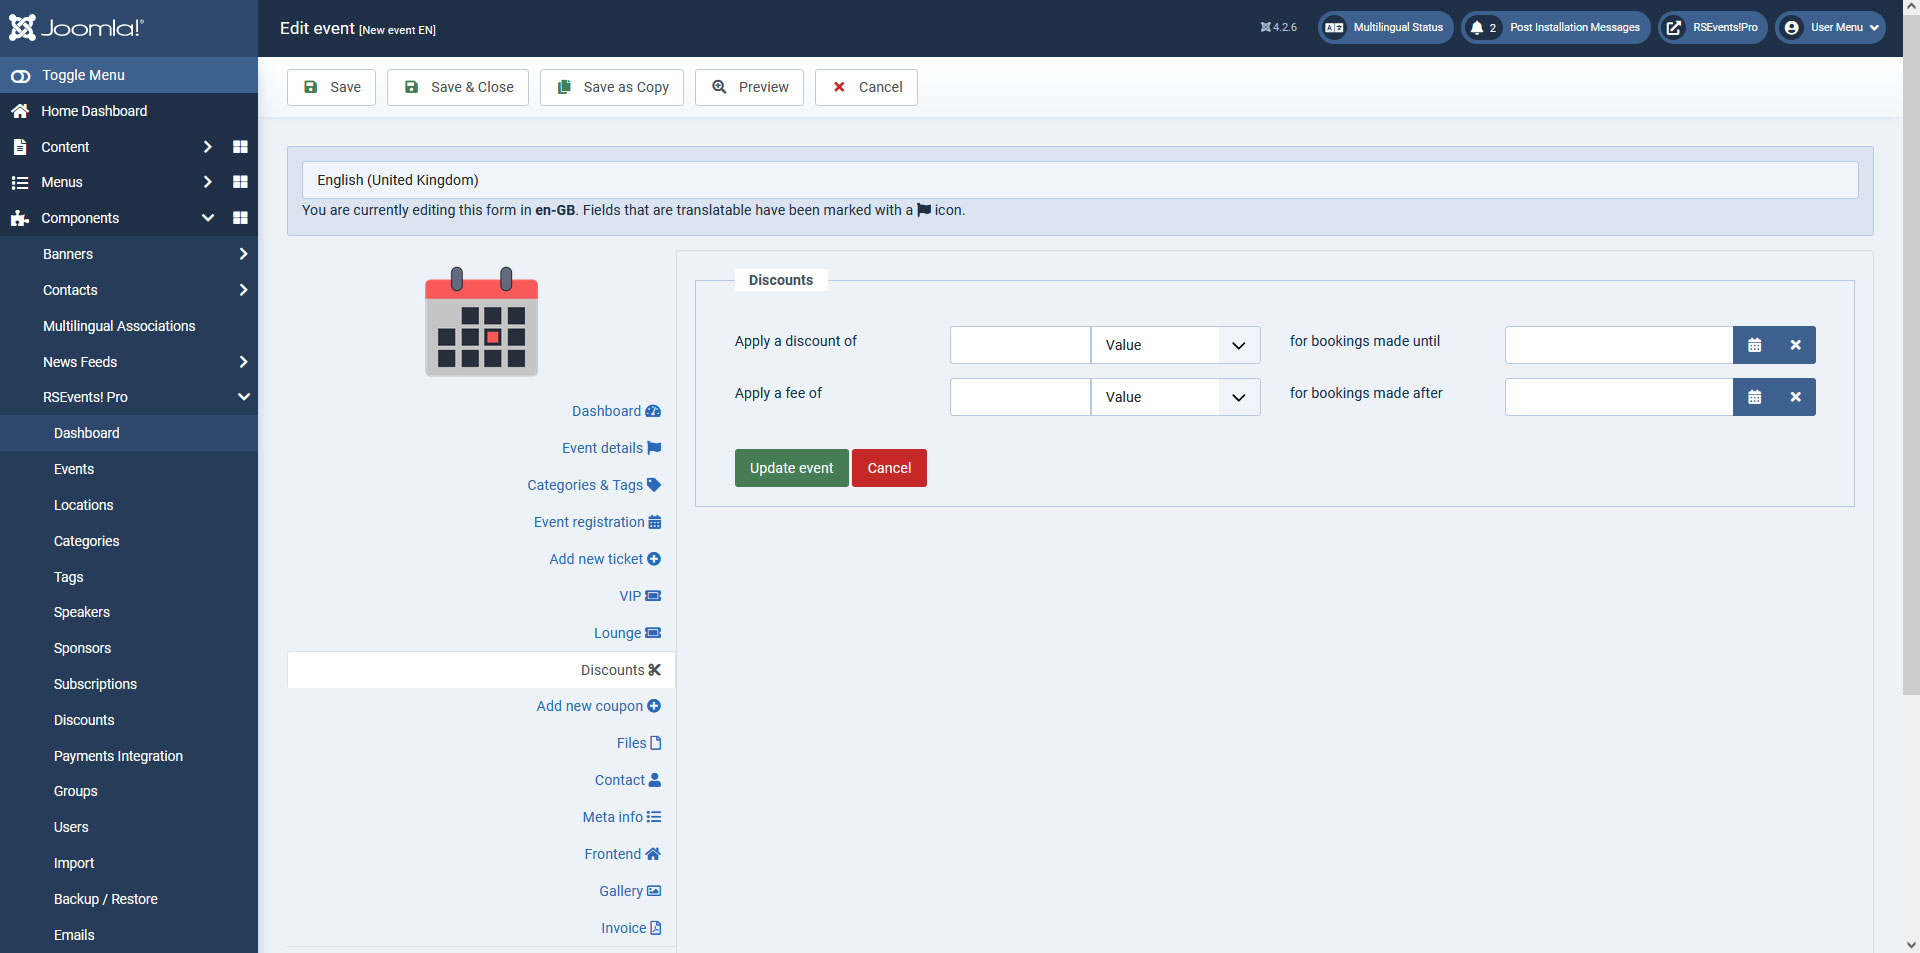
Discounts and coupons
Checking the "Enable discounts" option in the "Event registration" tab will open the "Discounts" and "New Coupon" tabs.
Discounts tab
- Apply a discount of (choose value) for events registrations made until (set date): This setting allows you to apply a discount of a chosen amount / percentage for bookings made until a set date.
- Apply a fee of (choose value) for events registrations made after (set date): Used for applying a fee of a chosen amount / percentage for bookings made after a set date.
Add new coupon tab
In this tab you can define discount coupons with the following configuration options:
- Name: the name of the discount coupon.
- Coupon codes: automatically generates coupon codes. You can choose the amount of coupon codes to be generated.
- Coupon availability: set a start and an end date for the coupon's availability.
- Max usage: the maximum number of times a coupon can be used. Type Unlimited for unlimited use.
- Apply a discount of: here you can choose whether to apply a fixed discount or a percentage of the total amount to a single ticket or to all events tickets.
- Apply discount instantly to: The discount will be automatically applied to all users that belong to one or more RSEvents!Pro groups that you can select from a drop-down menu.

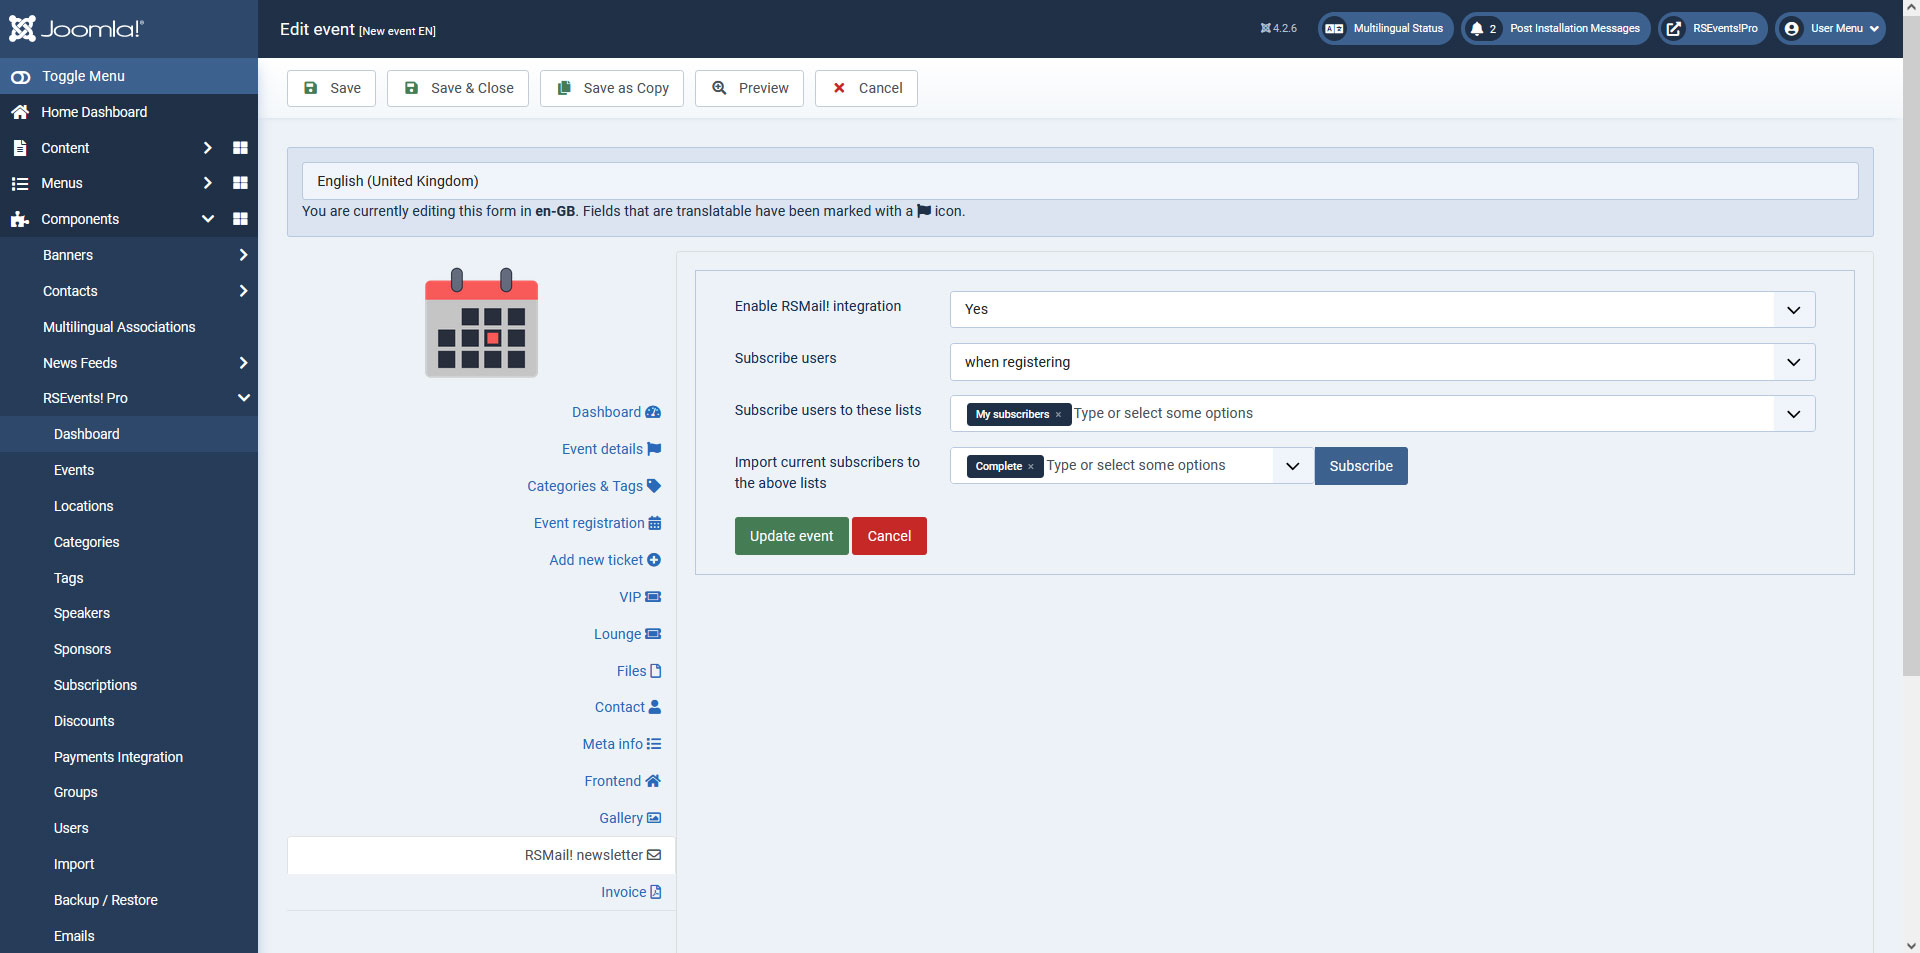
RSMail! Newsletter
Event subscribers can also be automatically subscribed to an RSMail! newsletter as well. Here, you will be able to access the following options:
- Enable RSMail! integration: Yes / No. As the name implies, this setting allows you to either enable or not the integration between RSEvents!Pro and RSMail!.
- Subscribe users: You can choose how new users will be subscribed to a newsletter list, either when registering to the event or after the confirmation.
- Subscribe users to these list: This area will display the selected RSMail! lists on which you want your subscribers to be assigned to.
- Import current subscribers to the above lists: You can also import already existing RSEvents!Pro users to above RSMail! lists, these can be selected from Incomplete, Complete or Denied type of subscriptions.
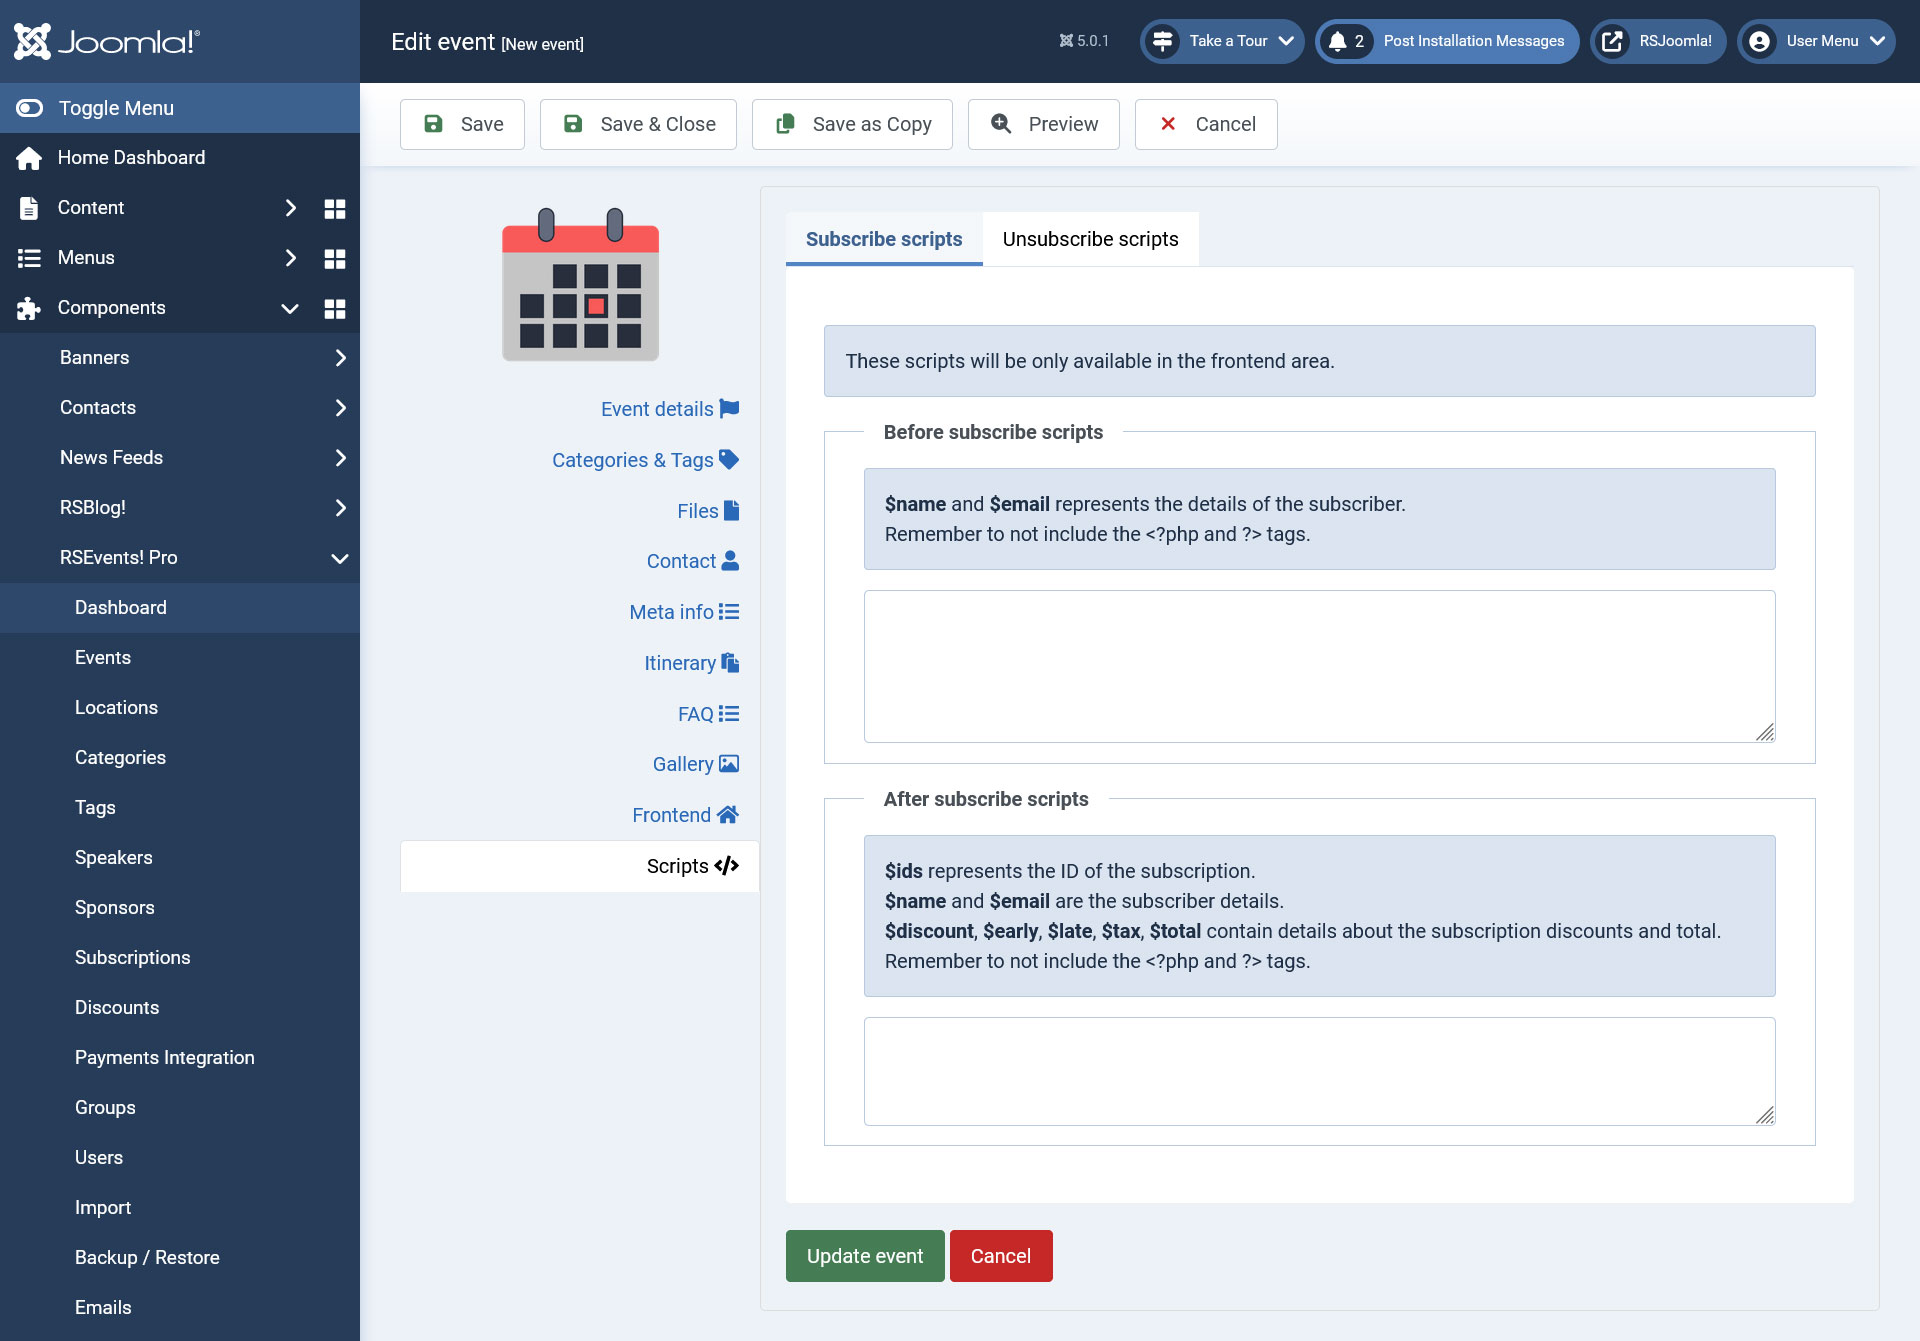
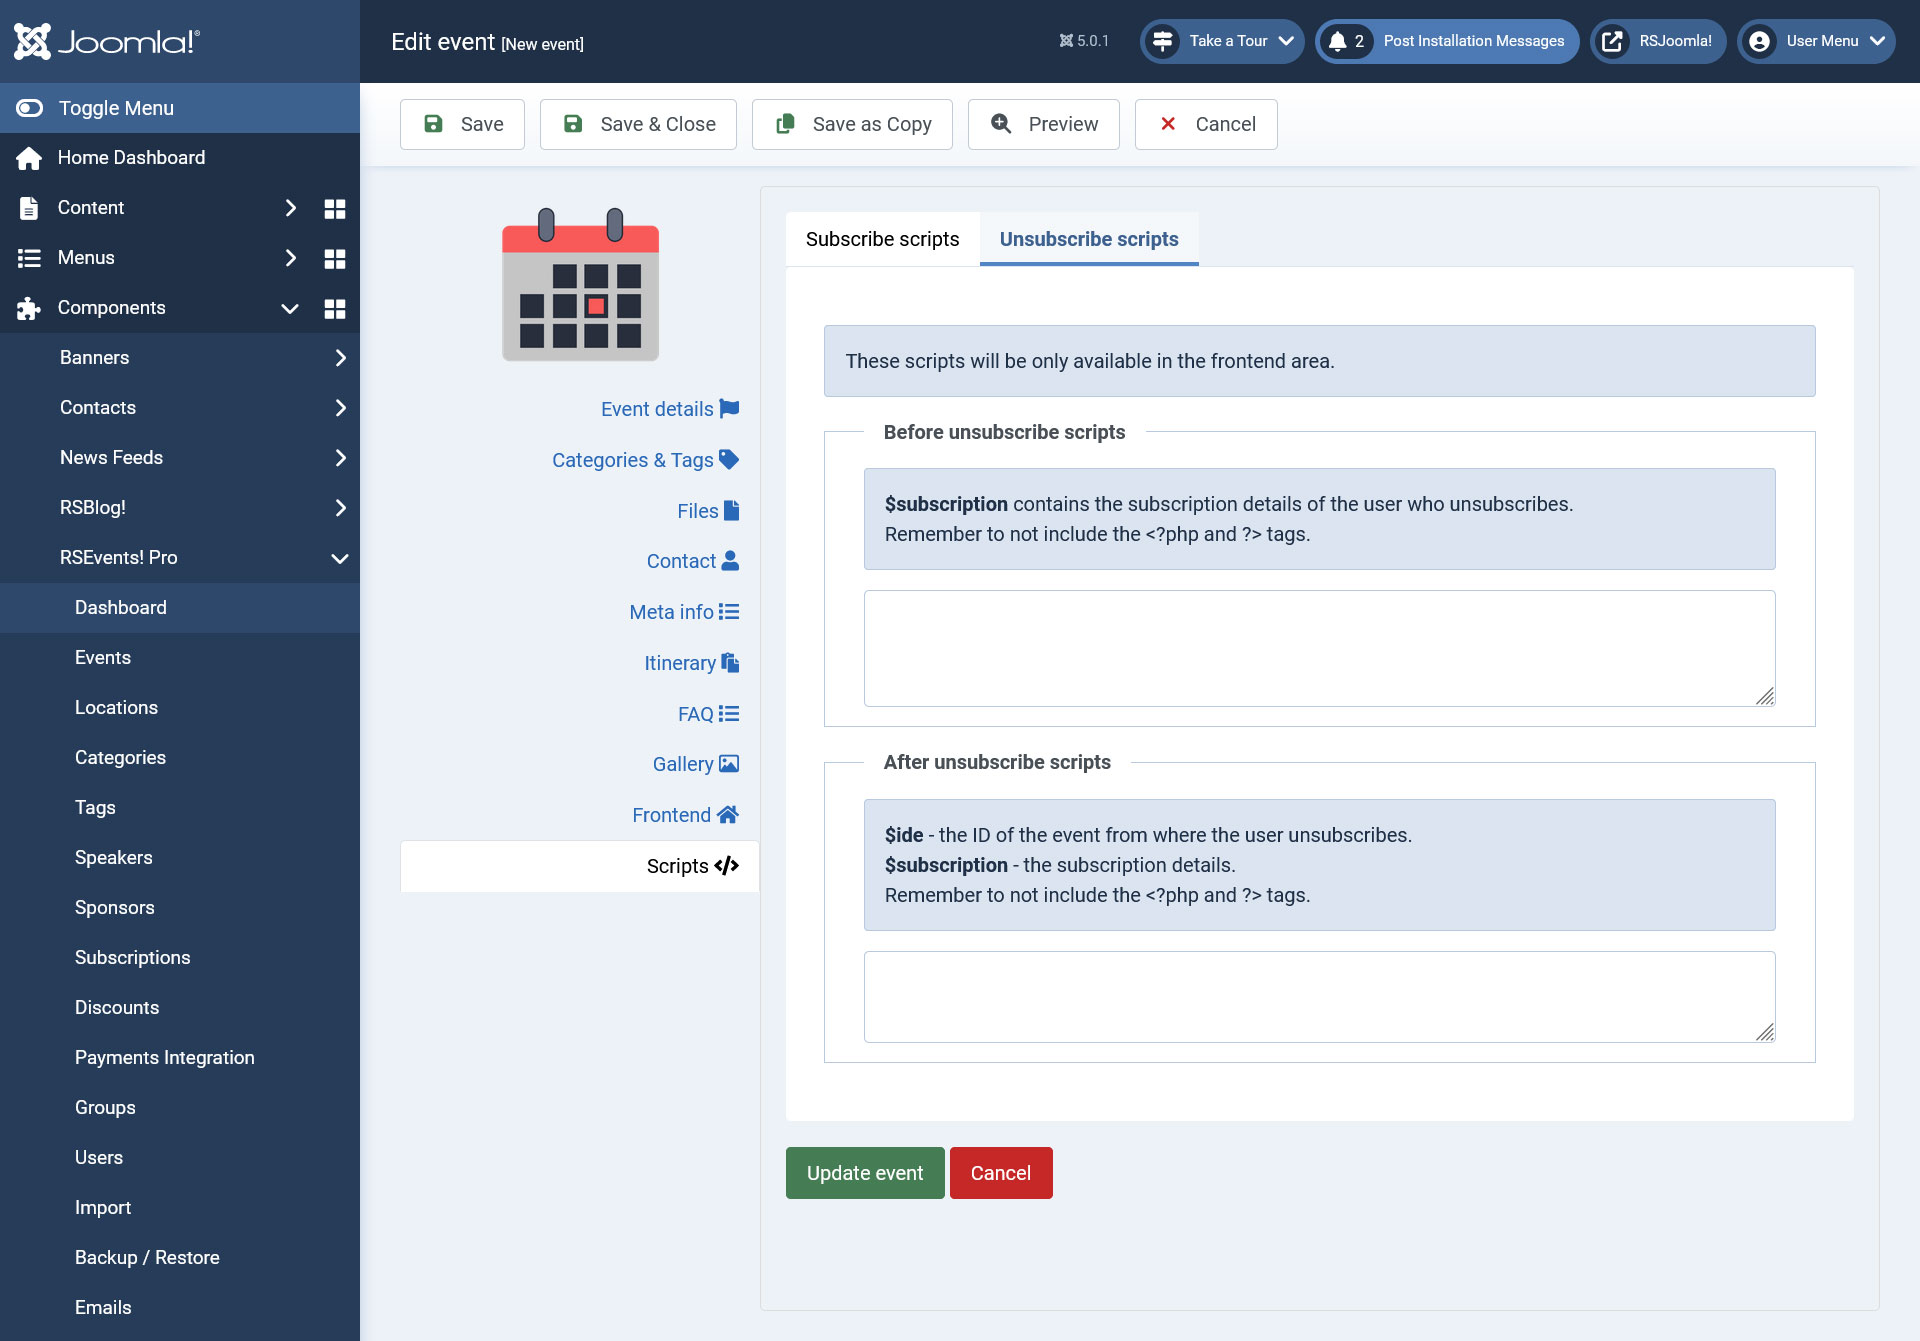
Scripts
There are 2 scripting areas available for the frontend area of the event:
Subscribe Scripts
- the following scripting areas can be configured:
- Before Subscribe Scripts- You can use the following variables:
- $name and $email - represents the details of the subscriber.
- After Subscribe Scripts- You can use the following variables:
- $ids- represents the ID of the subscription.
- $name and $email - represents the details of the subscriber.
- $discount, $early, $late, $tax, $total variables - contain details about the subscription discounts and total.
- Before Subscribe Scripts- You can use the following variables:
Unsubscribe Scripts
- the following scripting areas can be configured:
- Before Unsubscribe Scripts- You can use the following variable:
- $subscription - contains the subscription details of the user who unsubscribes.
- After Unsubscribe Scripts- You can use the following variables:
- $ide - contains the ID of the event from where the user unsubscribes.
- $subscription - contains the subscription details of the user who unsubscribes.
- Before Unsubscribe Scripts- You can use the following variable:
14 persons found this article helpful.