Settings
The RSEvents!Pro >> Settings area contains configuration options that apply globally (for all events).
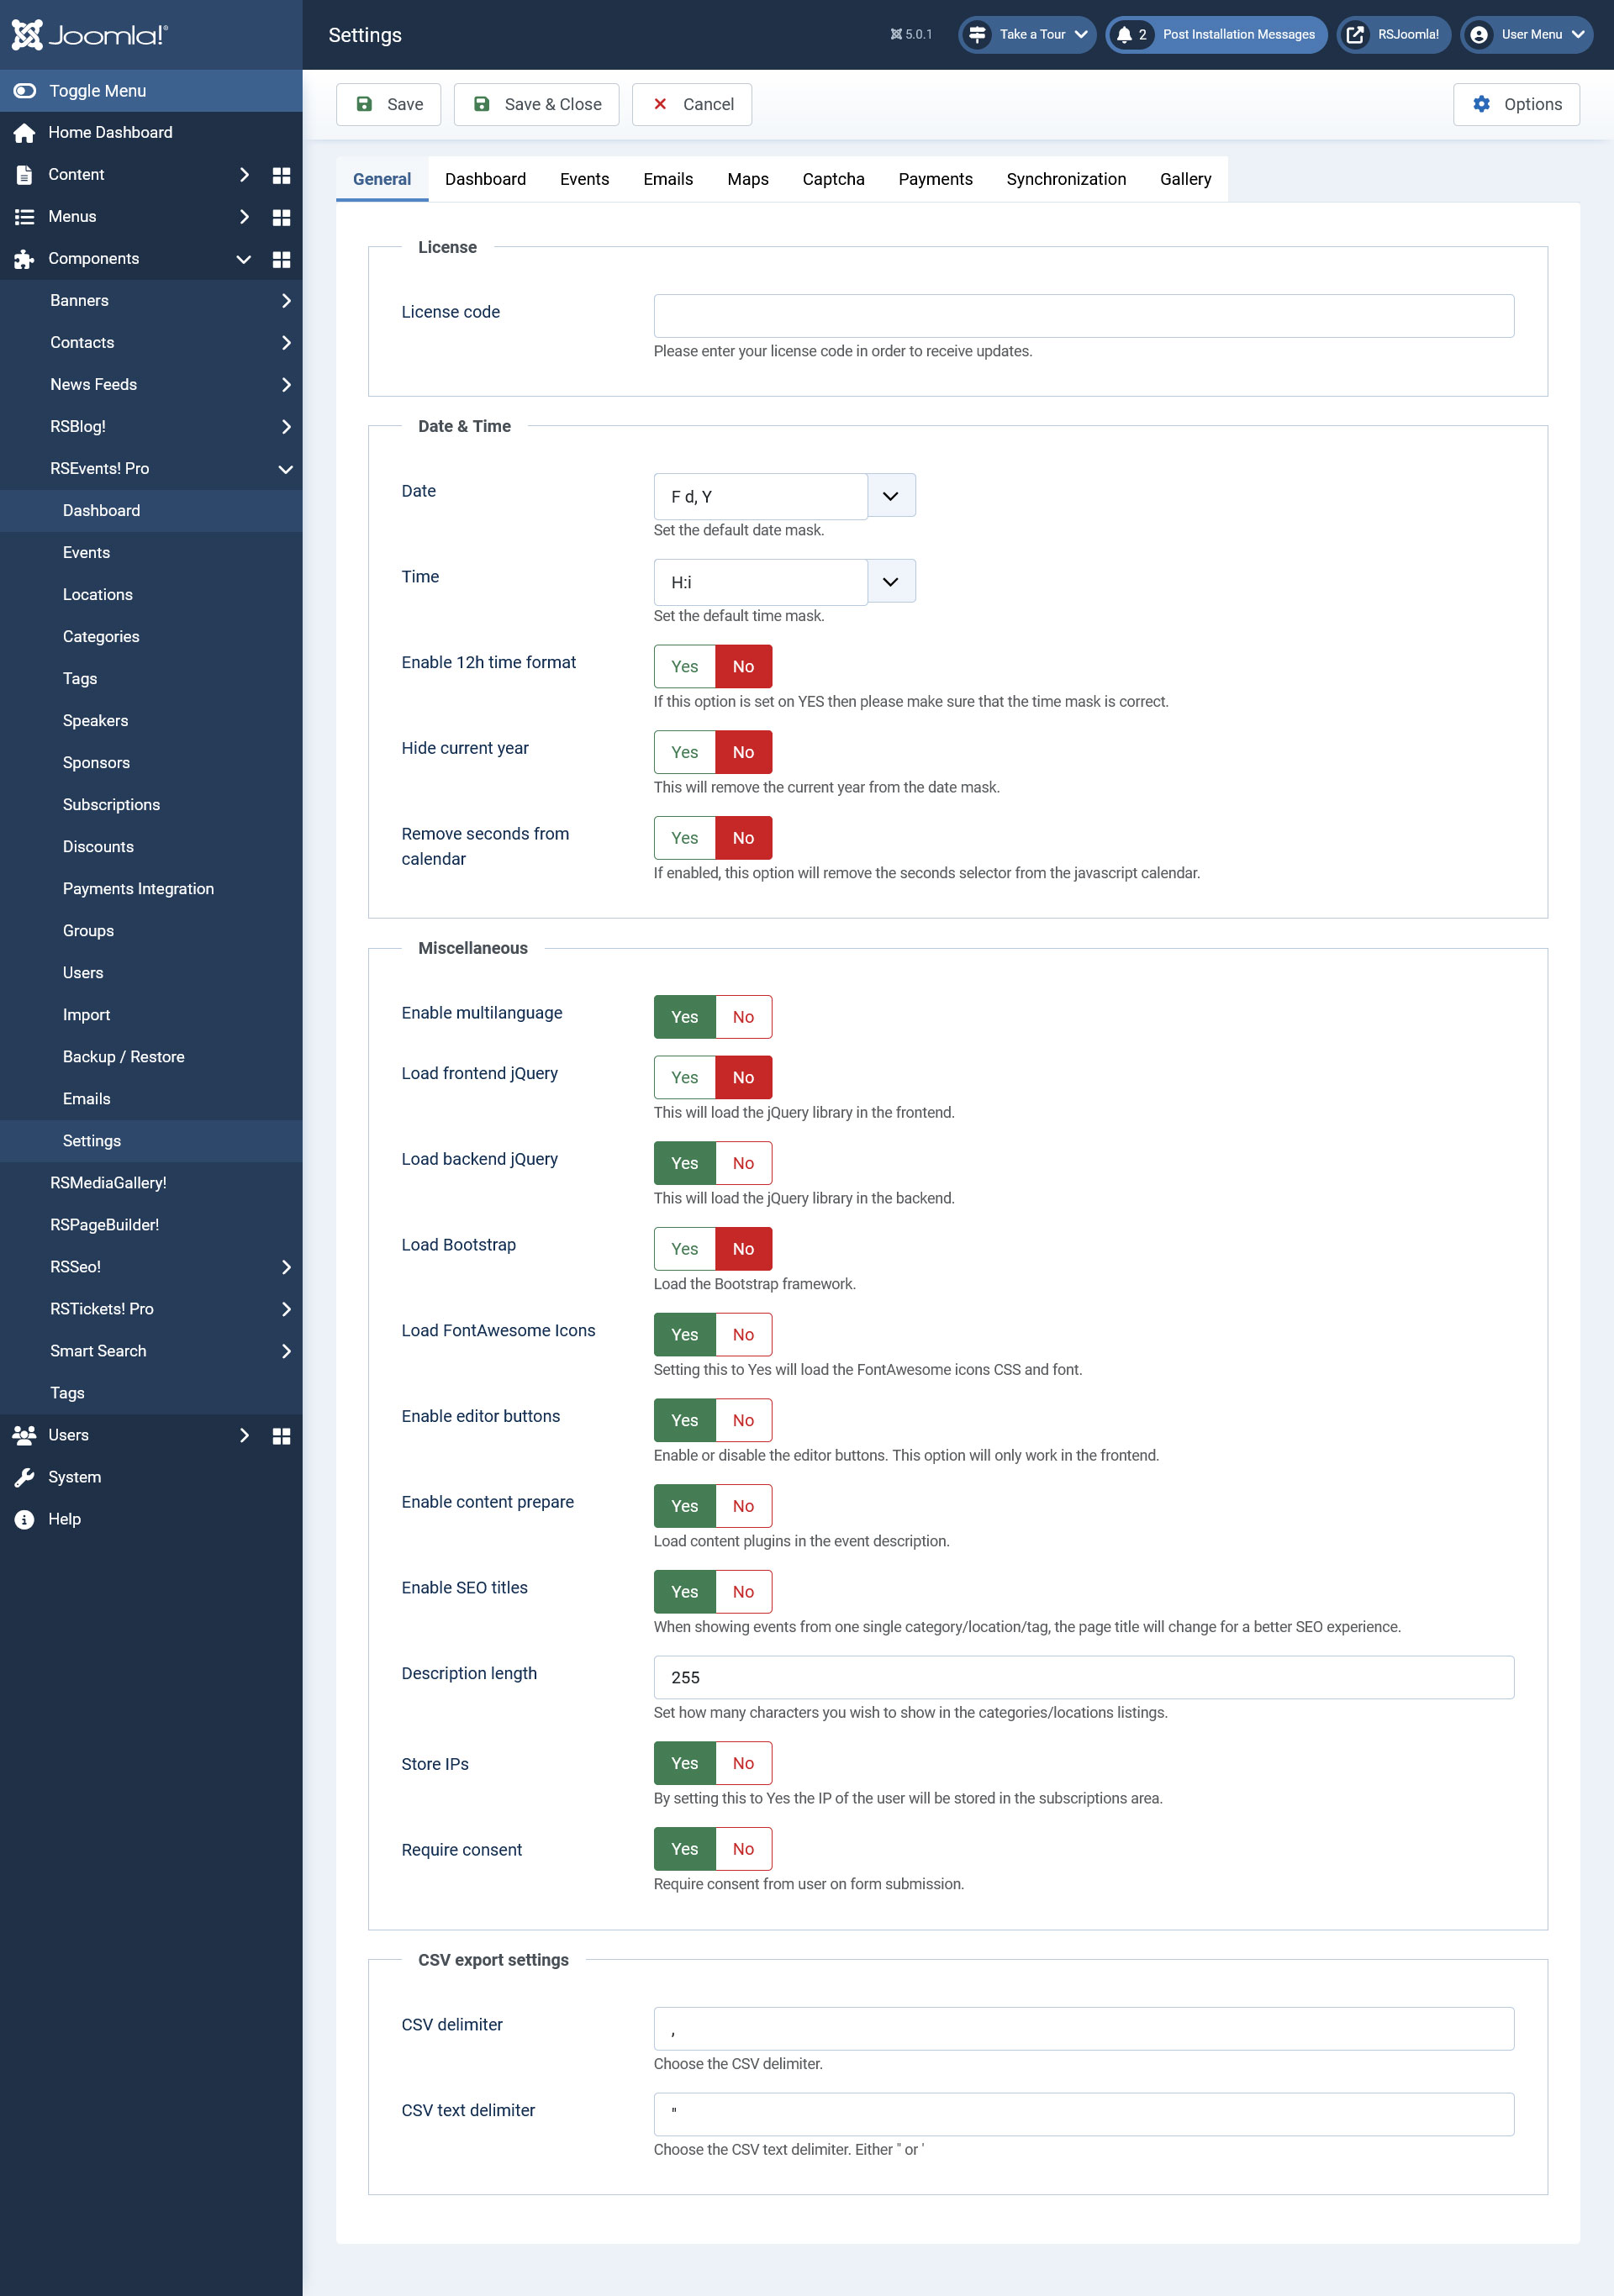
General
License
- License code: this is required for receiving updates directly on your RSEvents!Pro installation. The license code can be generated within the rsjoomla.com > My memberships area. You will need to specify the domain before the code can be generated.
Date & Time
- Date: the format of dates that will be used through the component. You can use the formats listed here.
- Time: the time format that will be used through RSEvents!Pro. You can use the formats listed here.
- Enable 12h time format ? the event times can be specified in a 12 h format. Make sure that the time format / mask is used accordingly.
- Hide current year: you can choose whether to display or not the event year (if this is current).
- Remove seconds from calendar: Yes / No - set yo Yes in order to remove the seconds from the start and end date selection in the calendar when creating / editing an event.
Miscellaneous
- Enable multilanguage: Yes / No - enable or disable the Multi Language functionality.
- Load frontend jQuery: Yes / No - enable jQuery in the frontend.
- Load backend jQuery: Yes / No - enable jQuery in the backend.
- Load Bootstrap: Yes / No - enable Bootstrap in the frontend, if your template already loads Bootstrap set this to NO.
- Load FontAwesome icons: if set to yes the will use FontAwesome icons in the frontend layout.
- Enable editor buttons: if set to yes the editor buttons will not be displayed in the front-end area.
- Enable content prepare: Yes / No if set to yes this will enable content plugins on event description.
- Enable SEO titles: Yes / No if set to yes, when showing events from one single category/location/tag, the page title will change for a better SEO experience.
- Description length: for a consistent look on event listing areas, you can set a fixed event description length. Note that on listing areas, the description HTML is tripped out.
- Enable JomSocial activities (optional): this is displayed only if JomSocial is installed. If enabled, new events are displayed via the JomSocial activity system.
- Store IPs: Yes / No - enabling this will store the user IP in the subscription area.
- Require consent: Yes / No - Require consent from user on form submission if set to Yes.
CSV export settings
- CSV delimiter: Choose the CSV delimiter.
- CSV text delimiter: Choose the CSV text delimiter. Either " or '
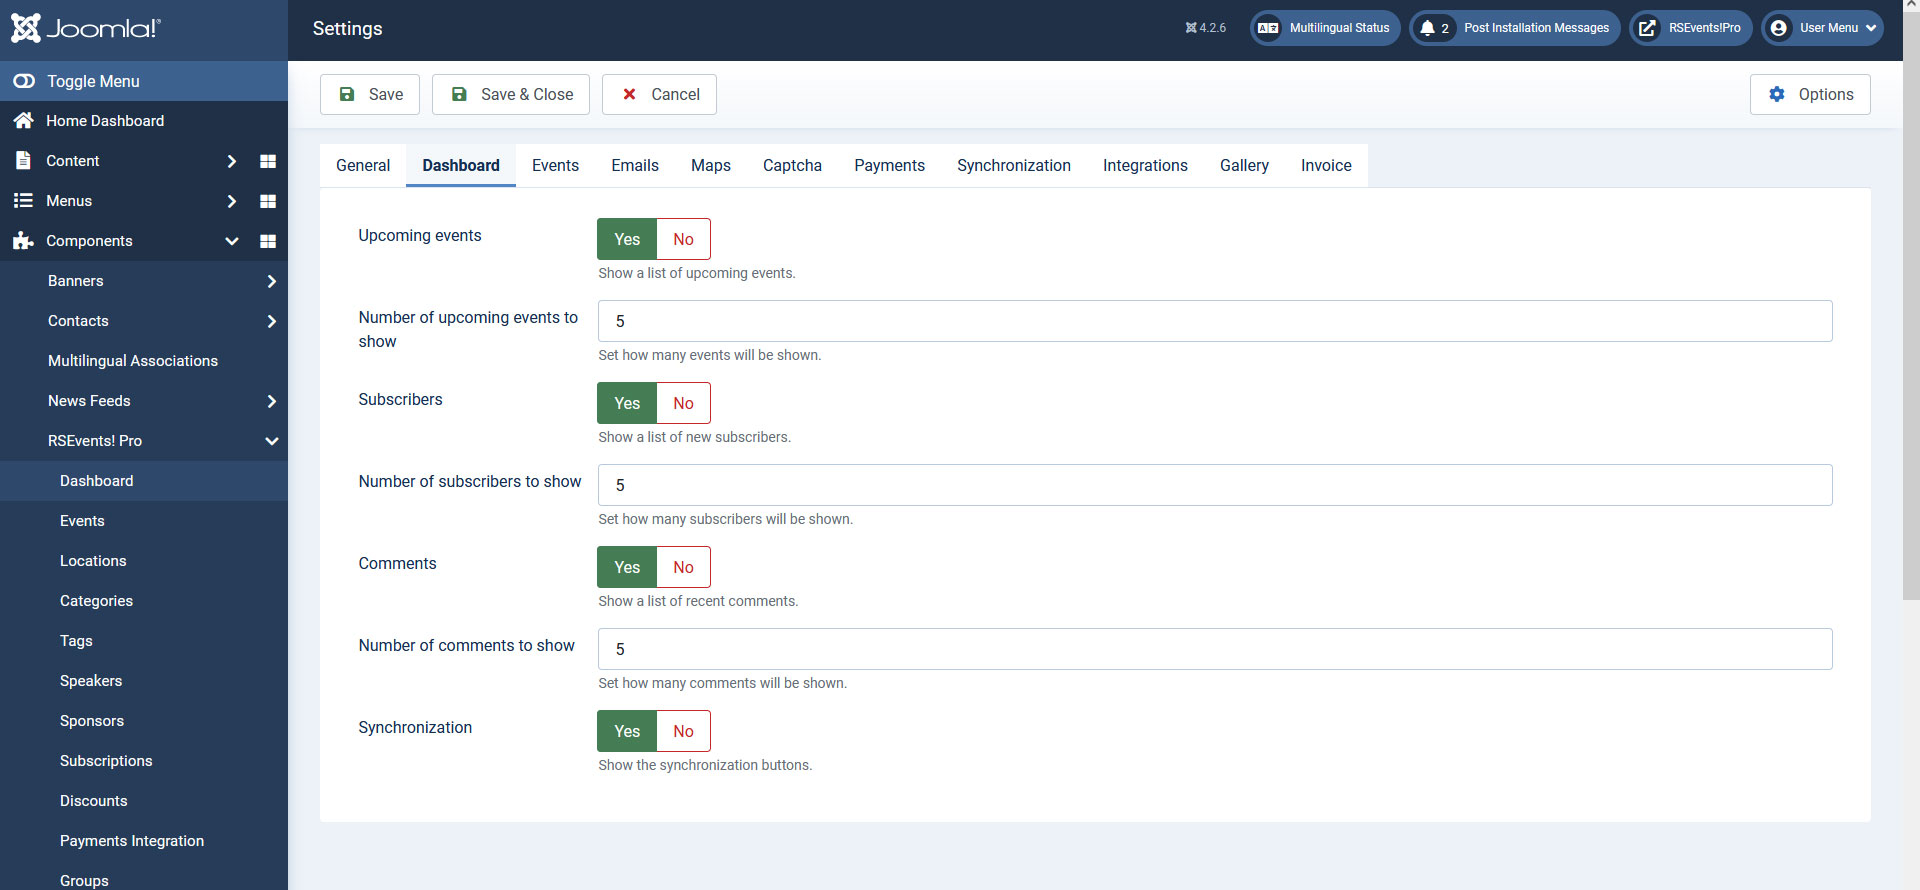
Dashboard
- Upcoming events: if enabled the upcoming events list will be dispalyed.
- Number of upcoming events to show: if the upcoming events list is displayed, this controls how many events will display.
- Subscribers: if enabled, the most recent subscribers will be displayed.
- Number of subscribers to show: if subscribers are displayed, this option controls how many are displayed by default.
- Comments: if enabled, the latest event related comments will be displayed.
- Number of comments to show : if the comment option is enabled, this controls how many are displayed.
- Synchronization: if the enabled, the Synchronization buttons will be displayed.
Events
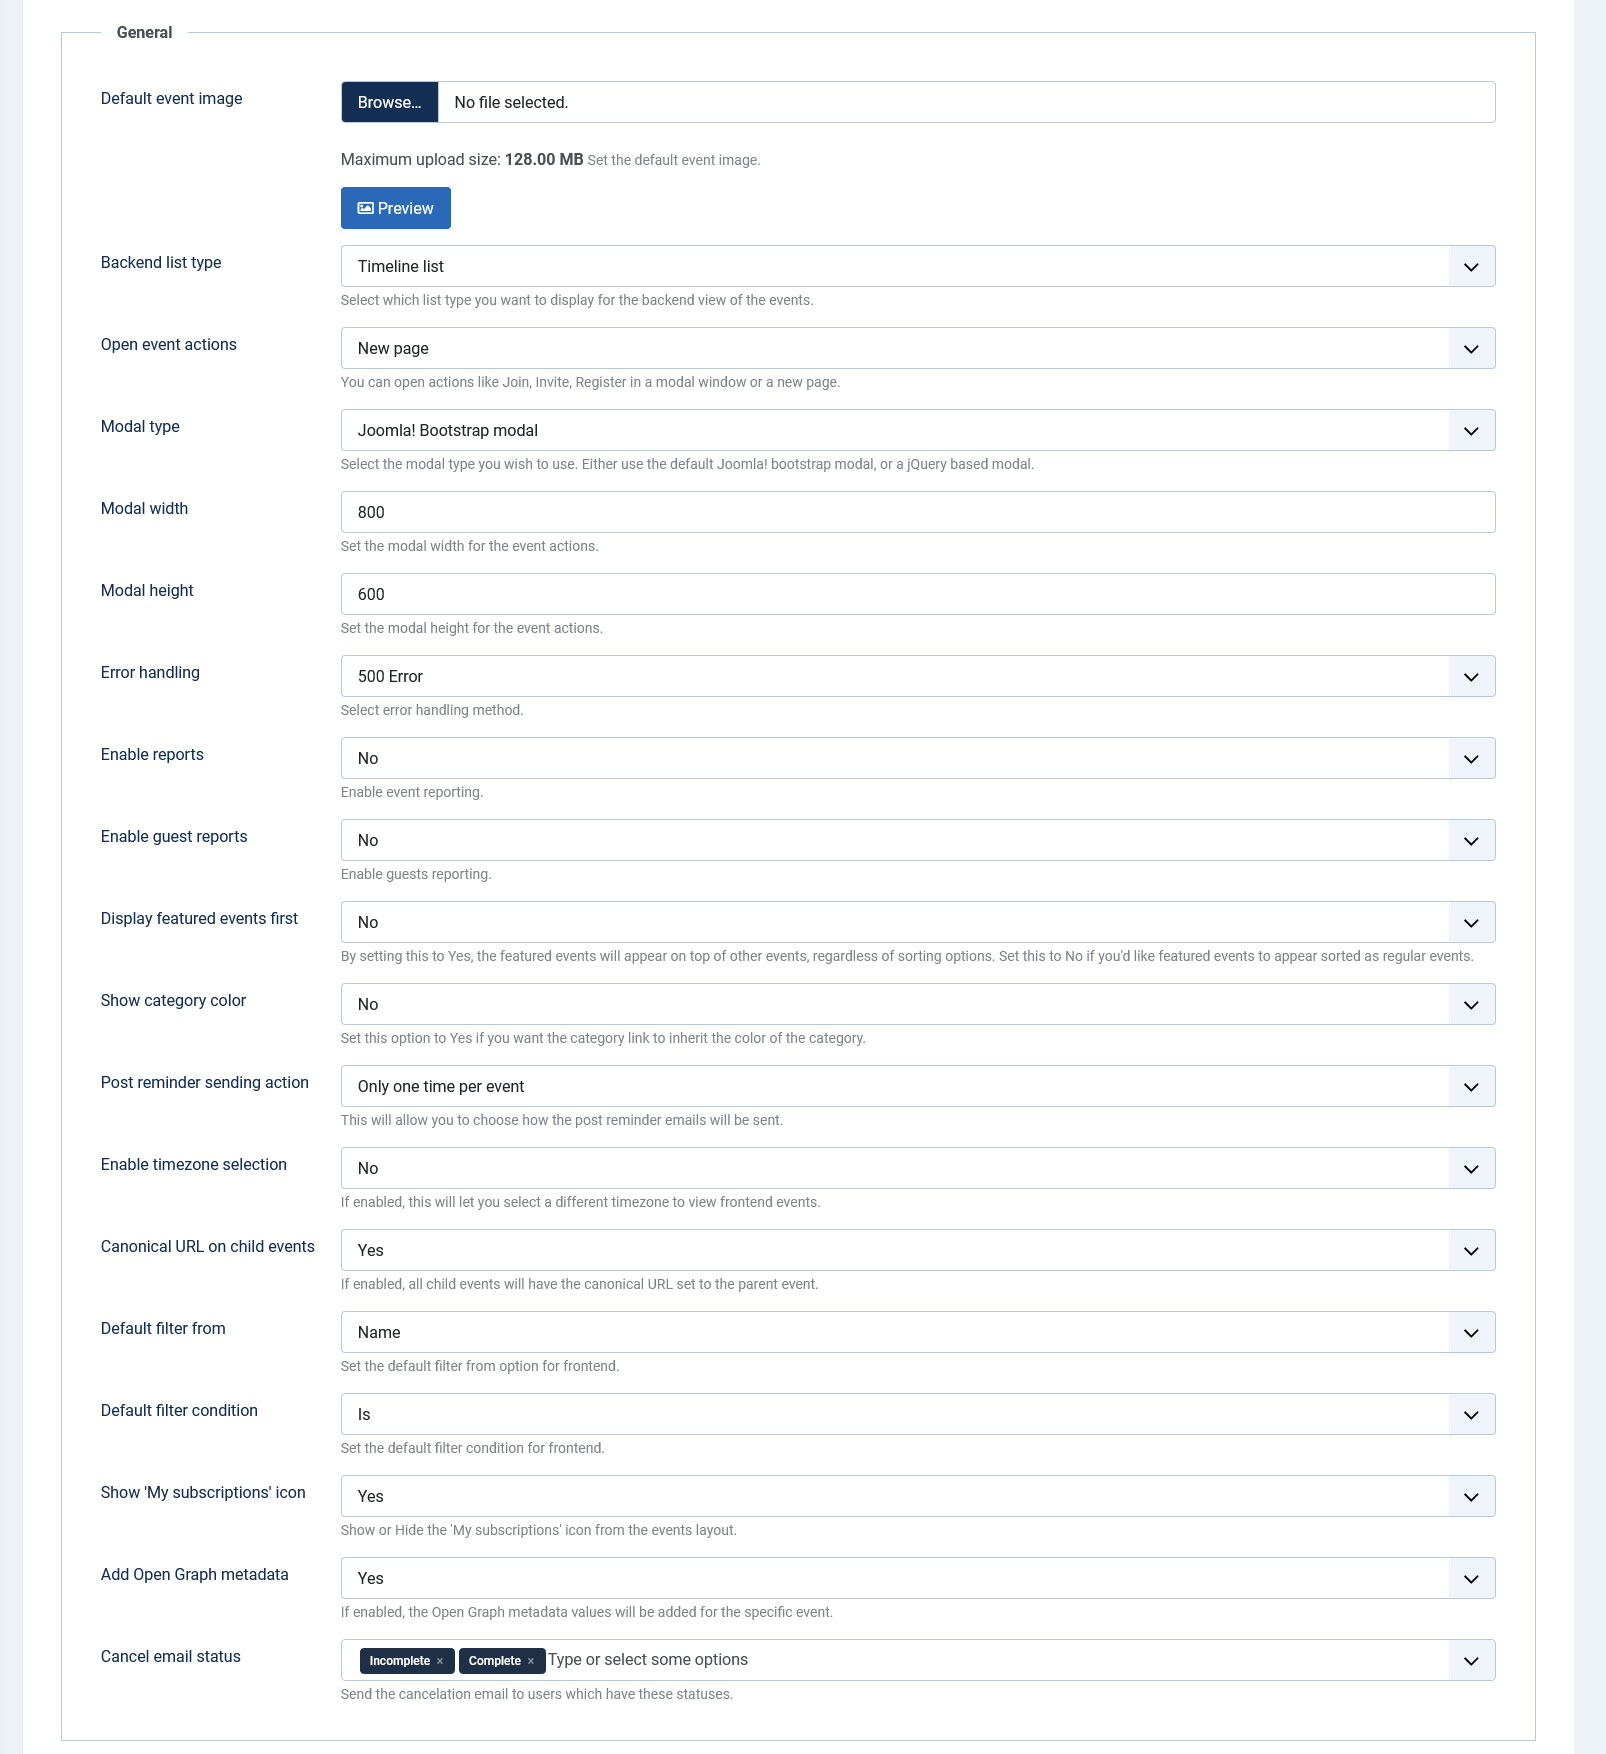
General
- Default event image: upload and set a default event image to be used on the event listing page where events have been submitted without an image.
- Backend list type: Timeline list / Standard list - select the type of list you wish to display in the backend event listing.
- Open event actions in: once on a event details page, you can perform several actions such as: join, subscribe or issue invitations. These actions can be performed by opening a New page or Modal.
- Modal Type: Select the modal type you wish to use (used for the event's image, or tickets configuration area). Either use the default Joomla! bootstrap modal, or a jQuery based modal.
- Modal width: set the width of the modal window.
- Modal height: set the height of the modal window.
- Error handling: This functionality will be triggered when restricted activity is detected. You can choose between 3 methods: 500, 403 and Redirect.
- Enable reports: Setting this option to Yes will add a new button on the event page, Report, which gives the subscriber the possibility to report that event through a text message. The message can be viewed in the backend by the website's administrator.
- Enable guest reports: Enables event reporting for guests if set to Yes.
- Display featured events first: If set to Yes, featured events will be displayed on top of the events listing.
- Show category color: Displays the cateogory link (in the events listing) using the color that you have set up for that category.
- Post-reminder sending action: Only one time per event / Multiple times per event - choose how the Post-reminder emails get sent.
- Enable timezone selection: allow users to change the timezone the events are displayed in when viewing the general events listing page.
- Canonical URL on child events: If enabled, all child events will have the canonical URL set to the parent event.
- Default filter from: Set the default filter from options for frontend. Available options are: Name, Description, Location, Category, Tag
- Default filter condition: Set the default filter condition for frontend. Available options are: Is, Is not, Contains, does not contain.
- Show 'My subscriptions' icon: Show or Hide the 'My subscriptions' icon from the events layout.
- Add Open Graph metadata: If enabled, the Open Graph metadata values will be added for the specific event.
- Cancel email status: Send the cancelation email to users which have these statuses. By default, these are set to 'Incomplete' and 'Complete'.
Moderation
- Event moderation emails: An email will be sent to these email addresses in case the event requires moderation (multiple emails can be separated by using commas).
- Tag moderation emails: An email will be sent to these email addresses in case the event requires tag moderation (multiple emails can be separated by using commas).

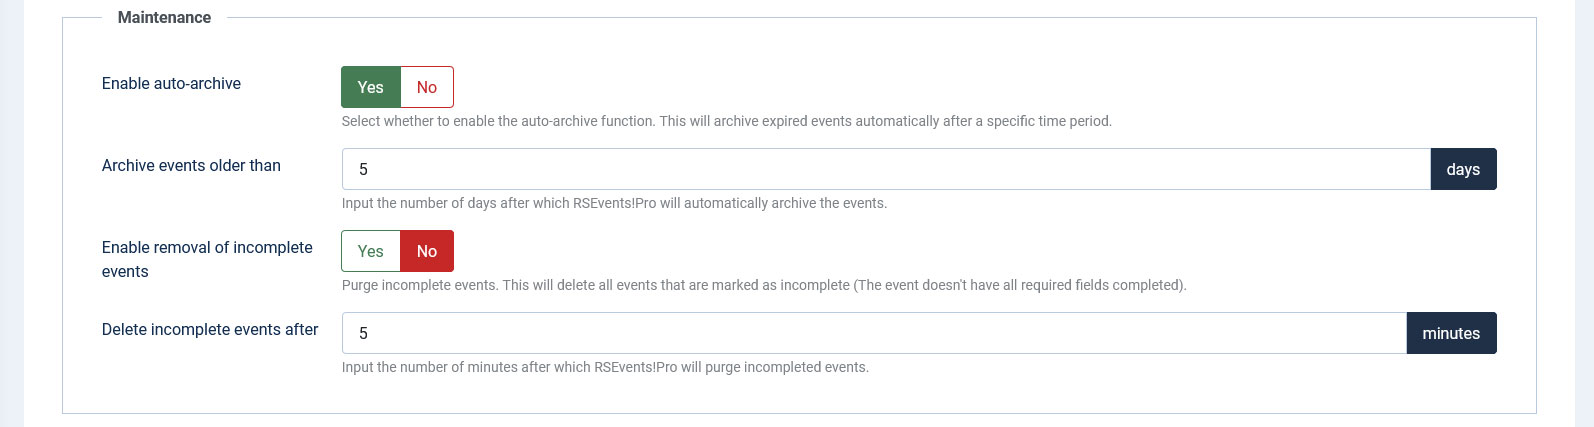
Maintenance
- Enable auto - archive: once an event has passed, this can be excluded from listing areas by archiving it. The auto-archive option allows you to automatically do this if the event has passed for x number of days.
- Archive events older than: the number of days before the event can be auto-archived.
- Enable removal of incomplete events: if an event has been saved without all the minimum required information, this is marked as incomplete. These are not included within the front-end listings. Enabling this option allows you to remove incomplete events after x number of minutes.
- Delete incomplete events after: the number of minutes after a incomplete event will be automatically removed.
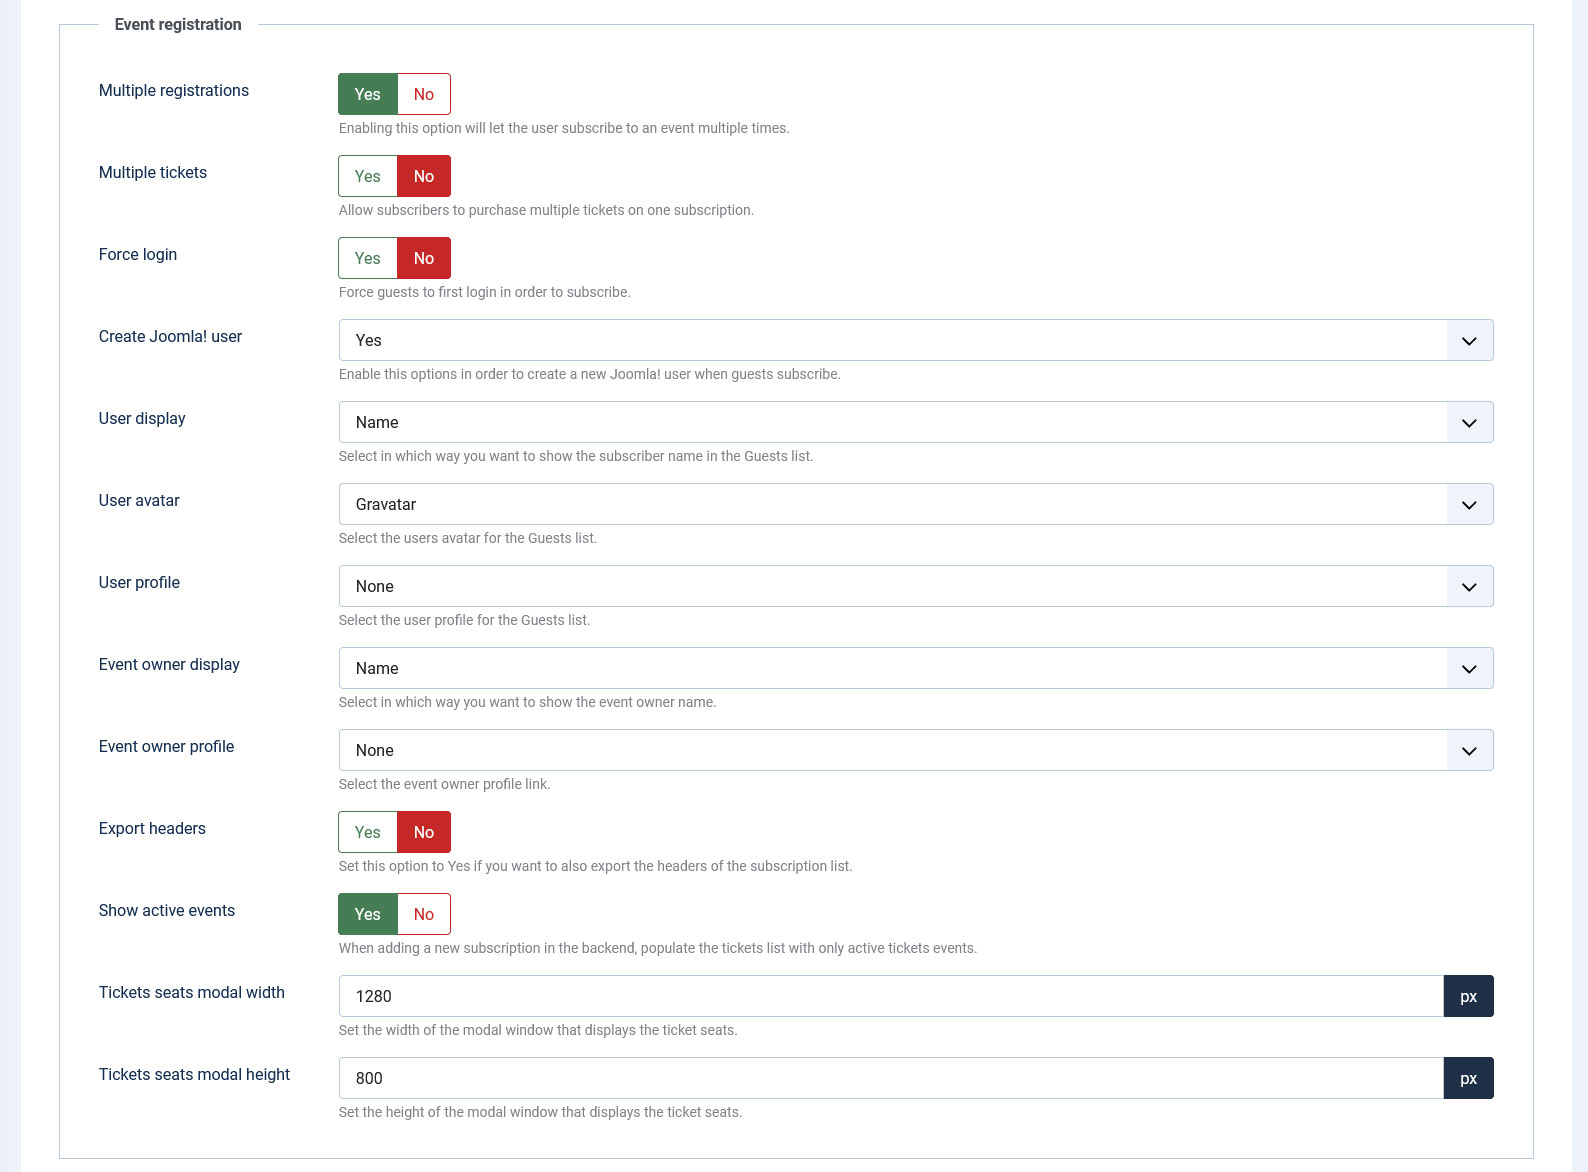
Event registration
- Multiple registrations: if enabled, an user is allowed to subscribe to an event more then once.
- Multiple tickets: if enabled, multiple ticket types can be purchased.
- Force login: if this is enabled, the user will be required to log in prior to registering to the event.
- Create Joomla! user: enabling this option will automatically create a new user account upon subcribing to an event (if the user is not logged in or it already has an account - this is determined by the email address specified in the event registration process). You can create a Joomla! user After subscriber is approved as a selectable option for the field. By choosing this option, the Joomla! user account will only be created when the subscription is approved.
- User display: if the Guest list is enabled, the following information can be displayed (one of the following): name, username, JomSocial name, Community Builder full name.
- User avatar: for each subscriber an avatar can be displayed. This can be automatically extracted from Gravatar, Community Builder, JomSocial, Kunena, Fireboard, EasySocial, EasyDiscuss or K2.
- User profile: the subscriber listing can be linked to a third party user profile (if available): JomSocial, EasySocial or Community Builder.
- Event owner display: within the event information the owner is also displayed. This option allows you to control if you wish to display the name, username, JomSocial name, Community Builder full name or RSEvents!Pro name.
- Event owner profile: Links the event owner to a JomSocial, EasySocial, Community Builder, EasyDiscuss or RSEvents!Pro profile.
- Export headers: setting this option to Yes will add table headers to the subscription export files.
- Show active events: When adding a subscription in the backend, populate the tickets list only with active event tickets.
- Tickets seats modal width: Set the width of the ticket seats modal.
- Tickets seats modal height: Set the height of the ticket seats modal.
Comments
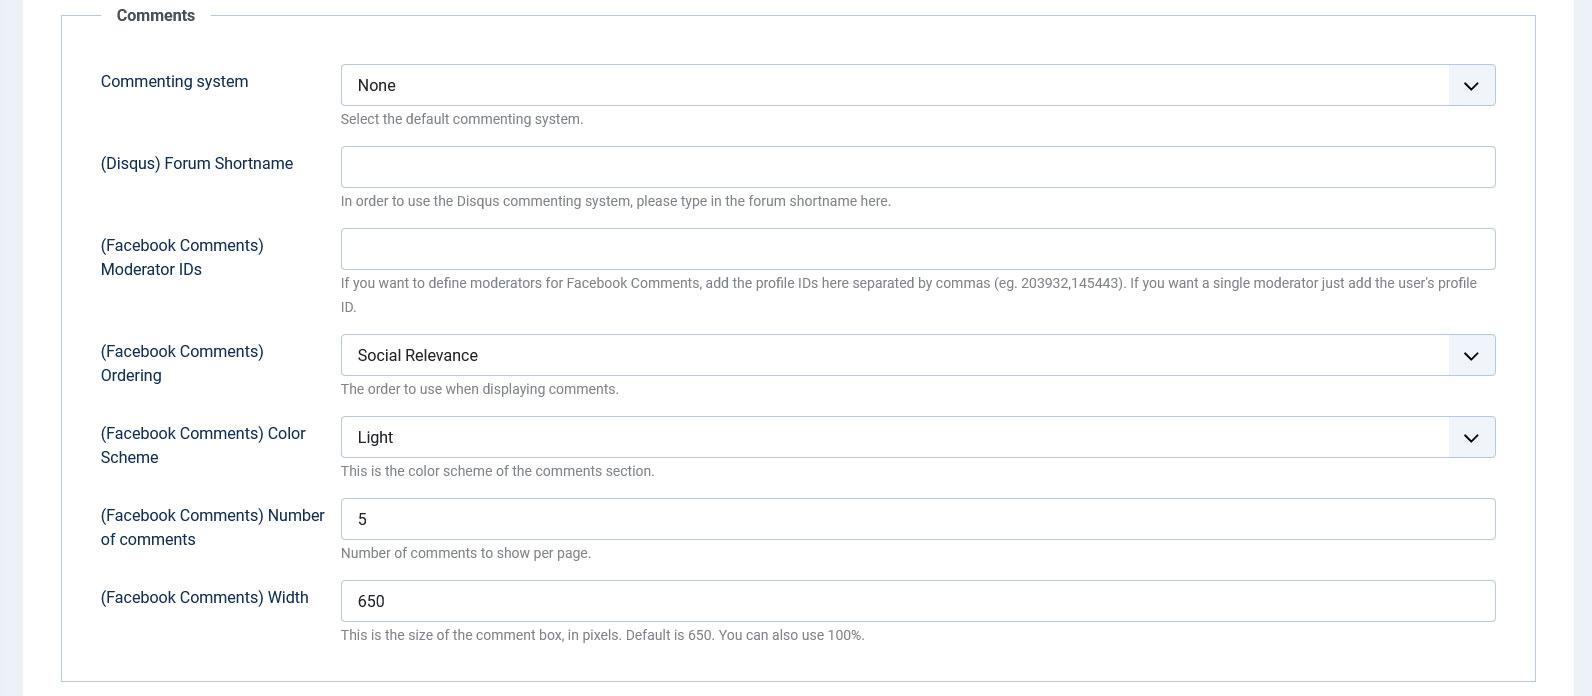
- Commenting system: RSEvents!Pro allows you to comment on event pages. The commenting system can be one of the following: Facebook, RSComments!, JComments, Jom Comments, Disqus.
- (Disqus) Forum Shortname: In order to use the Disqus commenting system, you will have to insert the forum shortname here.
- (Facebook Comments) Moderator IDs: Facebook moderators can be configured, you just have to insert the provide IDs here seperated by commas (eg. 203932, 145443).
- (Facebook Comments) Ordering: This field can be configured to sort by : Social Relevance, Newest comments at the top or Oldest comments at the top.
- (Facebook Comments) Color scheme: The color scheme of the comment section can be either: Light or Dark.
- (Facebook Comments) Number of comments: Number of comments to show per page.
- (Facebook Comments) Width: You can define the width of the comment box in pixels or percentage.
Media
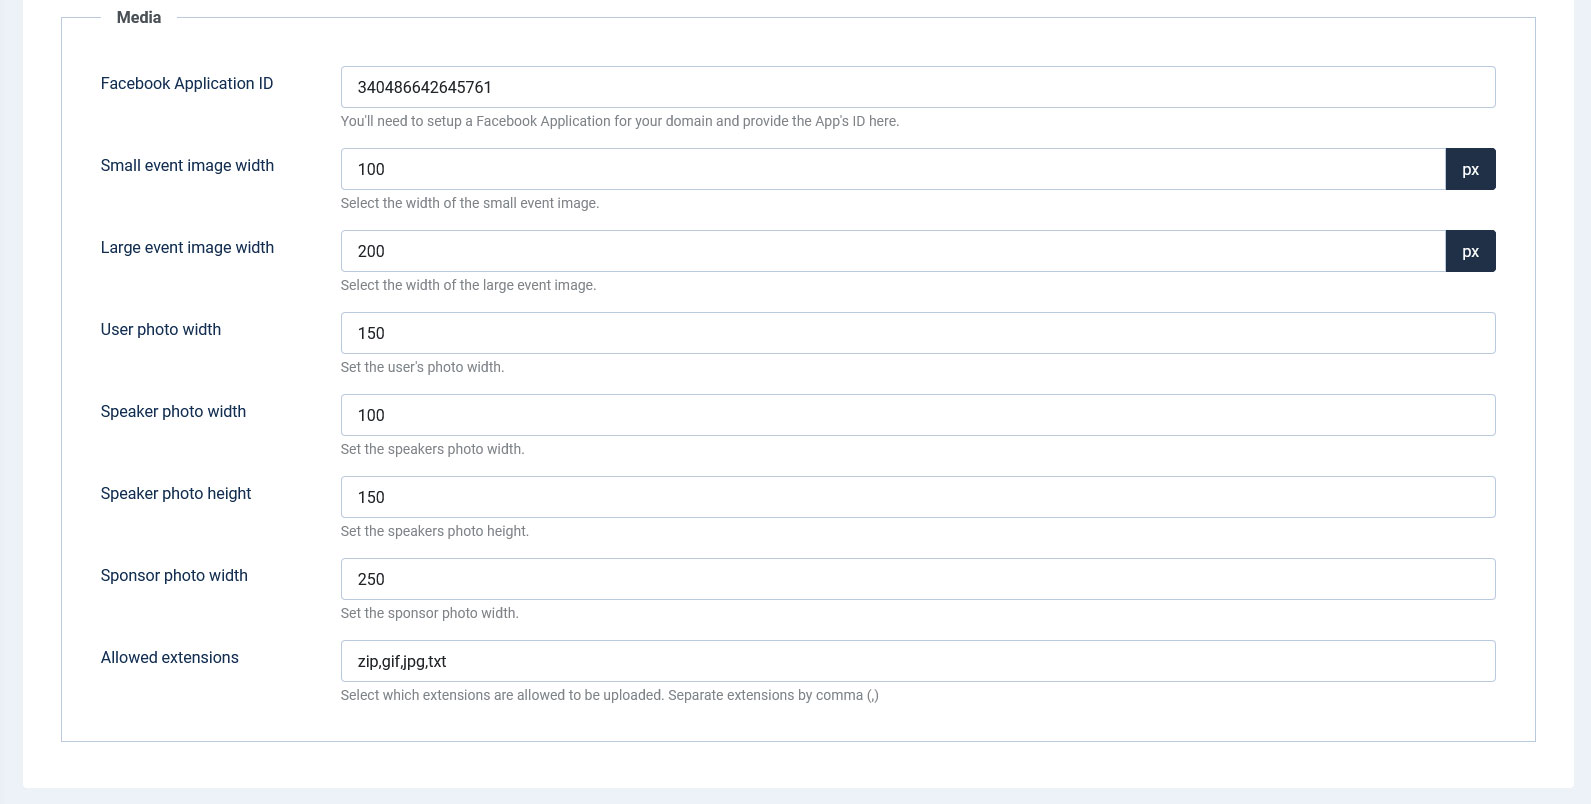
- Facebook Application ID: You will need to setup a Facebook Application for your domain and provide the App's id here.
- Small event image width: event thumb images can also be used. Once uploaded, this will be re-sized at the configured width value.
- Large event image width: two thumb images are generated. This options controls the width of the large thumb image.
- User photo width: This options controls the width of the user image.
- Speaker photo width: set the width for the speaker photo.
- Speaker photo height: set the height for the speaker photo.
- Sponsor photo width: set the width for the sponsor photo.
- Allowed extensions: you can only upload event files that are within the specified extensions list.
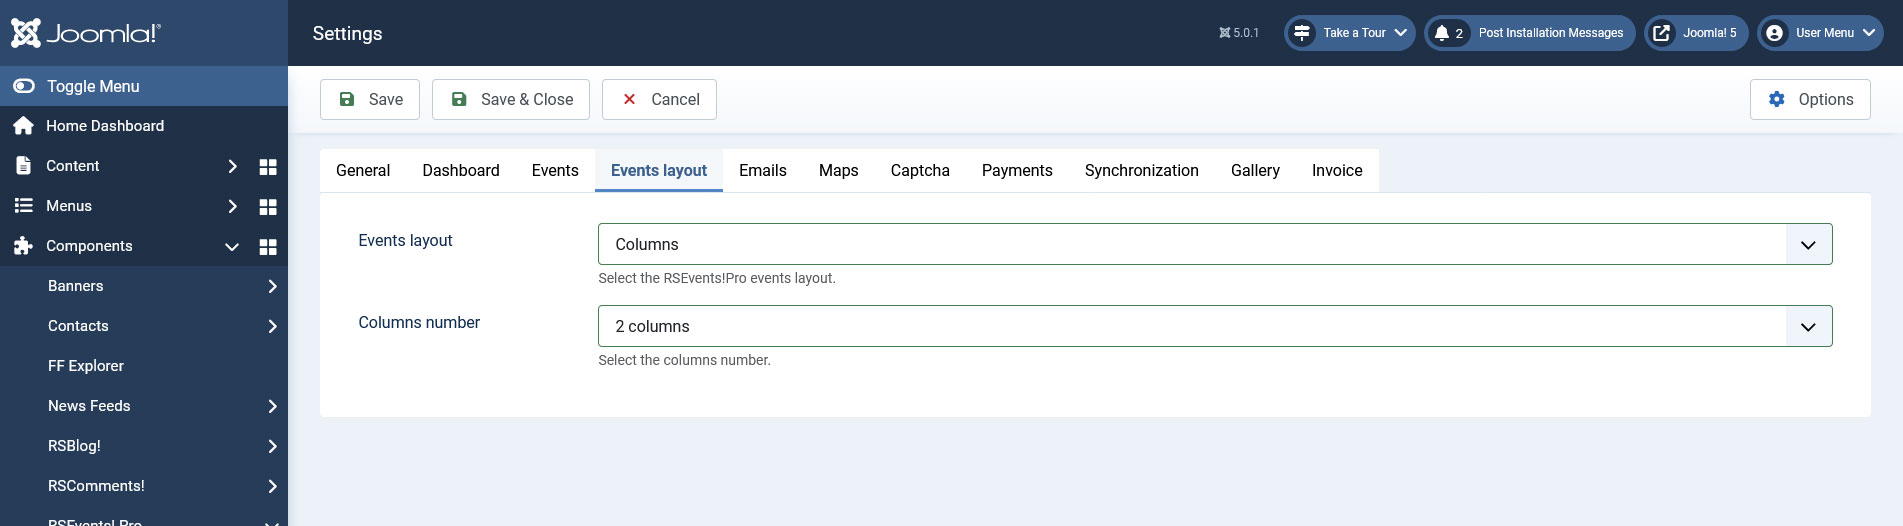
Events Layout
The Events Layout area allows to choose a layout for the events listing.
- Events Layout: Select the RSEvents!Pro events layout. (Default / Columns)
- Columns number: Select the columns number. (1 / 2 / 3)
Emails
The Emails area allows to set up the main email types that can be generated via RSEvents!Pro. The following configuration options are the same for all email types:
- From: email address that will appear in the from section.
- From name: the name of the sender.
- Reply to: if the email receiver replies to the email, this will go this configured email address.
- Reply to name: the name of the reply to receiver.
- CC: carbon copy email address.
- BCC: blind carbon copy email address.
You can no longer configure the email messages here, as they were moved in a separate tab, Emails. To access it, head to Components >> RSEvents!Pro >> Emails.

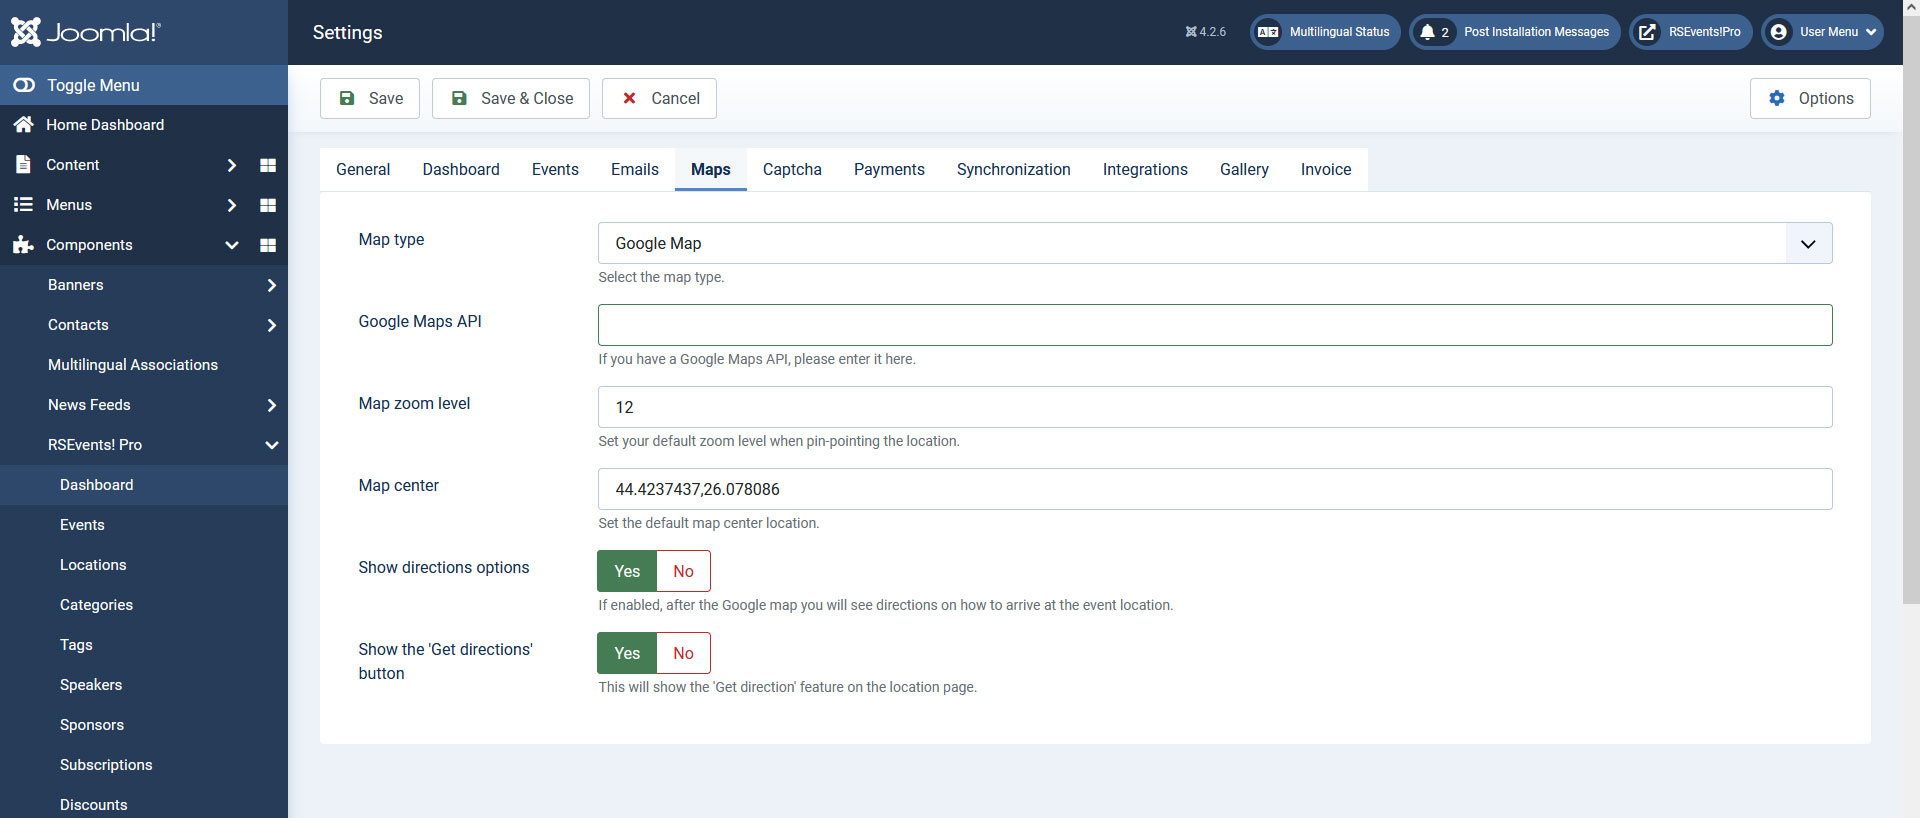
Maps
This area allows you enable and set up different map types as it follows:
Google Map
- Google Maps API - (optional) you can add your Google Maps API key in this field if you have heavy traffic on your website (generating such a key can be done via https://console.developers.google.com).
- Map zoom level - provide a default map zoom level.
- Change default map center: the default map can point out to a relevant surrounding.
- Show the 'Get directions' button: if enabled users will be able to get directions to the event locations.
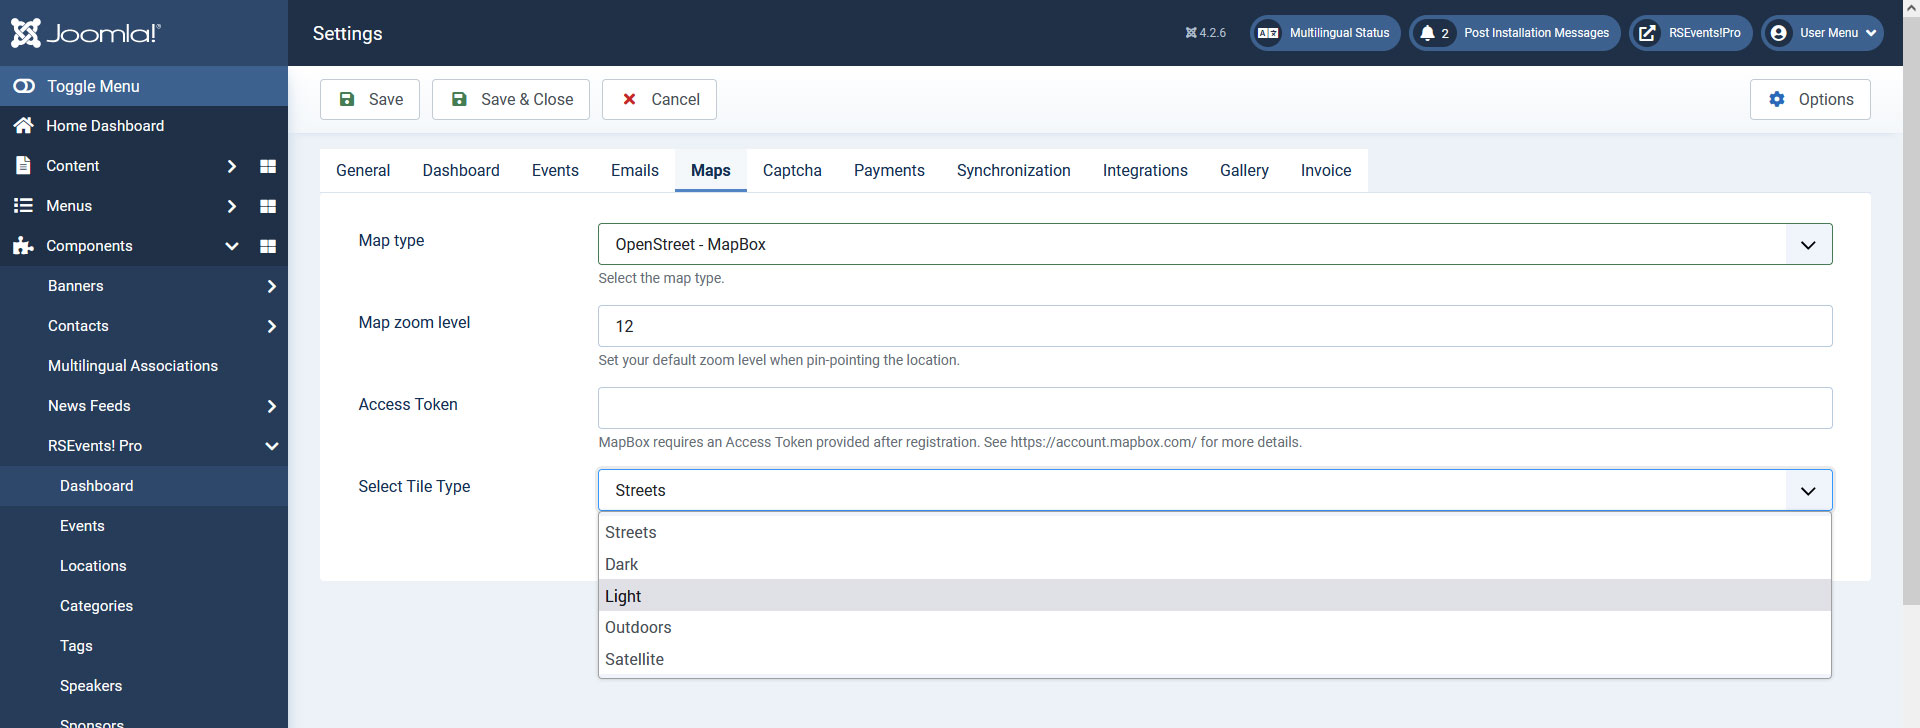
OpenStreet - MapBox
- Map zoom level - provide a default map zoom level.
- Access Token: MapBox requires an Access Token provided after registration. See account.mapbox.com for more details.
- Select Tile Type: You can choose from these map types: Streets, Dark, Lite, Outdoors, Satellite.
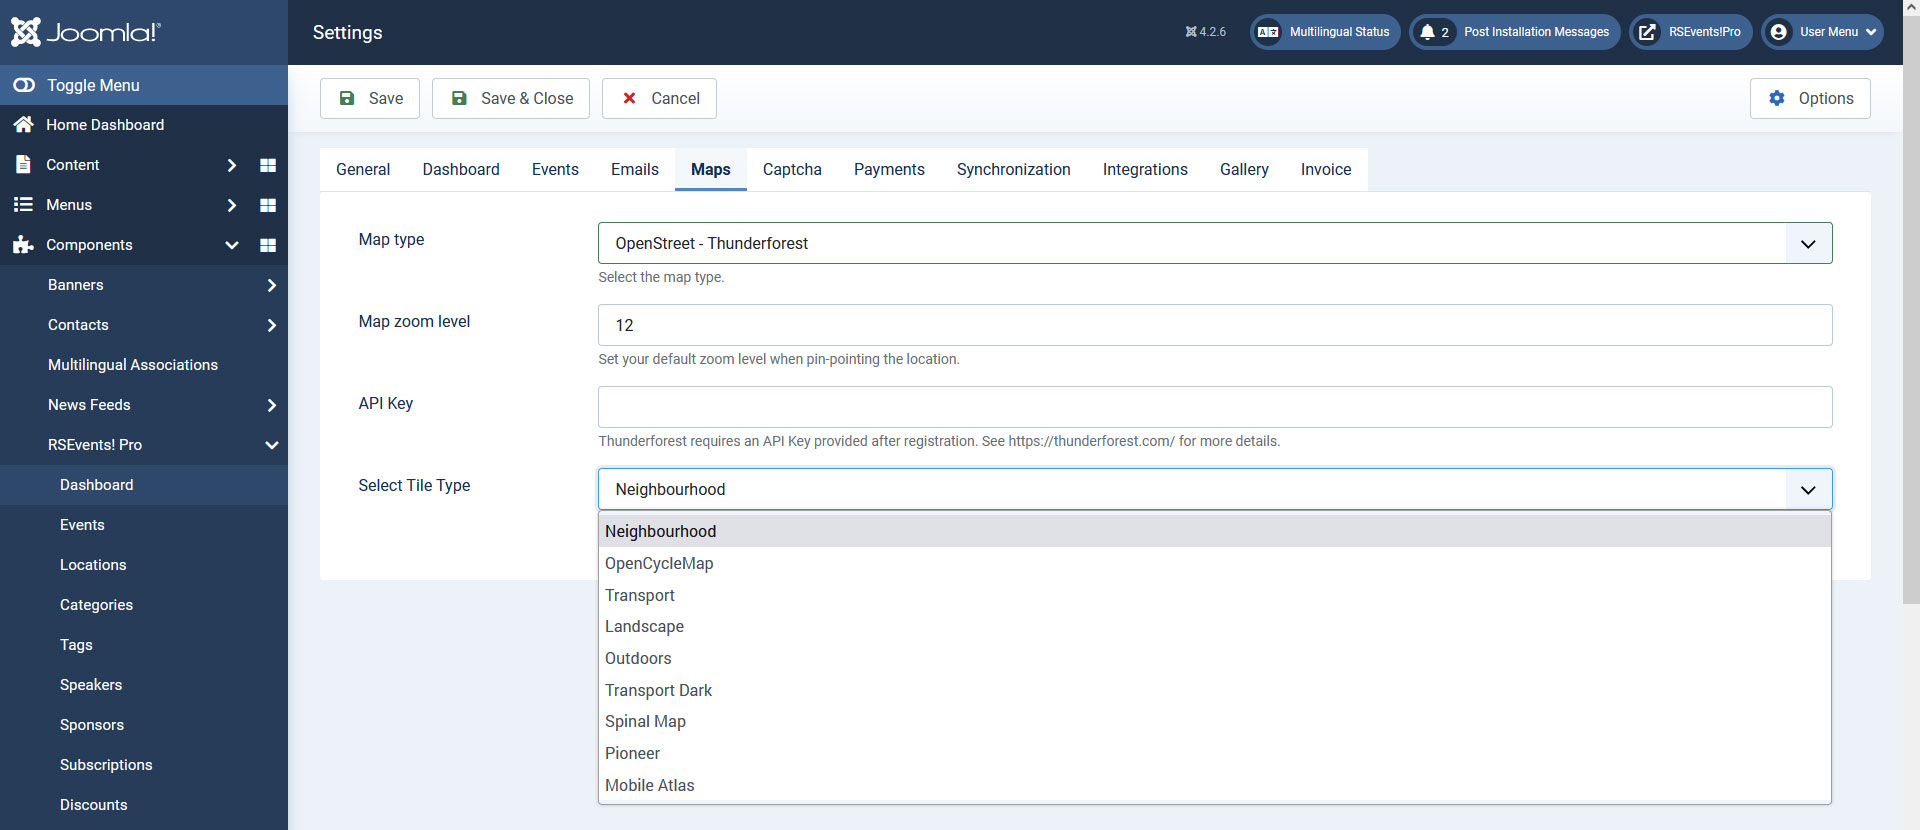
OpenStreet - Thunderforest
- Map zoom level - provide a default map zoom level.
- API Key: Thunderforest requires an API Key which is provided after registration. See account.thundersforest.com for more details.
- Select Tile Type: You can choose from these map types: Neighbourhood, OpenCycleMap, Transport, Landscape, Outdoors, Transport Dark, Spinal Map, Pioneer, Mobile Atlas.
OpenStreet - Esri
- Map zoom level - provide a default map zoom level.
- Select Tile Type: The Following Map Types are available (no API Key required): World Street, World Imagery, World Topo Map.

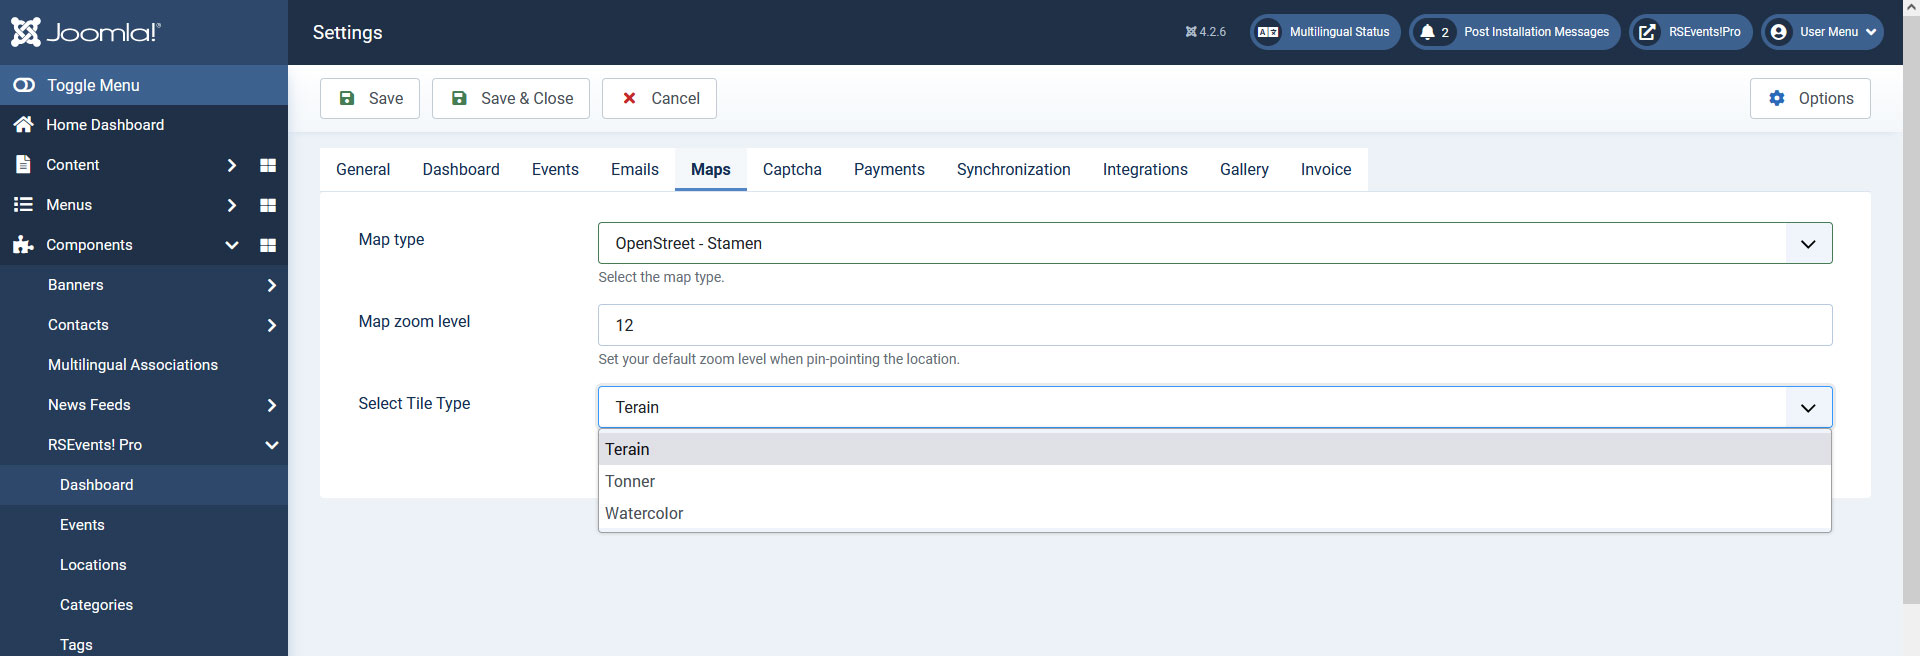
OpenStreet - Stamen
- Map zoom level - provide a default map zoom level.
- Select Tile Type: Available map types (no API Key required): Terain, Tonner, Watercolor.
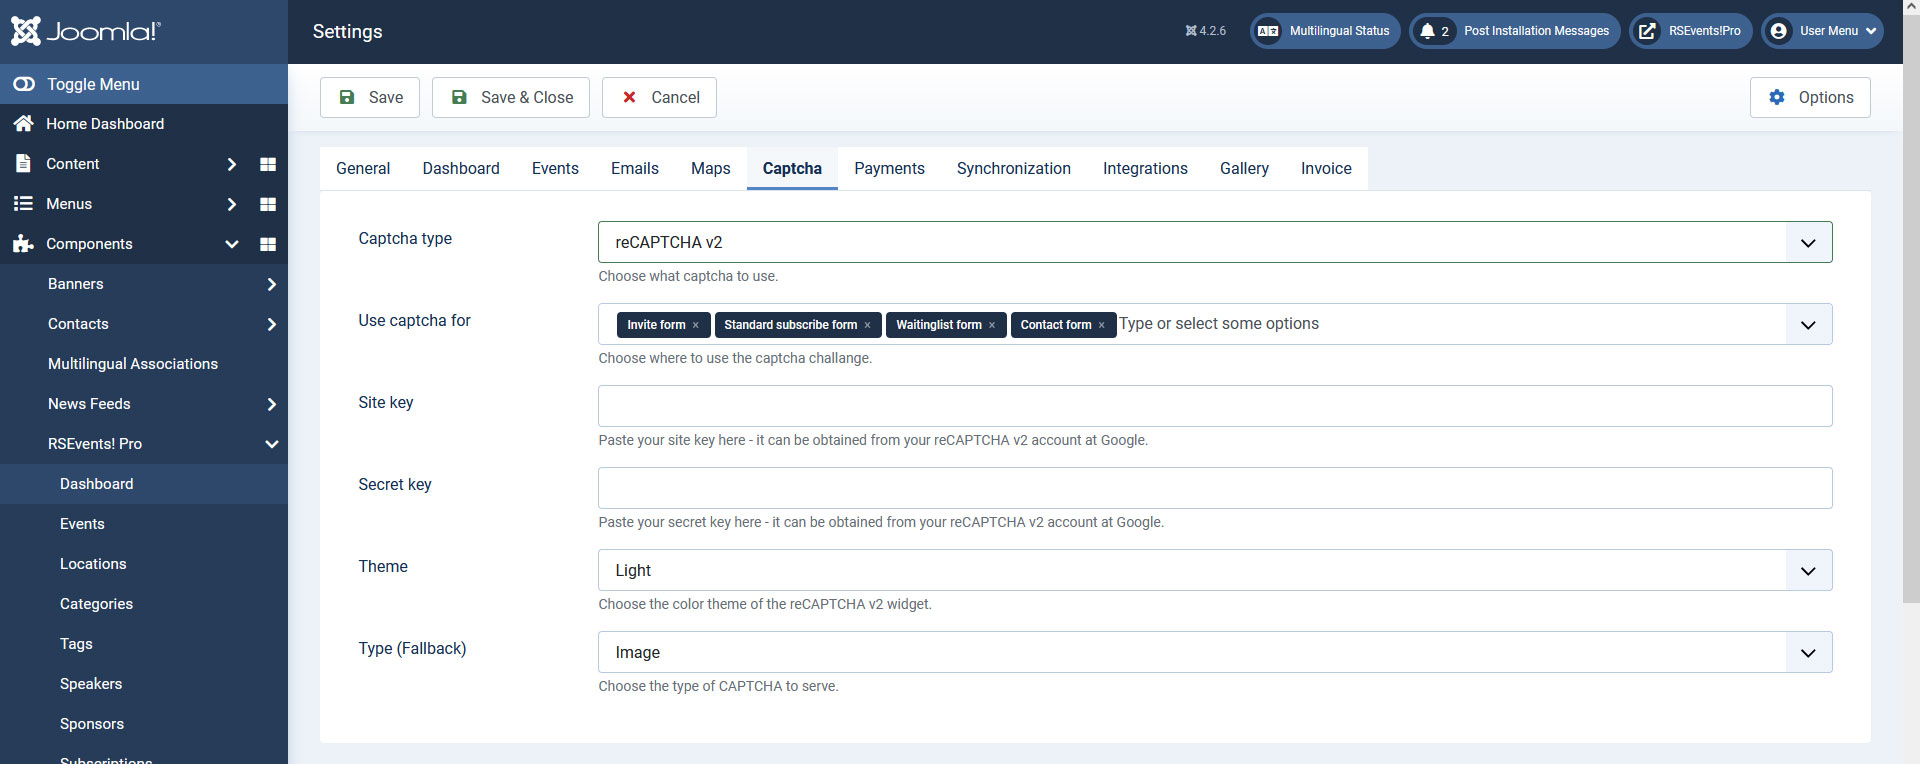
Captcha
In this tab you can select the CAPTCHA type used by the component in the frontend.
- Captcha type - here you can select the type between Math Captcha, reCAPTCHA v2 and hCaptcha
reCAPTCHA v2
- Site key - here you will need to add the site/public key retrieved from the reCAPTCHA site.
- Secret key - here you will need to add the secret/private key retrieved from the reCAPTCHA site.
- Theme - select between the Dark and Light themes available for the new reCAPTCHA integration.
- Type(Fallback) - choose between an image or audio fallback method for the reCAPTCHA functionality.
hCaptcha
- Site key - here you will need to add the site/public key retrieved from the hCaptcha site.
- Secret key - here you will need to add the secret/private key retrieved from the hCaptcha site.
- Language - select between the Auto (Detected by hCaptcha) and Site (Joomla! language).
- Theme - select between the Dark and Light themes available for the hCaptcha integration.
- Size - select between the Normal, Compact and Invisible options available for the new hCaptcha integration.
You can create an account for this anti-spam solution on the official hCaptcha website.
You can use the antispam solutions for: Invite form / Standard Subscribe form / Waitinglist form / Contact form.
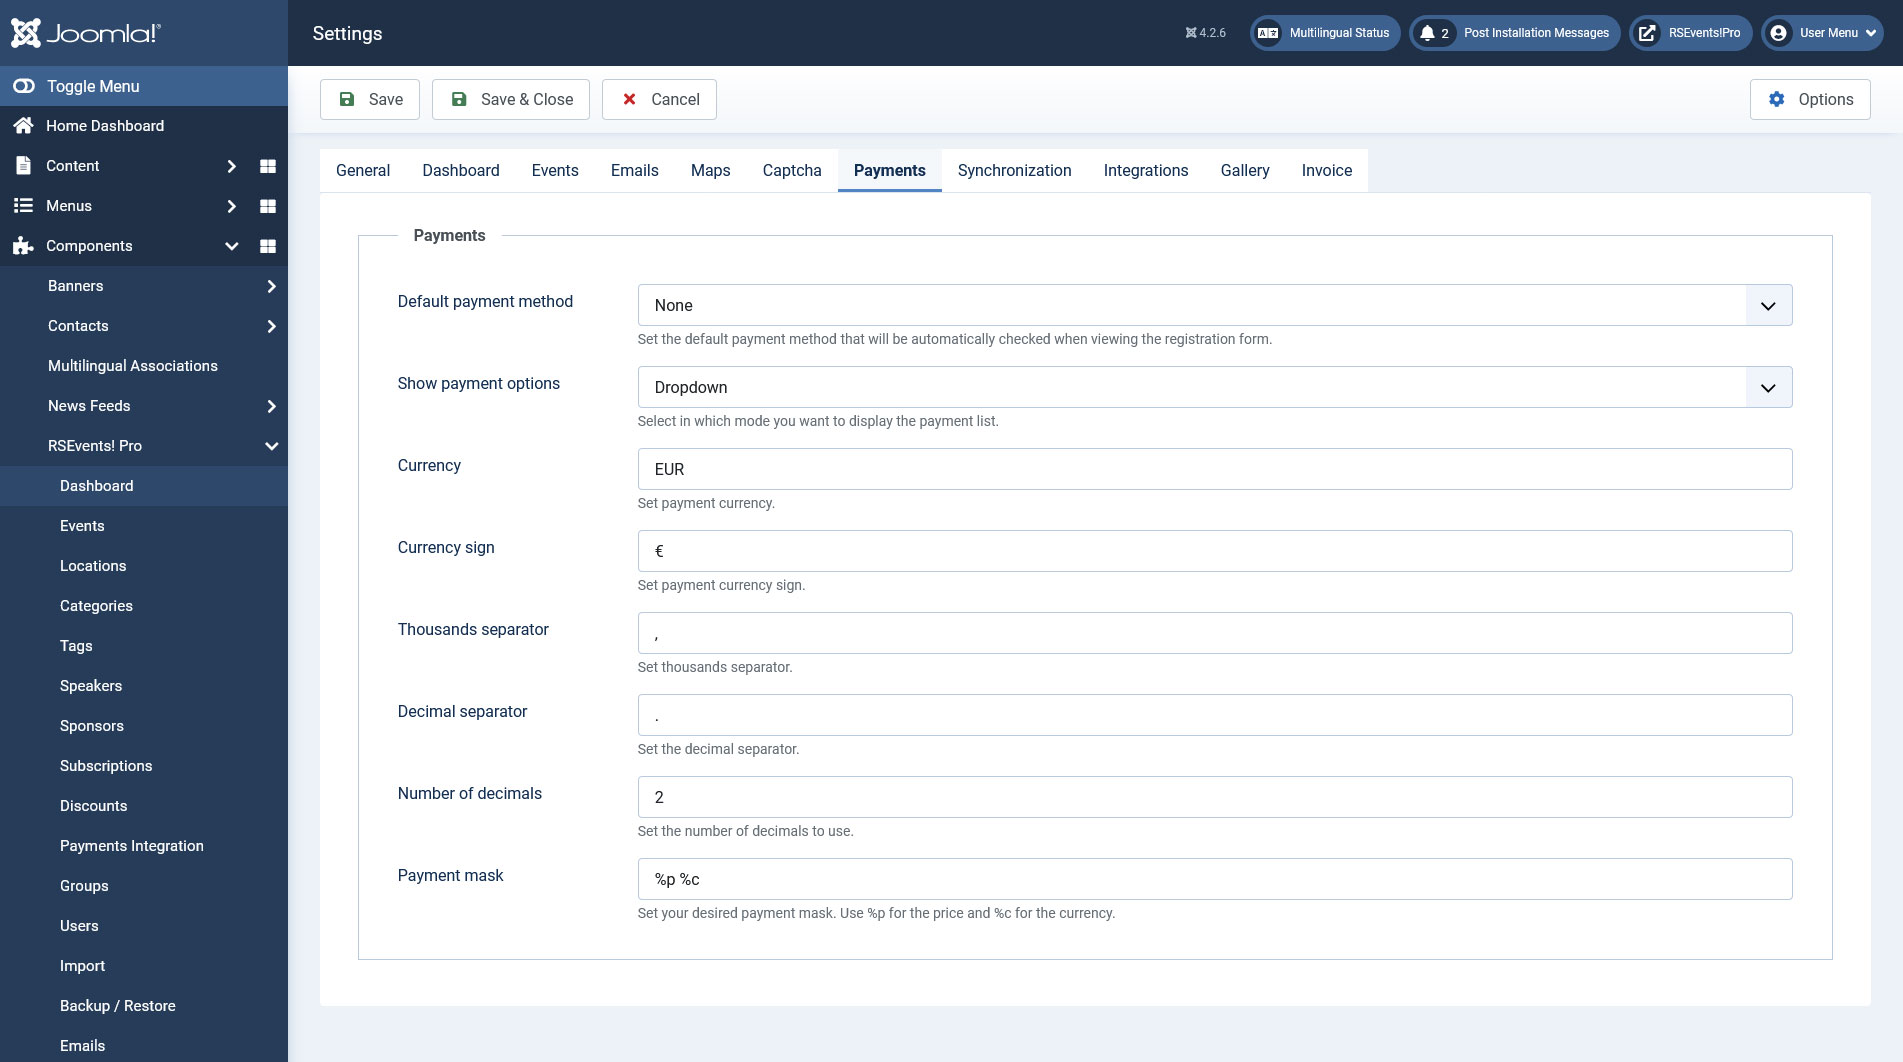
Payments
This area allows you to specify general payment related information. You can set the following:
- Default payment method: you can choose a default payment. The list will be autopopulated with the options listed within the Payment integrations area.
- Show payment options: the payment options can be displayed as a Radio group or Dropdown.
- Event hosters can sell their own tickets through PayPal: if this is enabled, event hosts will be able sell their own tickets.
- Currency: the currency code.
- Currency sign: symbolic sign of the currency code. You can also use the HTML entity reference(i.e. € for the euro sign) for the symbolic sign.
- Thousands separator - enter a character that will act as a thousands separator.
- Decimal separator - enter a character that will act as a decimal separator.
- Number of decimals - enter the number of decimals to be displayed and taken into accountw.
- Payment Mask: Set your desired payment mask. Use %p for the price and %c for the currency.
iDeal
In this area you can configure how RSEvents!Pro should integrate with the iDEAL payment processor:
- iDeal Account: choose from one of the following supported iDEAL account types: Mollie, ING Basic, ING Advanced, Rabobank Lite, Rabobank Professional, ABN AMRO Easy, TargetPay and Sisow.
- Payment mode: Choose a functioning mode for the iDeal payment option: Test or Live.
- iDeal ID: Enter your iDEAL account ID / Merchant ID.
Synchronization
To be able to import events from Google Calendar or Facebook you will need to set up some connection details.
Google Calendar
- Google Client ID: this would be the Client ID key.
- Google Secret: your Google generated secret key.
- Event category: select the category in which the events will be imported to.
- Event location: you can either select a predefined location or let the import tool create new locations based on the event details.
- Import expired events: select whether to import expired events or not.
- Import recurring events: select whether to import recurring events or not.
- Calendars: select the calendars from which you want to import events.
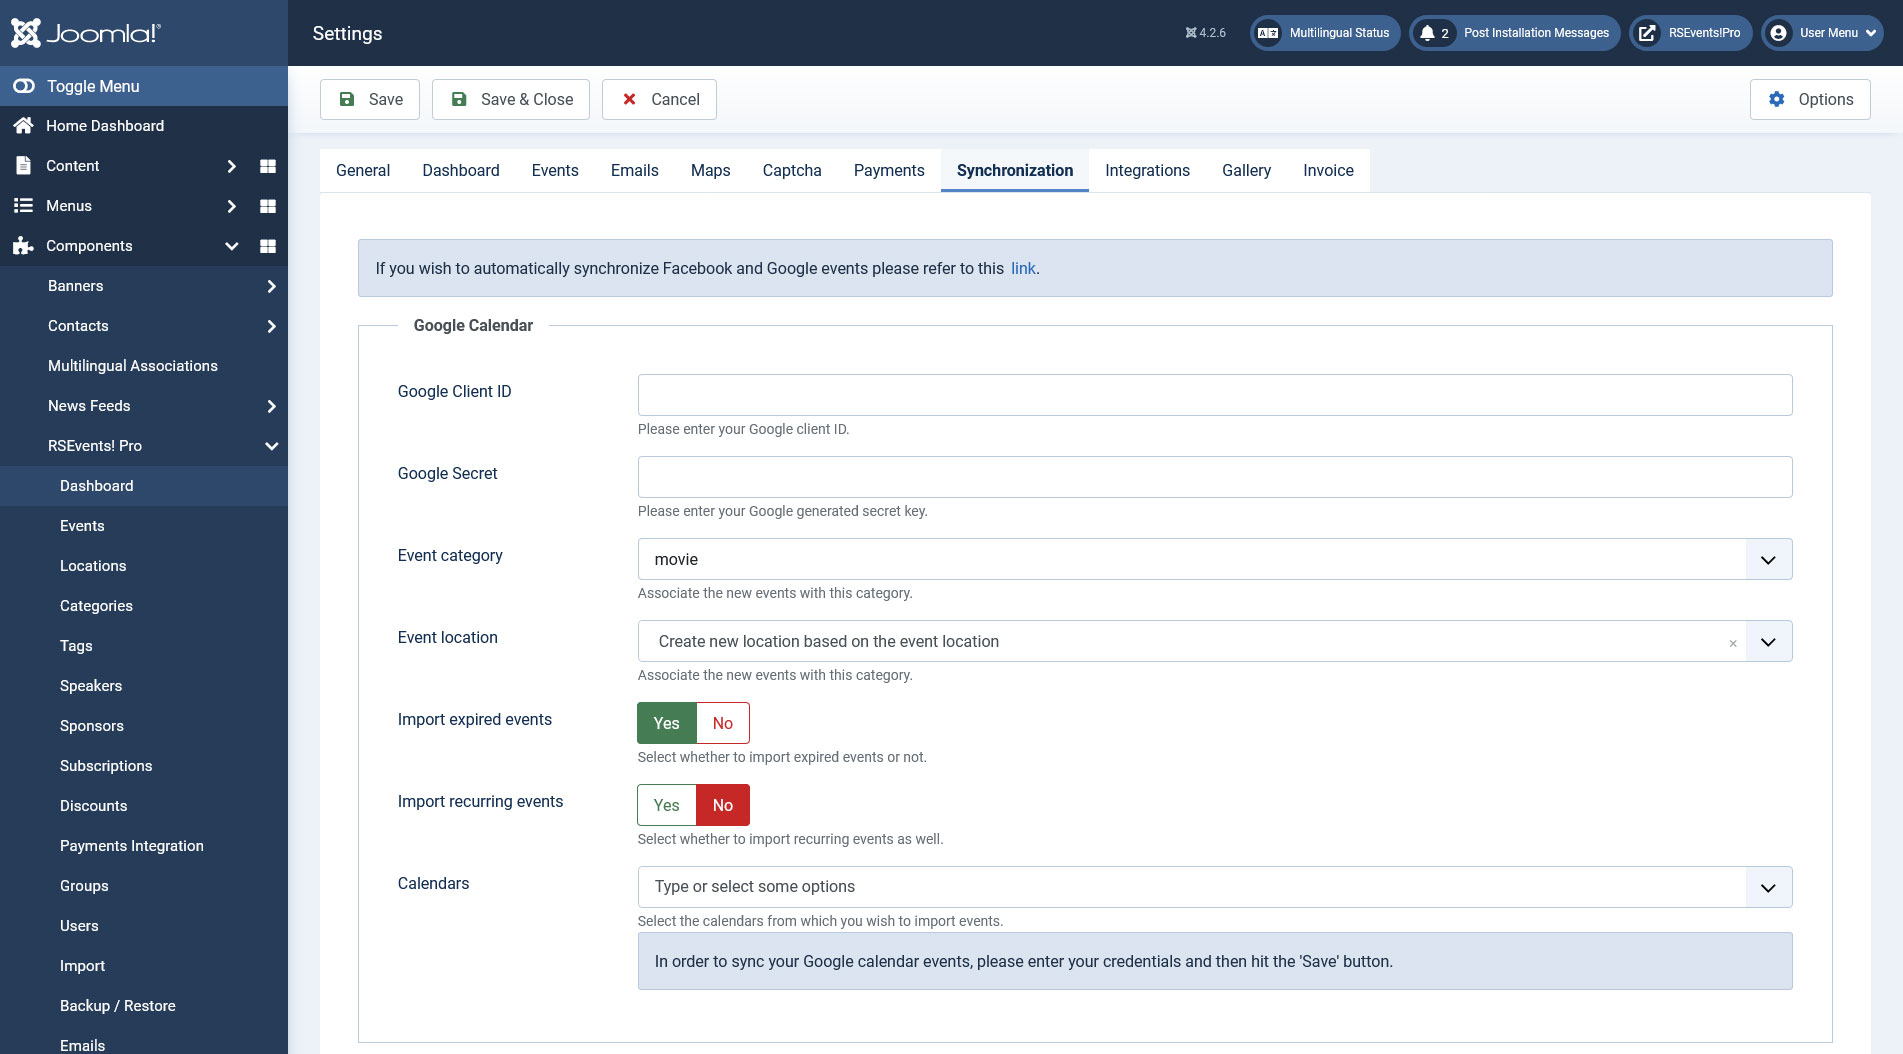
You can find a more detailed explanation on How to synchronize RSEvents!Pro with Google Calendar here.
Facebook Credentials
First you will need to create your own Facebook application as explained here. Afterwards you can add the app ID and secret key in the fields below
- Facebook app ID
- Facebook app secret
- Redirect URI
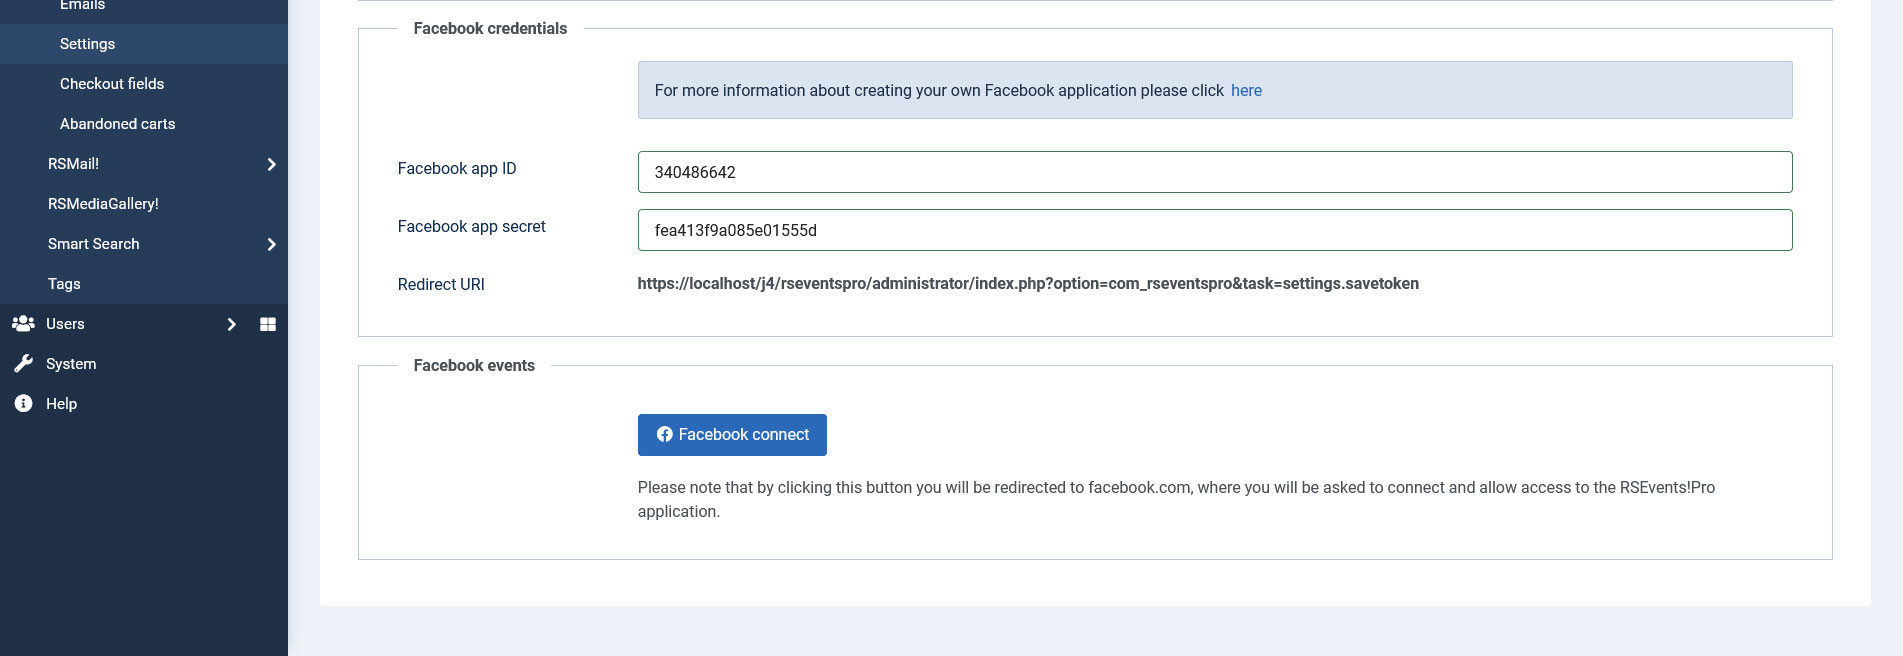
Facebook events
Clicking on the Connect to Facebook button will allow you to connect to the RSEvents!Pro application (this is required for the import process) and afterwards you can adjust the followings:
- Event category: select the category in which the events will be imported to.
- Event location: you can either select a predefined location or let the import tool create new locations based on the event details.
- Import from profile: import or not events from your personal Facebook profile.
- Check event owner (profile): if you set this to "No", the import will not check the owner of events and will import all events.
- Facebook pages: after you've successfully connected with Facebook, you'll be able to select your Facebook pages here by clicking inside the input.
- Check event owner (pages): similar as above, setting this to "No" will not check the event owner from the specified pages and will import all events.
- Facebook groups: after you've successfully connected with Facebook, you'll be able to select your Facebook groups here by clicking inside the input, from which you want to retrieve events.
- Import expired events: select whether to import expired events or not.
- Import recurring events: select whether to import recurring events or not.
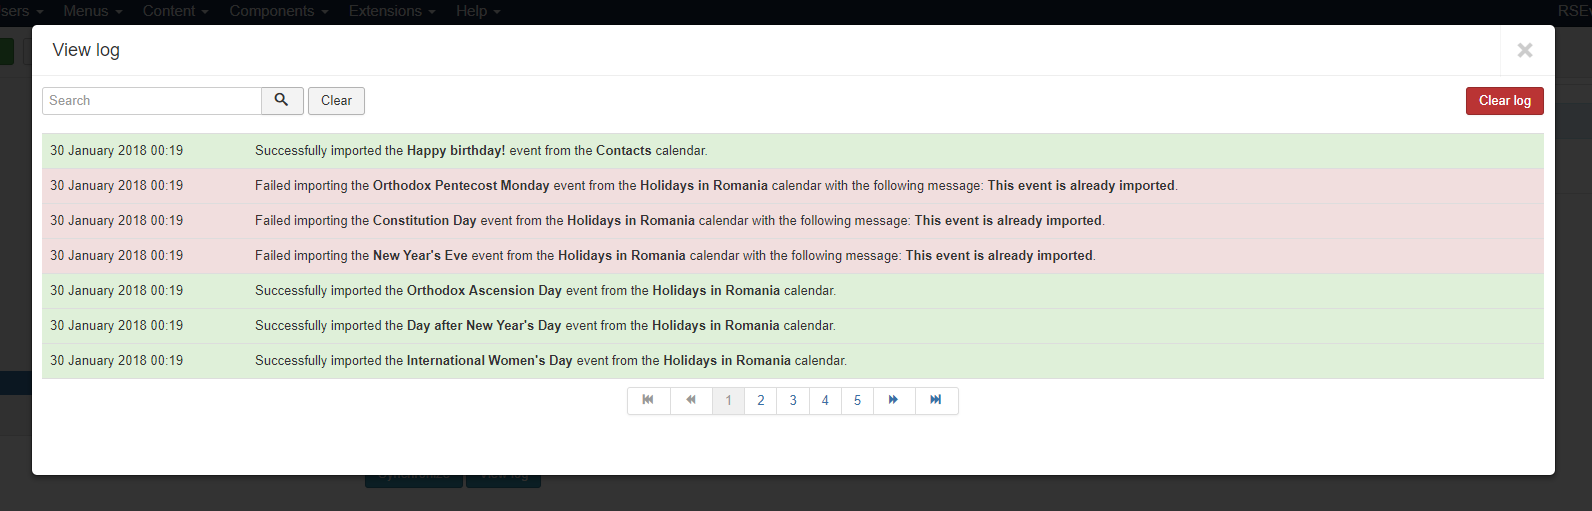
After you've finished with your settings, Google or Facebook, you can click the according "Synchronize" button in order to import your events.
A "View log" button is provided as well for debugging purposes, clicking it will provide a listing log as in the above screenshot.
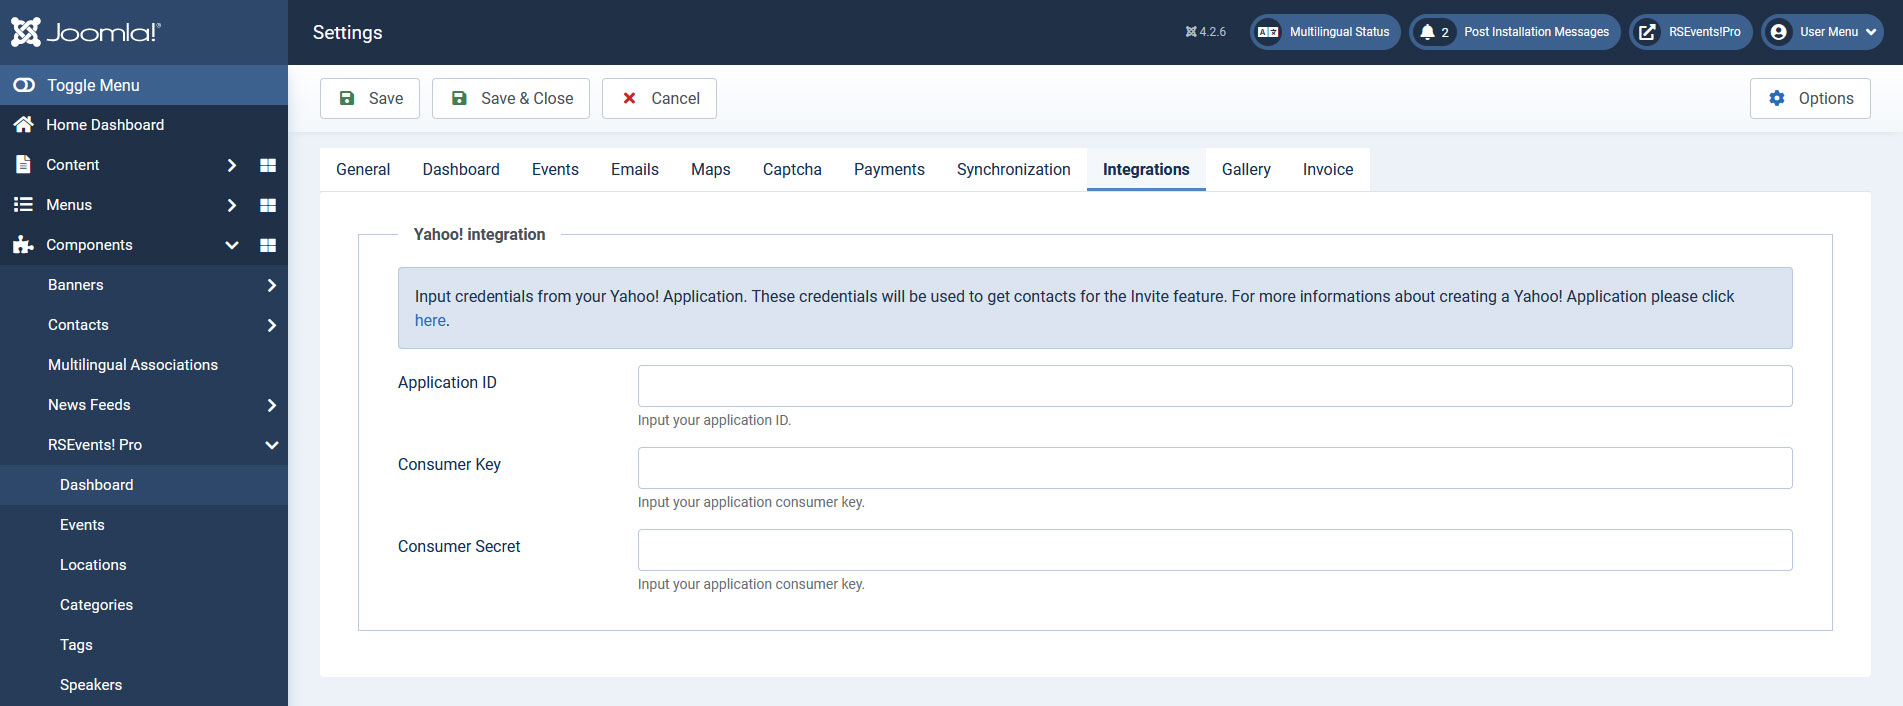
Integrations
Here, you can set up the integration with Yahoo!, which allows you to invite your Yahoo! contacts to an event. You need to specify the following credentials:
- Application ID
- Consumer Key
- Consumer Secret
The article linked above will provide a step-by-step guide to getting these codes.
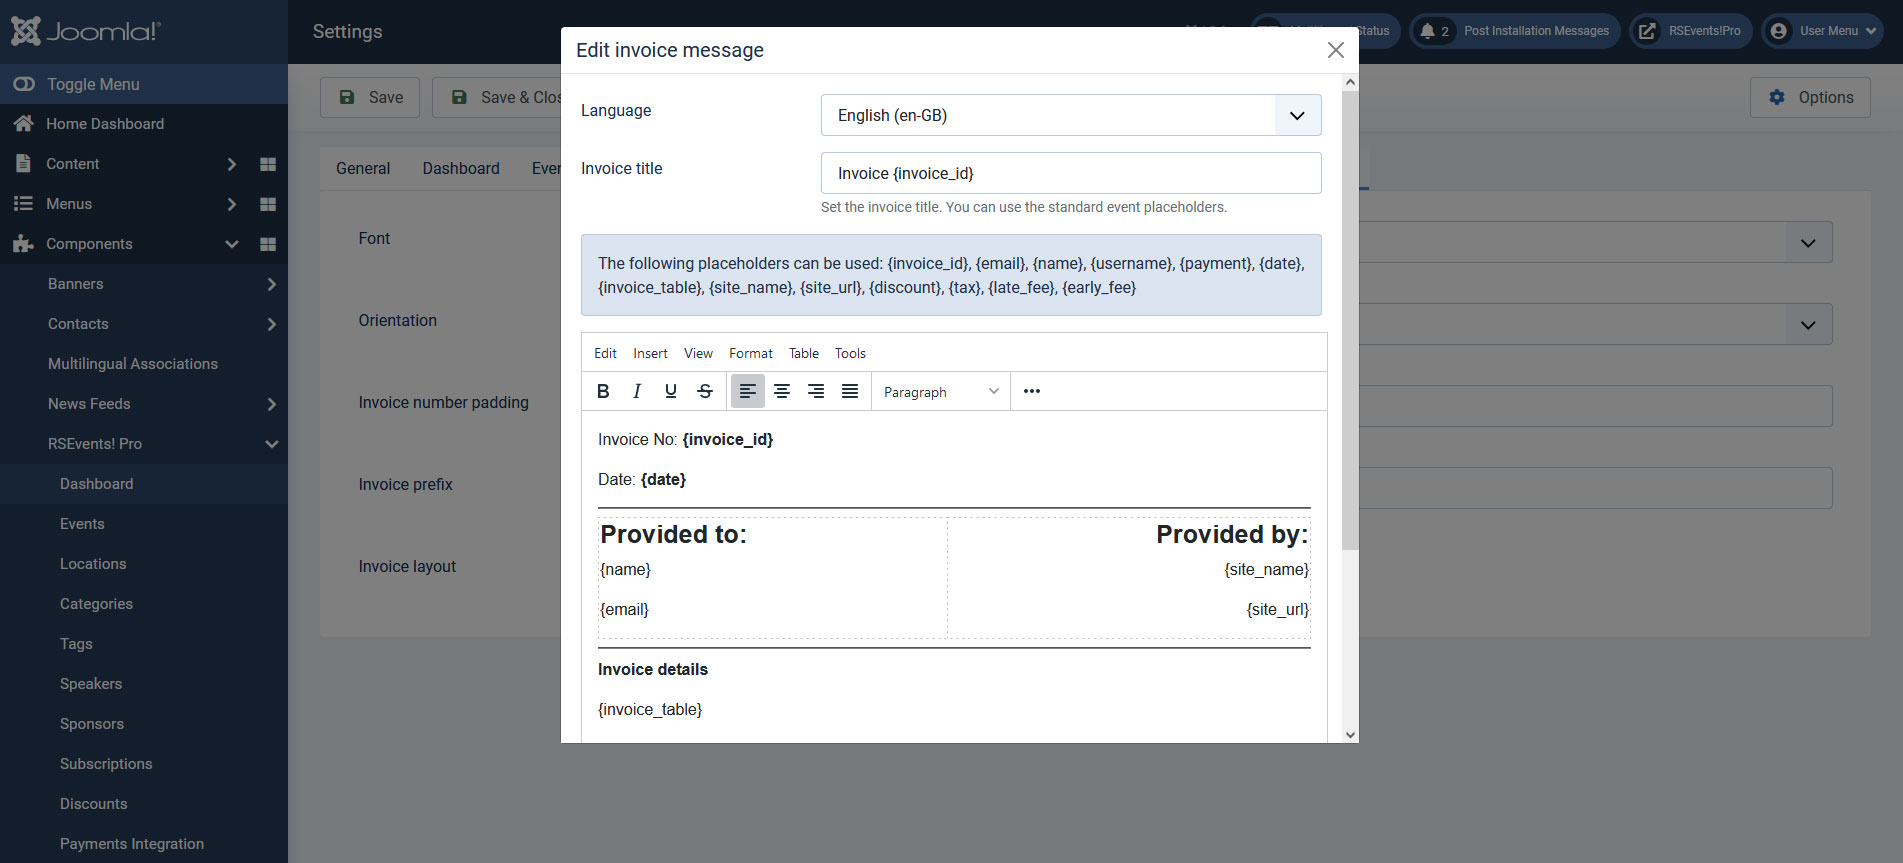
Invoice
The Invoice tab allows you to generate a PDF invoice sent out for each subscription made to a particular event. The Tickets PDF plugin is required for this to be available.
Available options:
- Font - Choose a font to be used within the invoice.
- Orientation - Select the document orientation (Landscape or Portrait)
- Invoice number padding - Add a padding of zeros to the invoice number, for example 0000049 instead of 49.
- Invoice prefix - Set a custom prefix for the invoice number, for example use RSEP, and the result will be RSEP0000049
- Language - Set the invoice language.
- Invoice title - Set the invoice title. You can also use the standard event placeholders.
- Invoice layout - Set the default invoice layout.
The following placeholders can be used:
| Placeholder name | Description |
|---|---|
| {invoice_id} | this placeholder will return the ID of the generated invoice |
| {email} | this placeholder will return the user email |
| {name} | this placeholder will return the name of the user |
| {username} | this placeholder will return the username |
| {payment} | this placeholder will return the payment method used when subscribing to the event |
| {date} | this placeholder will return the subscribing date |
| {invoice_table} | this placeholder will return the generated invoice table |
| {site_name} | this placeholder will return the site name |
| {site_url} | this placeholder will return the site url |
| {discount} | this placeholder will return the discount |
| {tax} | this placeholder will return the tax |
| {late_fee} | this placeholder will return the late fee |
| {early_fee} | this placeholder will return the early fee |
| {sitepath} | use this placeholder to display an image, you can use a similar syntax: <img src="{sitepath}/images/logo.png" /> |
If you use the RSEvents!Pro Cart Plugin and subscribe to multiple events at once, the global Invoice setup here will be used. Otherwise, if you subscribe to a single event and you have a custom Invoice set from the event's configuration area, then that one will be taken into consideration.
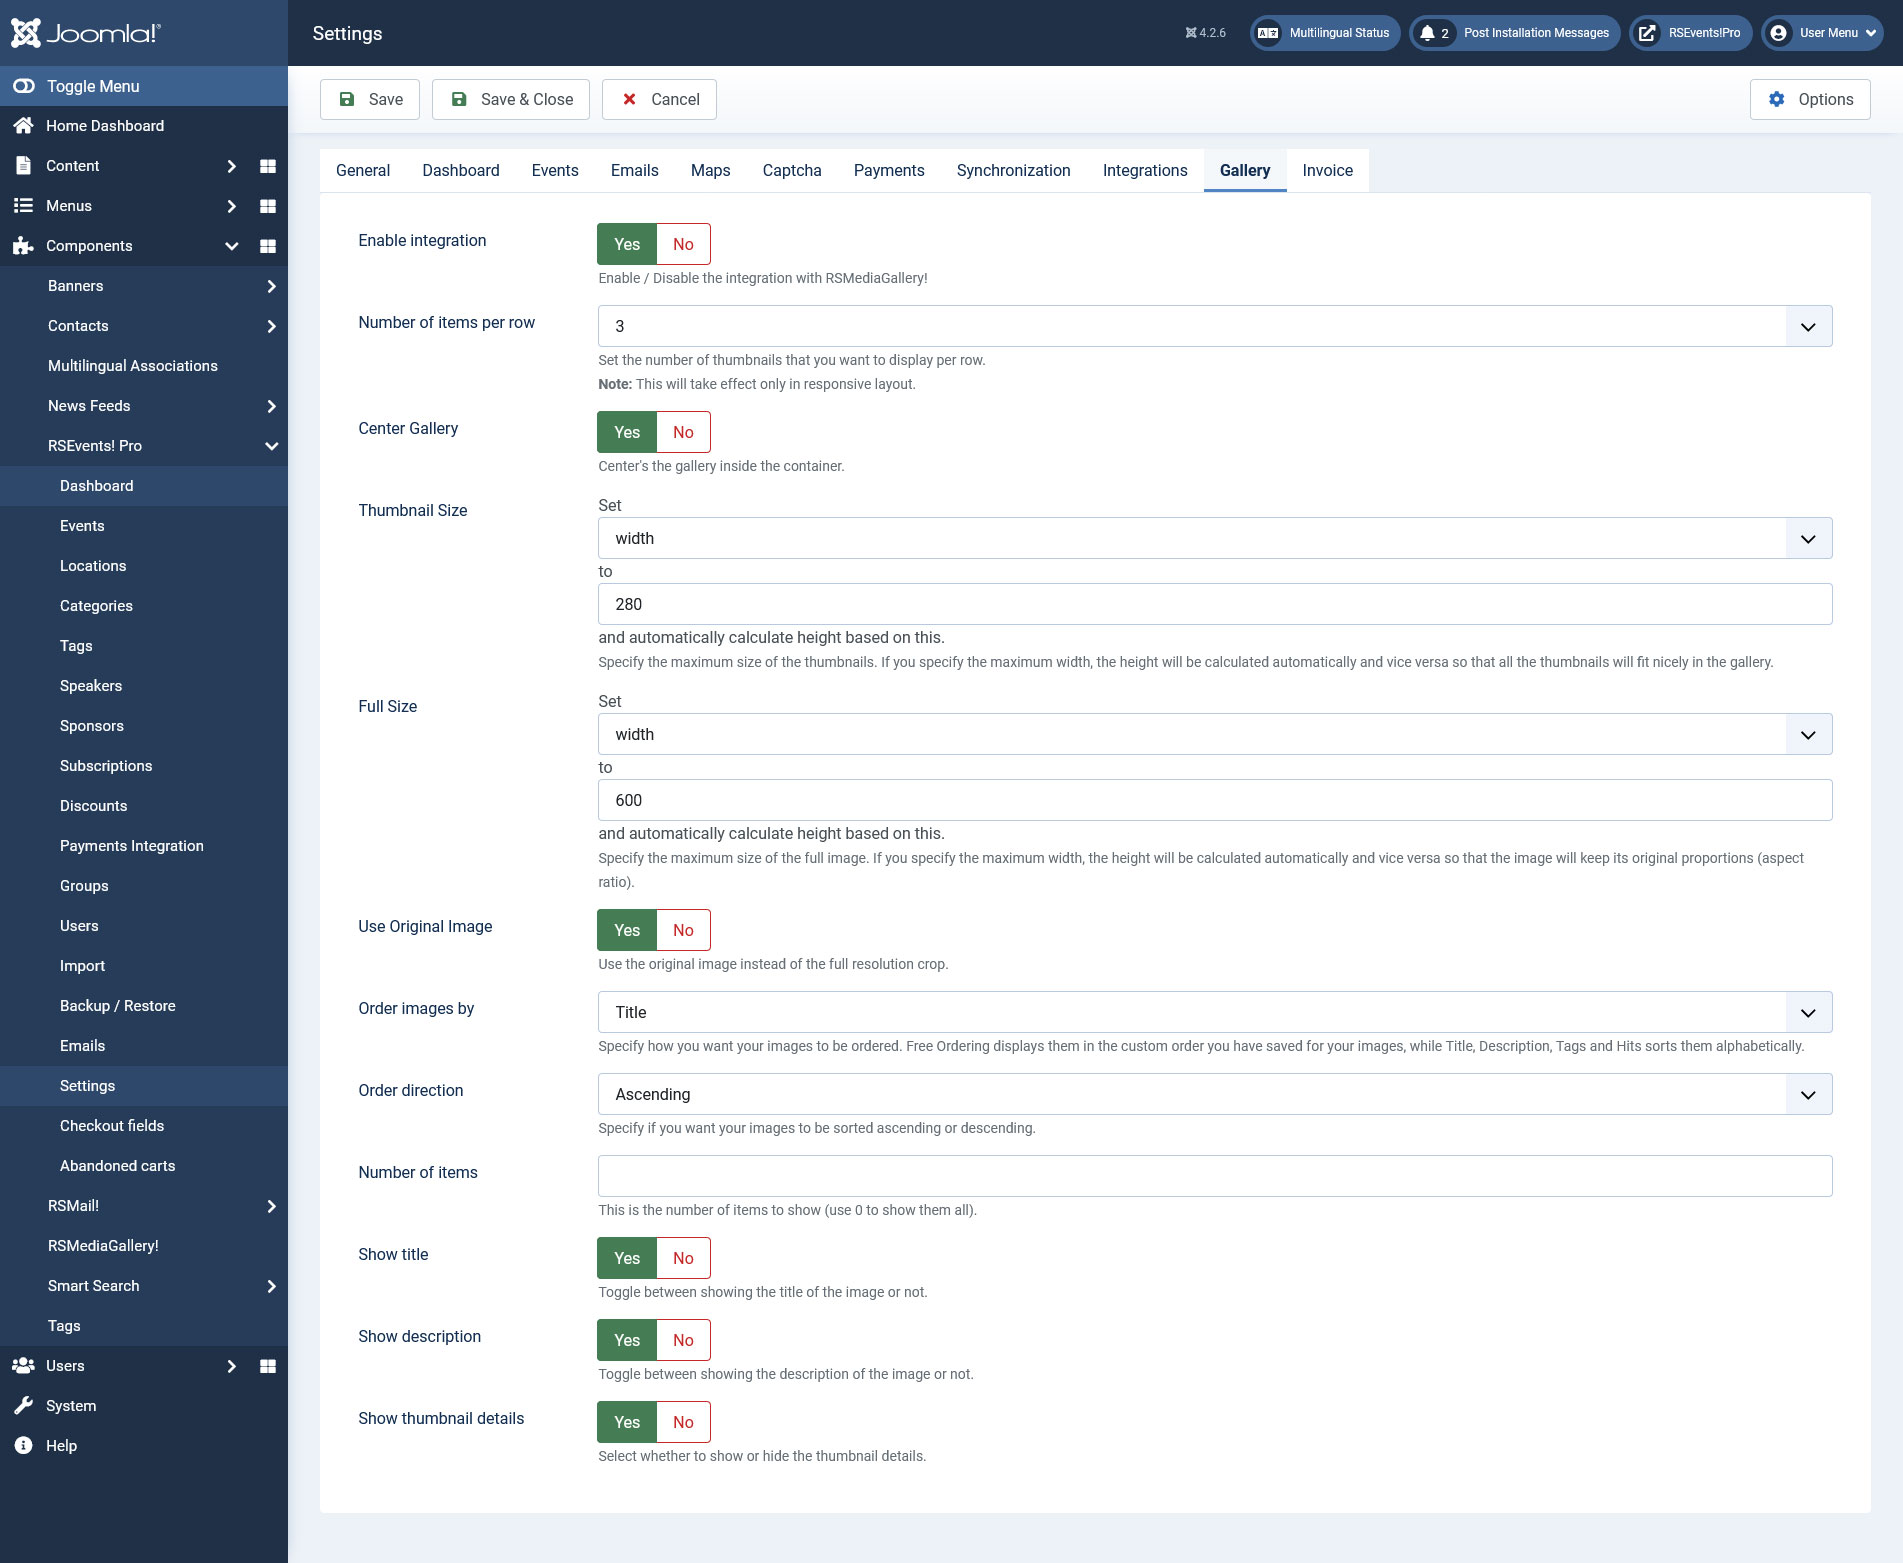
Gallery
This tab provides configuration options that allow you to control how RSMediaGallery! image galleries are displayed on event pages:
- Thumbnail Size: set a size for the image's thumbnail displayed on the event's page. You can either set the height and the width will be calculated automatically, and vice-versa.
- Full Size: set the size of the full image (when clicking on the thumbnail). You can either set the height and the width will be calculated automatically, and vice-versa.
- Use Original Image: Yes / No - choose whether to use the original image (when clicking on the thumbnail).
- Order images by: Free ordering / Title / Description / Hits / Created date / Modified date.
- Order direction: Ascending / Descending.
- Number of items: Set the number of images to be displayed (set to 0 to show all images).
- Show title: Yes / No - set whether to show or hide the image's title (when clicking on the thumbnail).
- Show description: Yes / No - set whether to show or hide the image's description (when clicking on the thumbnail).
- Show thumbnail details: Yes / No - set whether to show or hide the thumbnail details.
4 persons found this article helpful.