Configuration
The RSMembership! Configuration tab allows you to control some general component parameters.
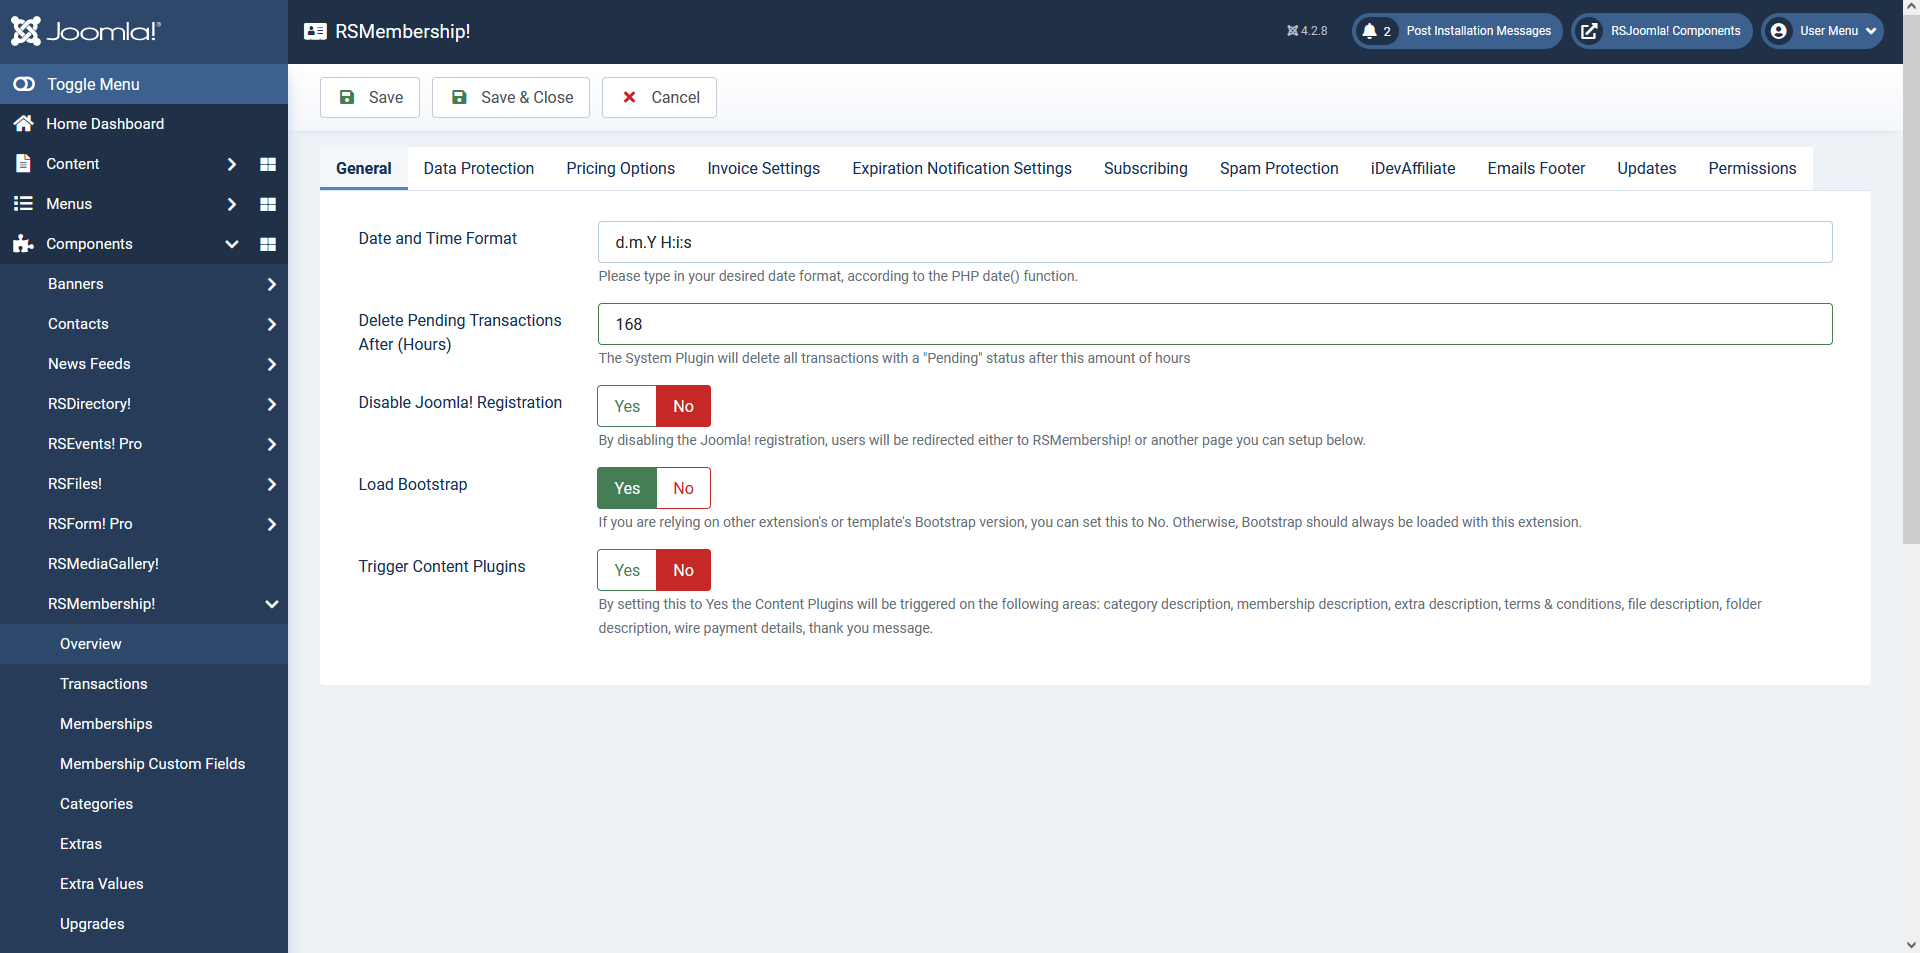
General
- Date and Time Format: Set the preferred date and time format (for example d.m.Y H:i:s - day.month.year hours:minutes:seconds). Please consult the PHP date function reference for more information on this topic.
- Delete pending transactions after: This field controls the hours after which the component will delete all transactions with a "Pending" status
- Disable Joomla! Registration: If you set this to Yes, users will be redirected to RSMembership! or on another page
- Registration Page URL: If the Joomla! Registration is set to Yes, you can insert here the page where you want your users to be redirected when trying to register
- Load Bootsrap: You can switch Bootstrap off if you are encountering any issues with it, or turn it on if your template does not include such capabilities
- Trigger Content Plugins: By setting this to Yes the Content Plugins will be triggered on the following areas: category description, membership description, extra description, terms & conditions, file description, folder description, wire payment details, thank you message.
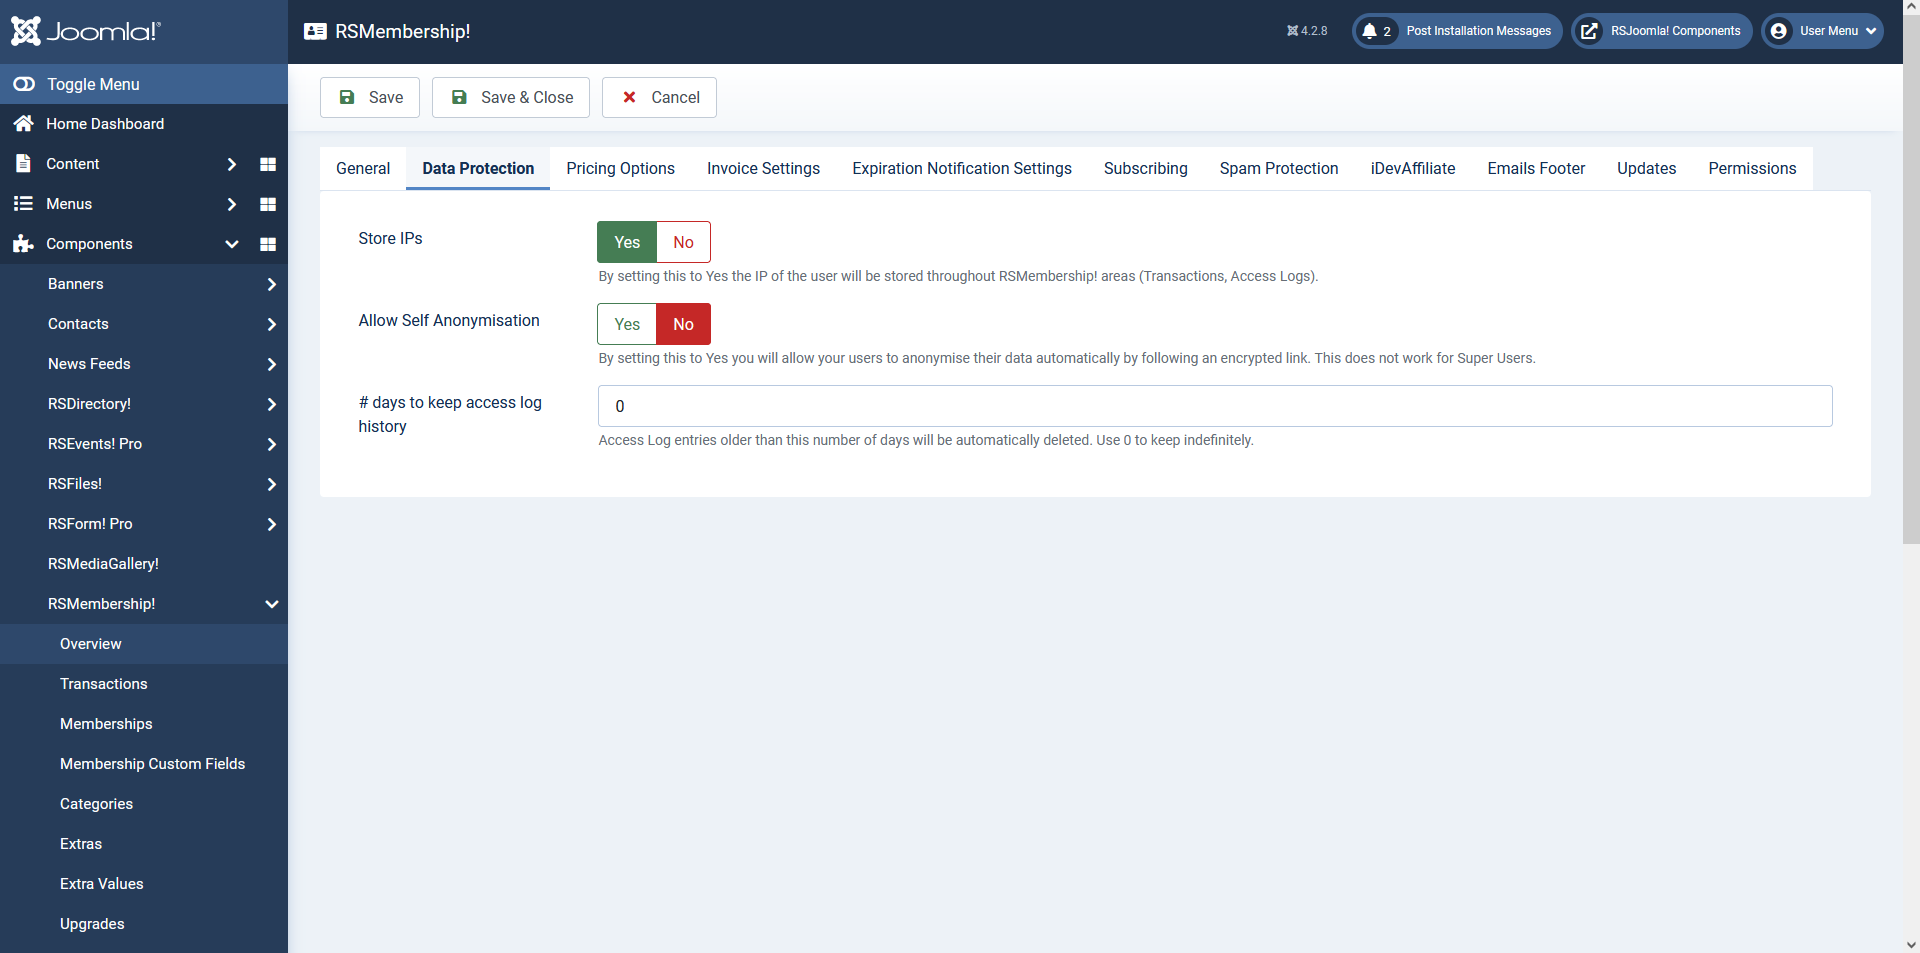
Data Protection
- Store IPs: Yes / No. By setting this to Yes the IP of the user will be stored throughout RSMembership! areas (Transactions, Access Logs).
- Allow Self Anonymisation: Yes / No. By setting this to Yes you will allow your users to anonymise their data automatically by following an encrypted link. This does not work for Super Users.
- # days to keep access log history: Access Log entries older than this number of days will be automatically deleted. Use 0 to keep indefinitely.
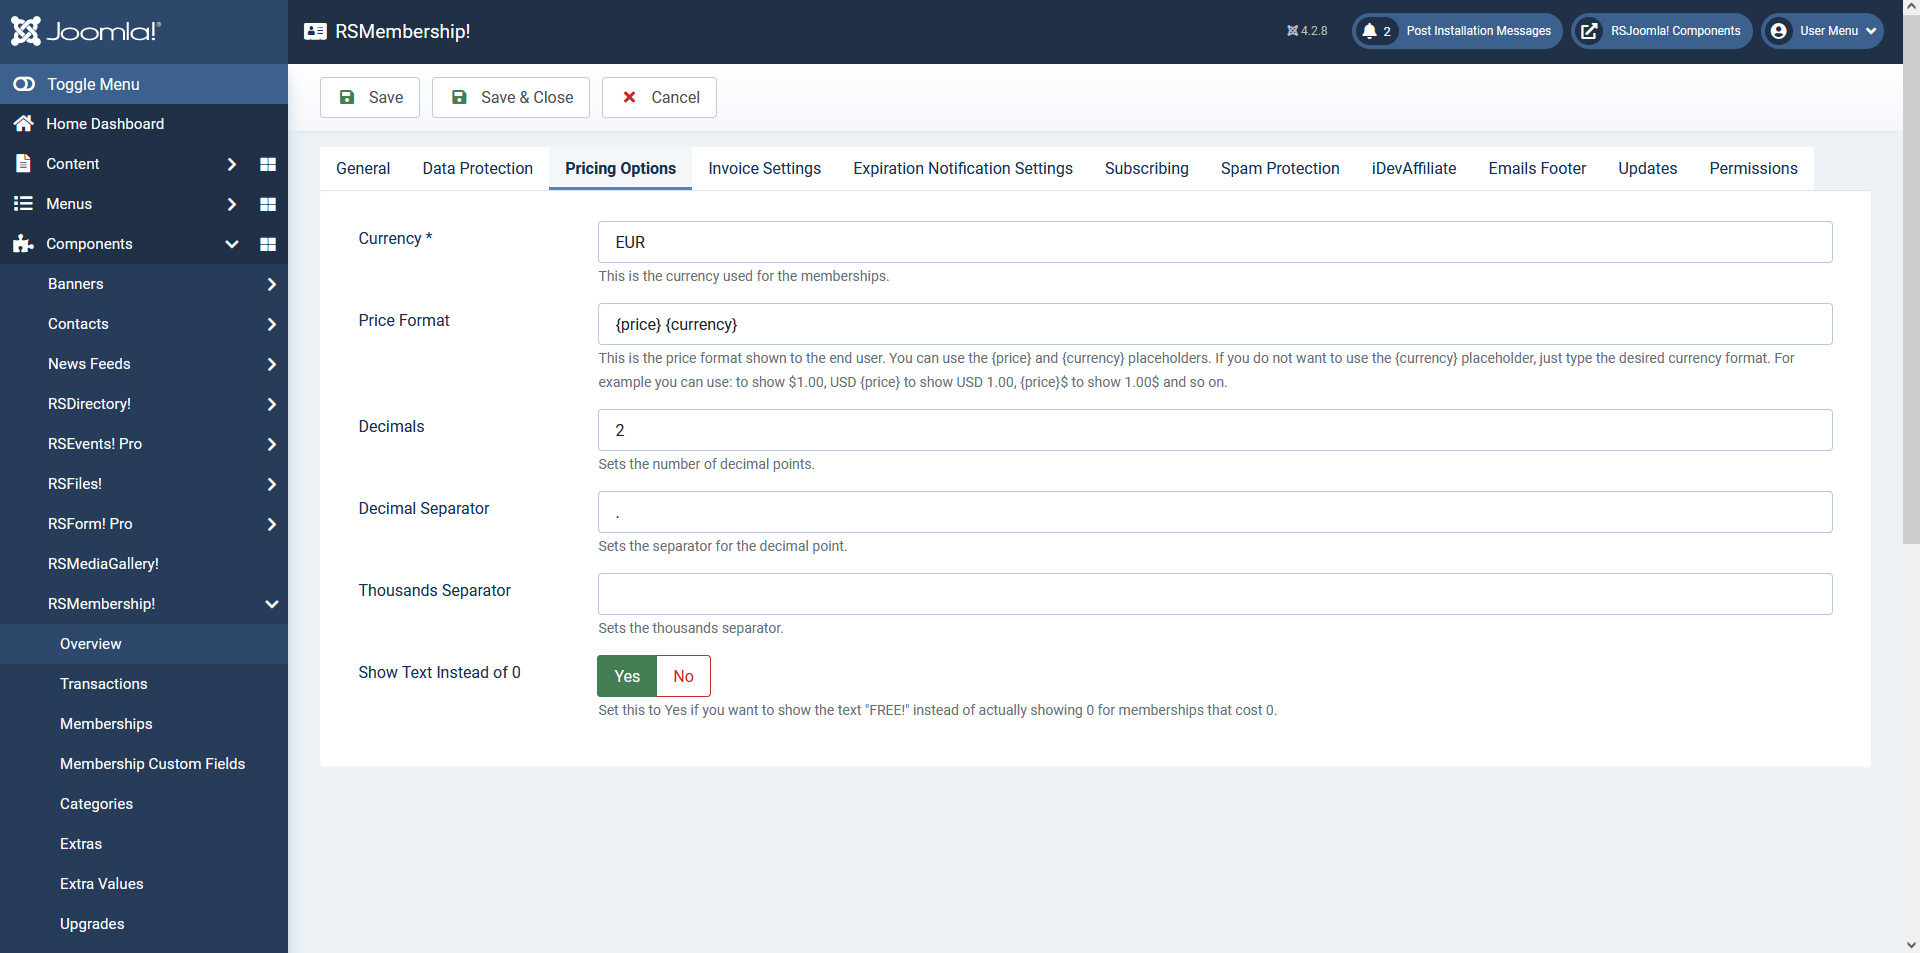
Pricing Options
- Currency: You can set the preferred currency used for the memberships
- Price Format: In this field you can set up the format of the price that is displayed in the front end to the user. This can be customized with the {price} and {currency} placeholders.
- Decimals: Sets the number of decimal points.
- Decimal Separator: Sets the separator for the decimal point.
- Thousands Separator: Sets the thousands separator.
- Show Text Instead of 0: Set this to yes if you want to show the text "FREE" instead of 0 in the front end
Invoice
This tab offers the following configuration parameters:
- Font: Select the default font for the PDF. Remember that not all fonts support all characters, so choose the correct font if you would like unicode support.
- Font Size: Set the font size for the PDF.
- Invoice Number Padding: Add a padding of zeros to the invoice number, for example 0000023 instead of 23.
- Invoice Title: Set the document name that will output. You can use placeholders.
- Invoice Body: The Layout of the invoice (you can use placeholders).
- {membership} - returns name of the selected membership
- {category} - returns the membership category
- {extras} - returns the selected options
- {email} - email address used for the subscription
- {name} - registered name
- {username} - the username chosen by the user for his account
- {total_price} - the total price
- {coupon} - returns the coupon code used
- {discount_type} - returns the type of the discount applied
- {discount_value} - returns the value of the applied discount
- {payment} - returns the payment gateway used
- {transaction_id} - returns the id of the transaction
- {transaction_hash} - returns the hash of the transaction
- {membership_from} - returns the form of the chosen membership
- {invoice_id} - returns the id of the invoice
- {tax_type} - returns the type of tax used
- {tax_value} - returns the value of the tax
- {invoice_transaction_table} - returns the table of the invoice transaction
- {date_purchased} - returns the purchasing date
- {site_name} - returns the site name
- {site_url} - returns the site url
- {address}
- {city}
- {state}
- {zip}
- {country}
You can use with this placeholders {if} conditions. Eg.: {if placeholder_name} content {/if}

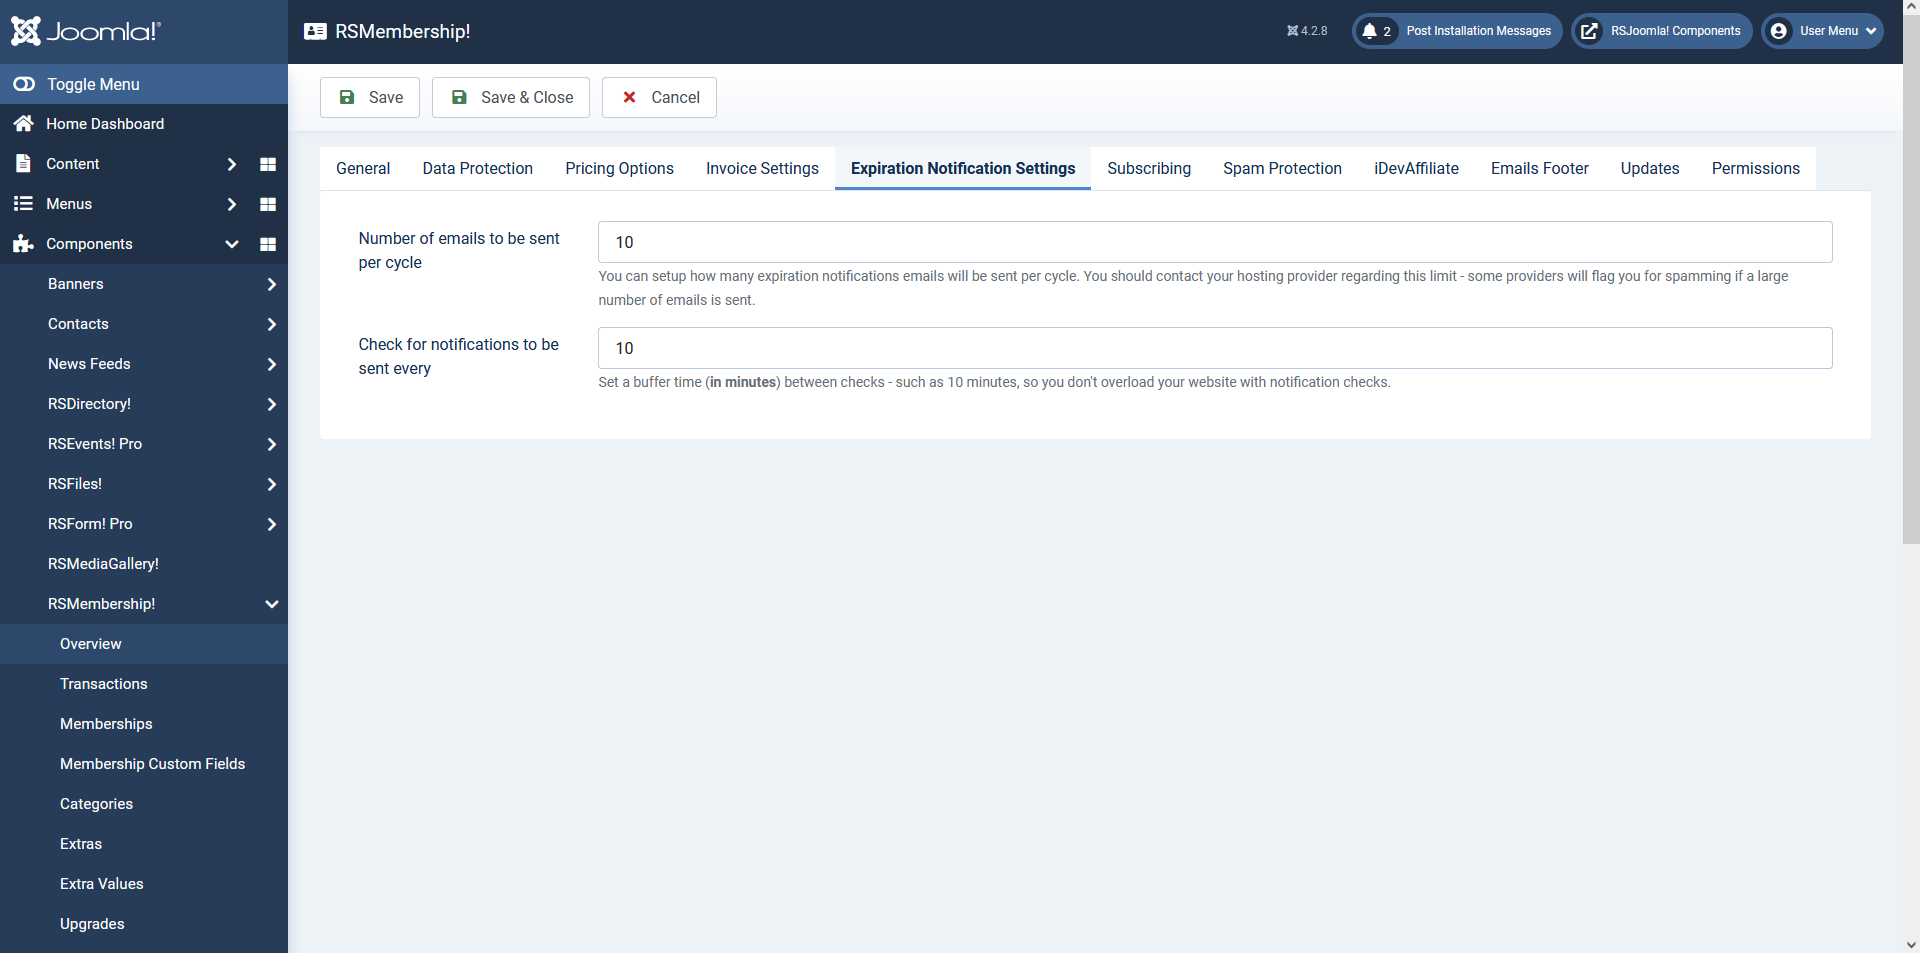
Expiration Notification Settings
Number of emails to be sent per cycle - this setting allows you to control the number of expiration notification emails that are sent per cycle
Check for notifications to be sent every - this allows you to set a time interval between notification checks
Note:
It is very important to contact the hosting provider and ask for imformation on how many emails can be sent per cycle, so that you do not get flagged as sending spam.
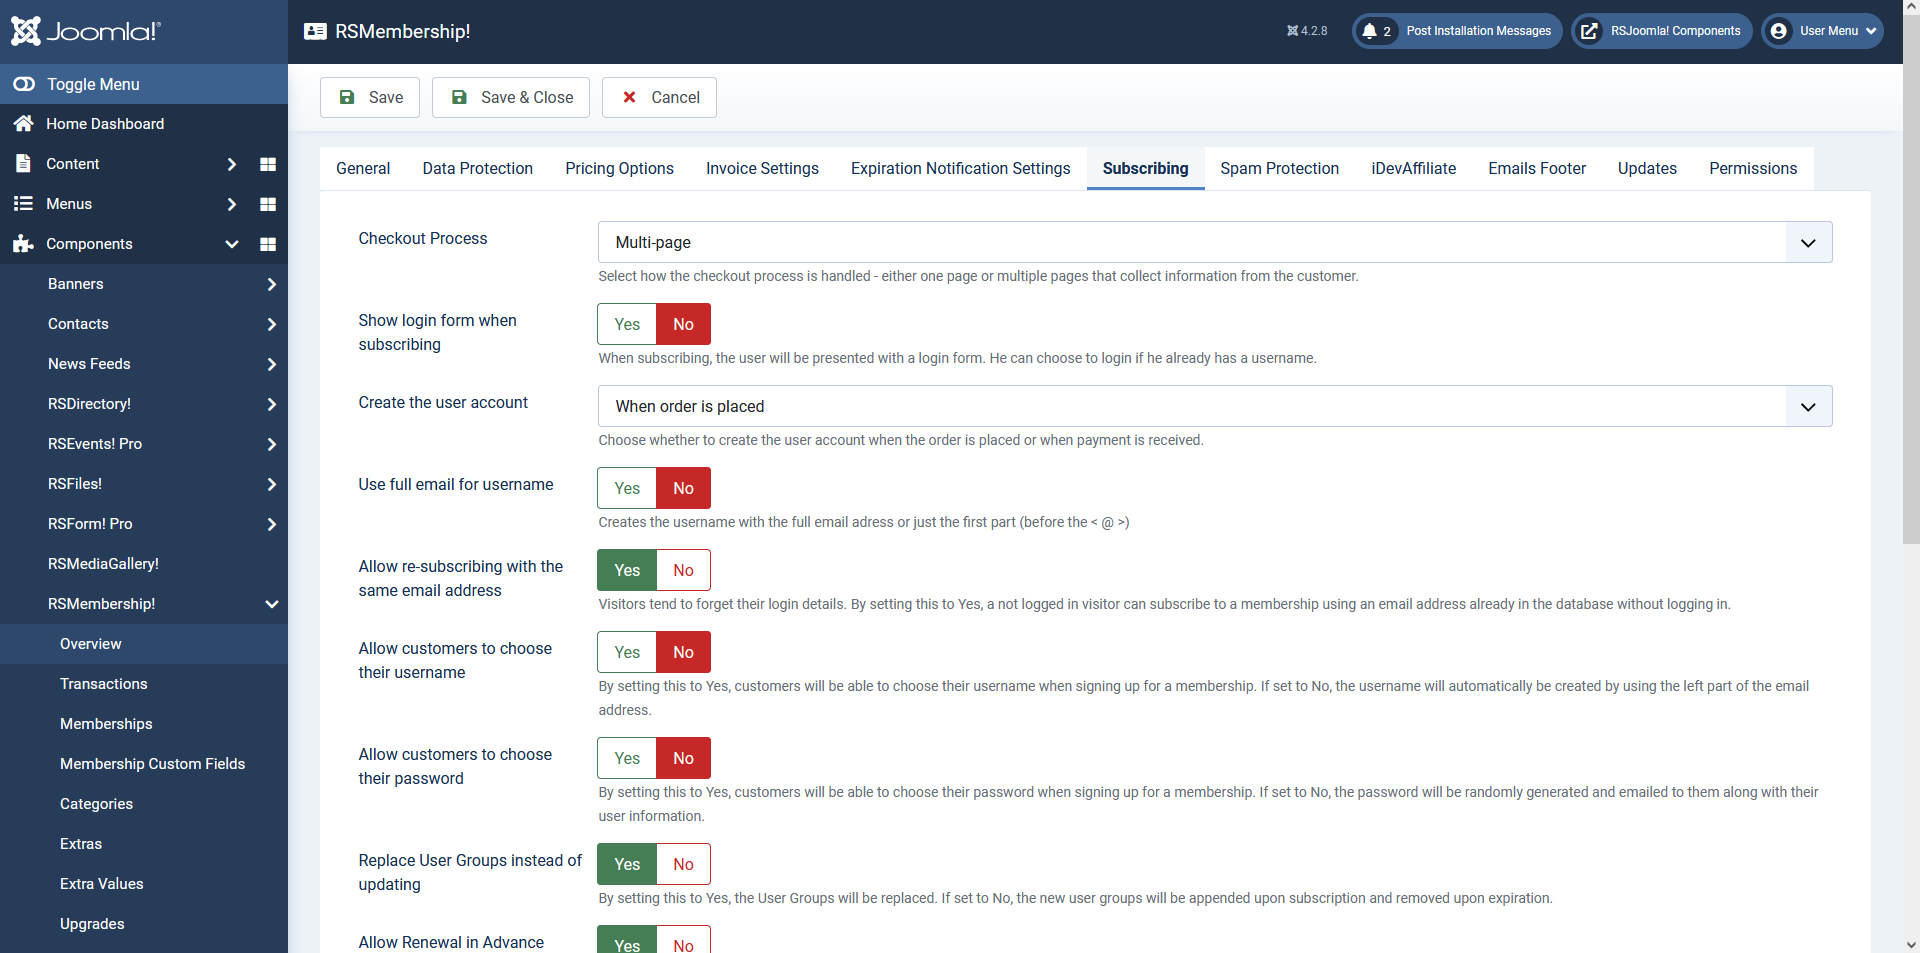
Subscribing
- Checkout Process: Select how the checkout process is handled - either one page or multiple pages that collect information from the customer.
- Show login form when subscribing: Enables you to display or not the log default Joomla! login, upon subscribing to a membership.
- Create the user account: When payment is received / When order is placed.
- Use full email for username: Set to Yes in order to use the full email address provided by the subscriber when assigning the username to a newly created account.
- Allow re-subscribing with the same email address: By setting this option to Yes, a not logged in visitor can subscribe to a membership (without logging in) using an email address already in the database.
- Allow customers to choose their username -NEW feature added in the latest release that allows users to choose their username when subscribing to your memberships.
- Allow customers to choose their password: By setting this to Yes, customers will be able to choose their password when signing up for a membership. If set to No the password will be generated automatically (random) and emailed to them along with the complete user information.
- Replace User Groups instead of updating - By setting this to Yes, the User Groups will be replaced. If set to No, the new user groups will be appended upon subscription and removed upon expiration.
- Allow renewal in advance: If set to No the Renew in Advance button will no longer be displayed in the frontend.
- Send User Account Email: Set this to Yes if you'd like to send the user account email everytime a subscription is made. Set to No if you'd like to never send this. You can also choose to send this email only once when account is created along with the subscription.
- Allow cancelling: This will provide a 'Cancel your subscription' button in the 'Show Subscriber's Memberships' menu item. Set to 'Yes' to allow the user to cancel immediately (with membership expiration settings taking in effect) or set to 'Cancel only payment' to allow the membership to expire on the next term.
Spam Protection
The filter spam subscriptions, you can use CAPTCHA or reCAPTCHA (legacy and new version) fields in your membership registration form.
Spam Protection
- Enable CAPTCHA - this setting will enable or disable the CAPTCHA / Use Built-in Captcha / reCAPTCHA (New) field for your registration form;
- Display CAPTCHA For - Unregistered/Registered - you can choose which user groups will need to pass the CAPTCHA validation;
Use Built-in CAPTCHA settings
- Characters - the number of characters the CAPTCHA image will contain;
- Generate Lines - in order to increase security you can choose to generate random lines in your image;
- Case Sensitive - choose if your CAPTCHA field validation will take the input case into consideration;
Use reCAPTCHA (New) Settings - "I'm not a robot" Checkbox
- Site Key - Paste your site key here - obtained from the reCAPTCHA account from google
- Secret Key - Paste your secret key here - obtained from the reCAPTCHA account from google
- Theme - Choose the desired theme, can be LIGHT or DARK
- Type (Fallback) - Fallback method can be chosen, IMAGE or AUDIO
Use Joomla! Global Configuration Captcha
No configurable options, you will need to make sure that you're actually configuring a core Joomla! captcha plugin and select it in the Global Configuration area > Site > Default Captcha.

You can retrieve your reCAPTCHA keys from the Google reCAPTCHA account (it's free).
iDevAffiliate
RSMembership! allows you to sell membership as an affiliate to a third party source, using iDevAffiliate, with only three configuration options:
- Enable Integration - No / Yes
- iDevAffiliate URL: this is available on your iDevAffiliate account configuration area
- Track Renewals - No / Yes: if enabled, the renewal purchase will be tracked to the affiliate
You should first enable the integration and set the iDevAffiliate URL and then click on the Attempt to connect button.

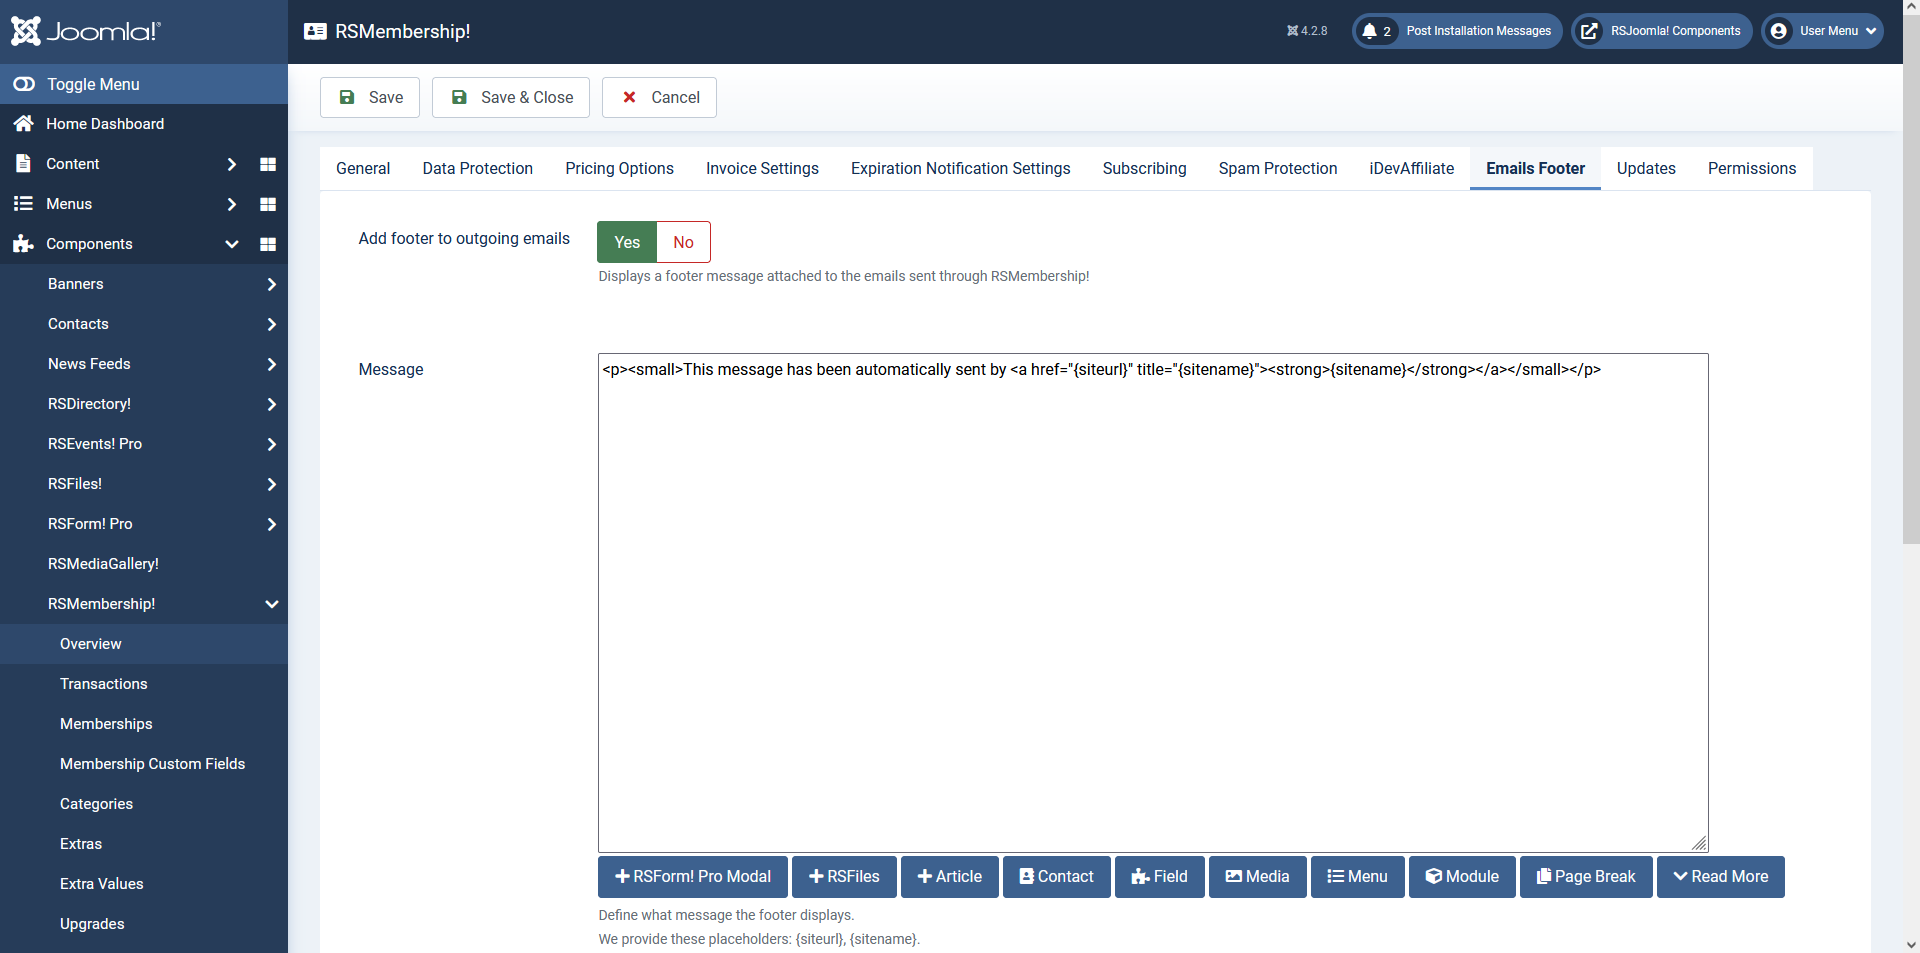
Emails Footer
- Add footer to outgoing emails: Yes/No - set to Yes to enable this feature
- Message: Add the actual footer's text (or HTML code) that will be appended to the emails' text
Updates
License code: In here you can insert the license code so that you will have access to updates and support
Permissions
This tab offers the possibility to manage the permission settings for the user groups. Basically, these permissions control the ability of the users to view and/or make changes to the component's back-end. A more in-depth explanation on how to use the options in this tab, can be found in the Joomla! Docs - Access Control List Tutorial article.
6 persons found this article helpful.